使用 Amazon Location Service 构建实时资产追踪应用程序


可使用免费套餐资源

本教程中使用的示例代码来自 GitHub

资产跟踪对于供应链运营至关重要。无论是跟踪全国各地的卡车,还是社区附近的最后一英里交付,掌握车队位置可以在防损、维护可持续性和节约总体成本方面增加业务价值。在本教程中,我们将部署一个简单的 Web 应用程序,该应用程序可显示资产的当前位置以及历史位置。然后,我们将基于 MQTT 协议,使用 Amazon IoT Core 来模拟车辆。MQTT 协议是一种专为 IoT 使用场景而设计的轻量级消息收发协议。我们将介绍如何:
- 使用 Amazon Amplify 构建 Web 应用程序,以便在地图上显示设备的当前位置和历史位置
- 配置 Amazon Location Service 跟踪器以存储位置数据
- 连接 Amazon Location Service 与 Amazon IoT Core,通过 IoT Core 规则引擎从 MQTT 摄取数据
前提条件
在开始本教程之前,需要满足以下条件:
- 亚马逊云科技账户(如果您还没有,可以创建一个并在此处设置您的环境)。
部署 Cloud9 实例
我们将使用 Amazon Cloud9 来部署资产跟踪应用程序。Cloud9 是一种基于云的集成开发环境 (IDE),让您只需使用浏览器即可编写、运行和调试代码。使用 Cloud9 可以轻松构建和部署应用程序,同时减少在构建者工作站上进行本地开发的需求。Cloud9 还集合了许多亚马逊云科技构建工具,以便快速开始开发。
前往亚马逊云科技管理控制台,选择 Cloud9。然后点击 Create environment(创建环境)。

将实例类型设为 t3.small 并为其命名。点击 Create(创建)。
.26375aad87c71612610c40fc36311ab57daf8f95.png)
启动 Cloud9 实例后,我们就可以开始部署应用程序了。
部署跟踪应用程序
Cloud9 实例现已启动,我们可以下载代码来构建应用程序。在 Cloud9 终端上,克隆存储库:
git clone https://github.com/aws-samples/amazon-location-samples.git接下来,前往应用程序目录:
cd amazon-location-samples/maplibre-js-react-iot-asset-tracking/安装我们的依赖项:
npm install为了配置 Amplify,我们需要在 Cloud9 实例上设置一个亚马逊云科技服务配置文件。为此,请输入以下命令,并将其中的区域替换为运行当前实验的区域(如 us-east-1):
echo $'[profile default]\nregion=us-east-1'> ~/.aws/config接下来,我们需要确保 Amplify 已安装好:
npm install -g @aws-amplify/cli现在,我们可以初始化 Amplify 环境:
amplify init接受默认选项。
Note: It is recommended to run this command from the root of your app directory
? Enter a name for the project maplibrejsreactiotas
The following configuration will be applied:

Project information
| Name: maplibrejsreactiotas
| Environment: dev
| Default editor: Visual Studio Code
| App type: javascript
| Javascript framework: react
| Source Directory Path: src
| Distribution Directory Path: build
| Build Command: npm run-script build
| Start Command: npm run-script start

? Initialize the project with the above configuration? Yes
Using default provider awscloudformation
? Select the authentication method you want to use: AWS profile

For more information on AWS Profiles, see:
https://docs.thinkwithwp.com/cli/latest/userguide/cli-configure-profiles.html

? Please choose the profile you want to use default.5c7e4983e6e16a80bdfeee8e7a41803daedb6555.png)
现在,我们可以使用 Amazon Amplify 添加 Amazon Location Service 资源:
amplify add geo并且选择以下选项。请注意,由于服务条款要求我们将 HERE 数据提供程序用于资产跟踪使用场景,因此我们更改了地图数据提供程序。此外,在选择哪些人可以访问地图时,请选择 Authorized and Guest users。如果您的应用程序具有身份验证(如登录门户)的需求,则可以选择只有授权用户才能查看地图资源。但我们的应用程序没有设置登录系统,因此我们允许未经身份验证的用户访问地图。
? Select which capability you want to add: Map (visualize the geospatial data)
✔ geo category resources require auth (Amazon Cognito). Do you want to add auth now? (Y/n) · yes
Using service: Cognito, provided by: awscloudformation

 The current configured provider is Amazon Cognito.

 Do you want to use the default authentication and security configuration? Default configuration
 Warning: you will not be able to edit these selections.
 How do you want users to be able to sign in? Username
 Do you want to configure advanced settings? No, I am done.
✅ Successfully added auth resource maplibrejsreactiotase08797a2 locally

✅ Some next steps:
"amplify push" will build all your local backend resources and provision it in the cloud
"amplify publish" will build all your local backend and frontend resources (if you have hosting category added) and provision it in the cloud

✔ Provide a name for the Map: · mapiottracker
✔ Who can access this Map? · Authorized and Guest users
Available advanced settings:
- Map style & Map data provider (default: Streets provided by Esri)

✔ Do you want to configure advanced settings? (y/N) · yes
✔ Specify the map style. Refer https://docs.thinkwithwp.com/location-maps/latest/APIReference/API_MapConfiguration.html · Explore (data provided by HERE)
⚠️ Auth configuration is required to allow unauthenticated users, but it is not configured properly.
✅ Successfully updated auth resource locally.
✅ Successfully added resource mapiottracker locally.

✅ Next steps:
"amplify push" builds all of your local backend resources and provisions them in the cloud
"amplify publish" builds all of your local backend and front-end resources (if you added hosting category) and provisions them in the cloud.47e3e2e9d27ed8d51fc70c7901fd00b22201d2df.png)
在推送 Amplify 配置之前,我们需要做一个小改动,让我们的应用程序和 Amazon Location Service 跟踪器协同工作。
amplify override project.6f8f9d746f4c6dfb0c4fd783fbc9b685a228e6fb.png)
现在前往刚刚创建的 amplify/backend/awscloudformation/override.ts 文件,并将其内容替换为:
import { AmplifyRootStackTemplate } from "@aws-amplify/cli-extensibility-helper";

export function override(resources: AmplifyRootStackTemplate) {
 resources.unauthRole.addOverride("Properties.Policies", [
 {
 PolicyName: "trackerPolicy",
 PolicyDocument: {
 Version: "2012-10-17",
 Statement: [
 {
 Effect: "Allow",
 Action: ["geo:GetDevicePositionHistory"],
 Resource: {
 "Fn::Sub":
 "arn:aws:geo:${AWS::Region}:${AWS::AccountId}:tracker/trackerAsset01",
 },
 },
 ],
 },
 },
 ]);
}这将更新 Amazon Cognito 在地图上显示跟踪器位置的策略。
.c137910eb2b39df98ec261a658db47ba0c63d276.png)
保存 override.ts 文件。现在我们可以推送 Amplify 配置并在云中创建资源。
amplify push对于此处显示的选项,请选择 y:
✔ Successfully pulled backend environment dev from the cloud.

 Current Environment: dev

┌──────────┬──────────────────────────────┬───────────┬───────────────────┐
│ Category │ Resource name │ Operation │ Provider plugin │
├──────────┼──────────────────────────────┼───────────┼───────────────────┤
│ Auth │ maplibrejsreactiotas543a61f5 │ Create │ awscloudformation │
├──────────┼──────────────────────────────┼───────────┼───────────────────┤
│ Geo │ mapiottracker │ Create │ awscloudformation │
└──────────┴──────────────────────────────┴───────────┴───────────────────┘
✔ Are you sure you want to continue? (Y/n) · yes.a6b52f18955f022efaef4848c46a810053e1920a.png)
接下来,运行以下命令启动应用程序:
npm start本教程需要一直运行 npm start,以保持资产跟踪应用程序的运行状态。在 Cloud9 中,选择 Run(运行),然后选择 Preview Running Application(预览正在运行的应用程序)以查看该应用程序。
.77b07521186868d022a7f2403af52c02f20c086e.png)
您现在应当会看到您的应用程序在 Cloud9 中运行,如下所示。
.584e49977e71a8619964ad11d3b339590057975e.png)
设置 IoT Core 资源
我们现已配置好 Amazon Location Service 资源,启动并运行了 Web 应用程序,还需要配置一个 IoT 规则,用于将 MQTT 事件发送到新的 Amazon Location Service 跟踪器。此规则将监视有关 assets/tracker MQTT 主题的消息,解析消息,并将位置信息发送到 AssetTracker Amazon Location Service 跟踪器,然后该跟踪器会更新地图上显示的 thing123 设备。
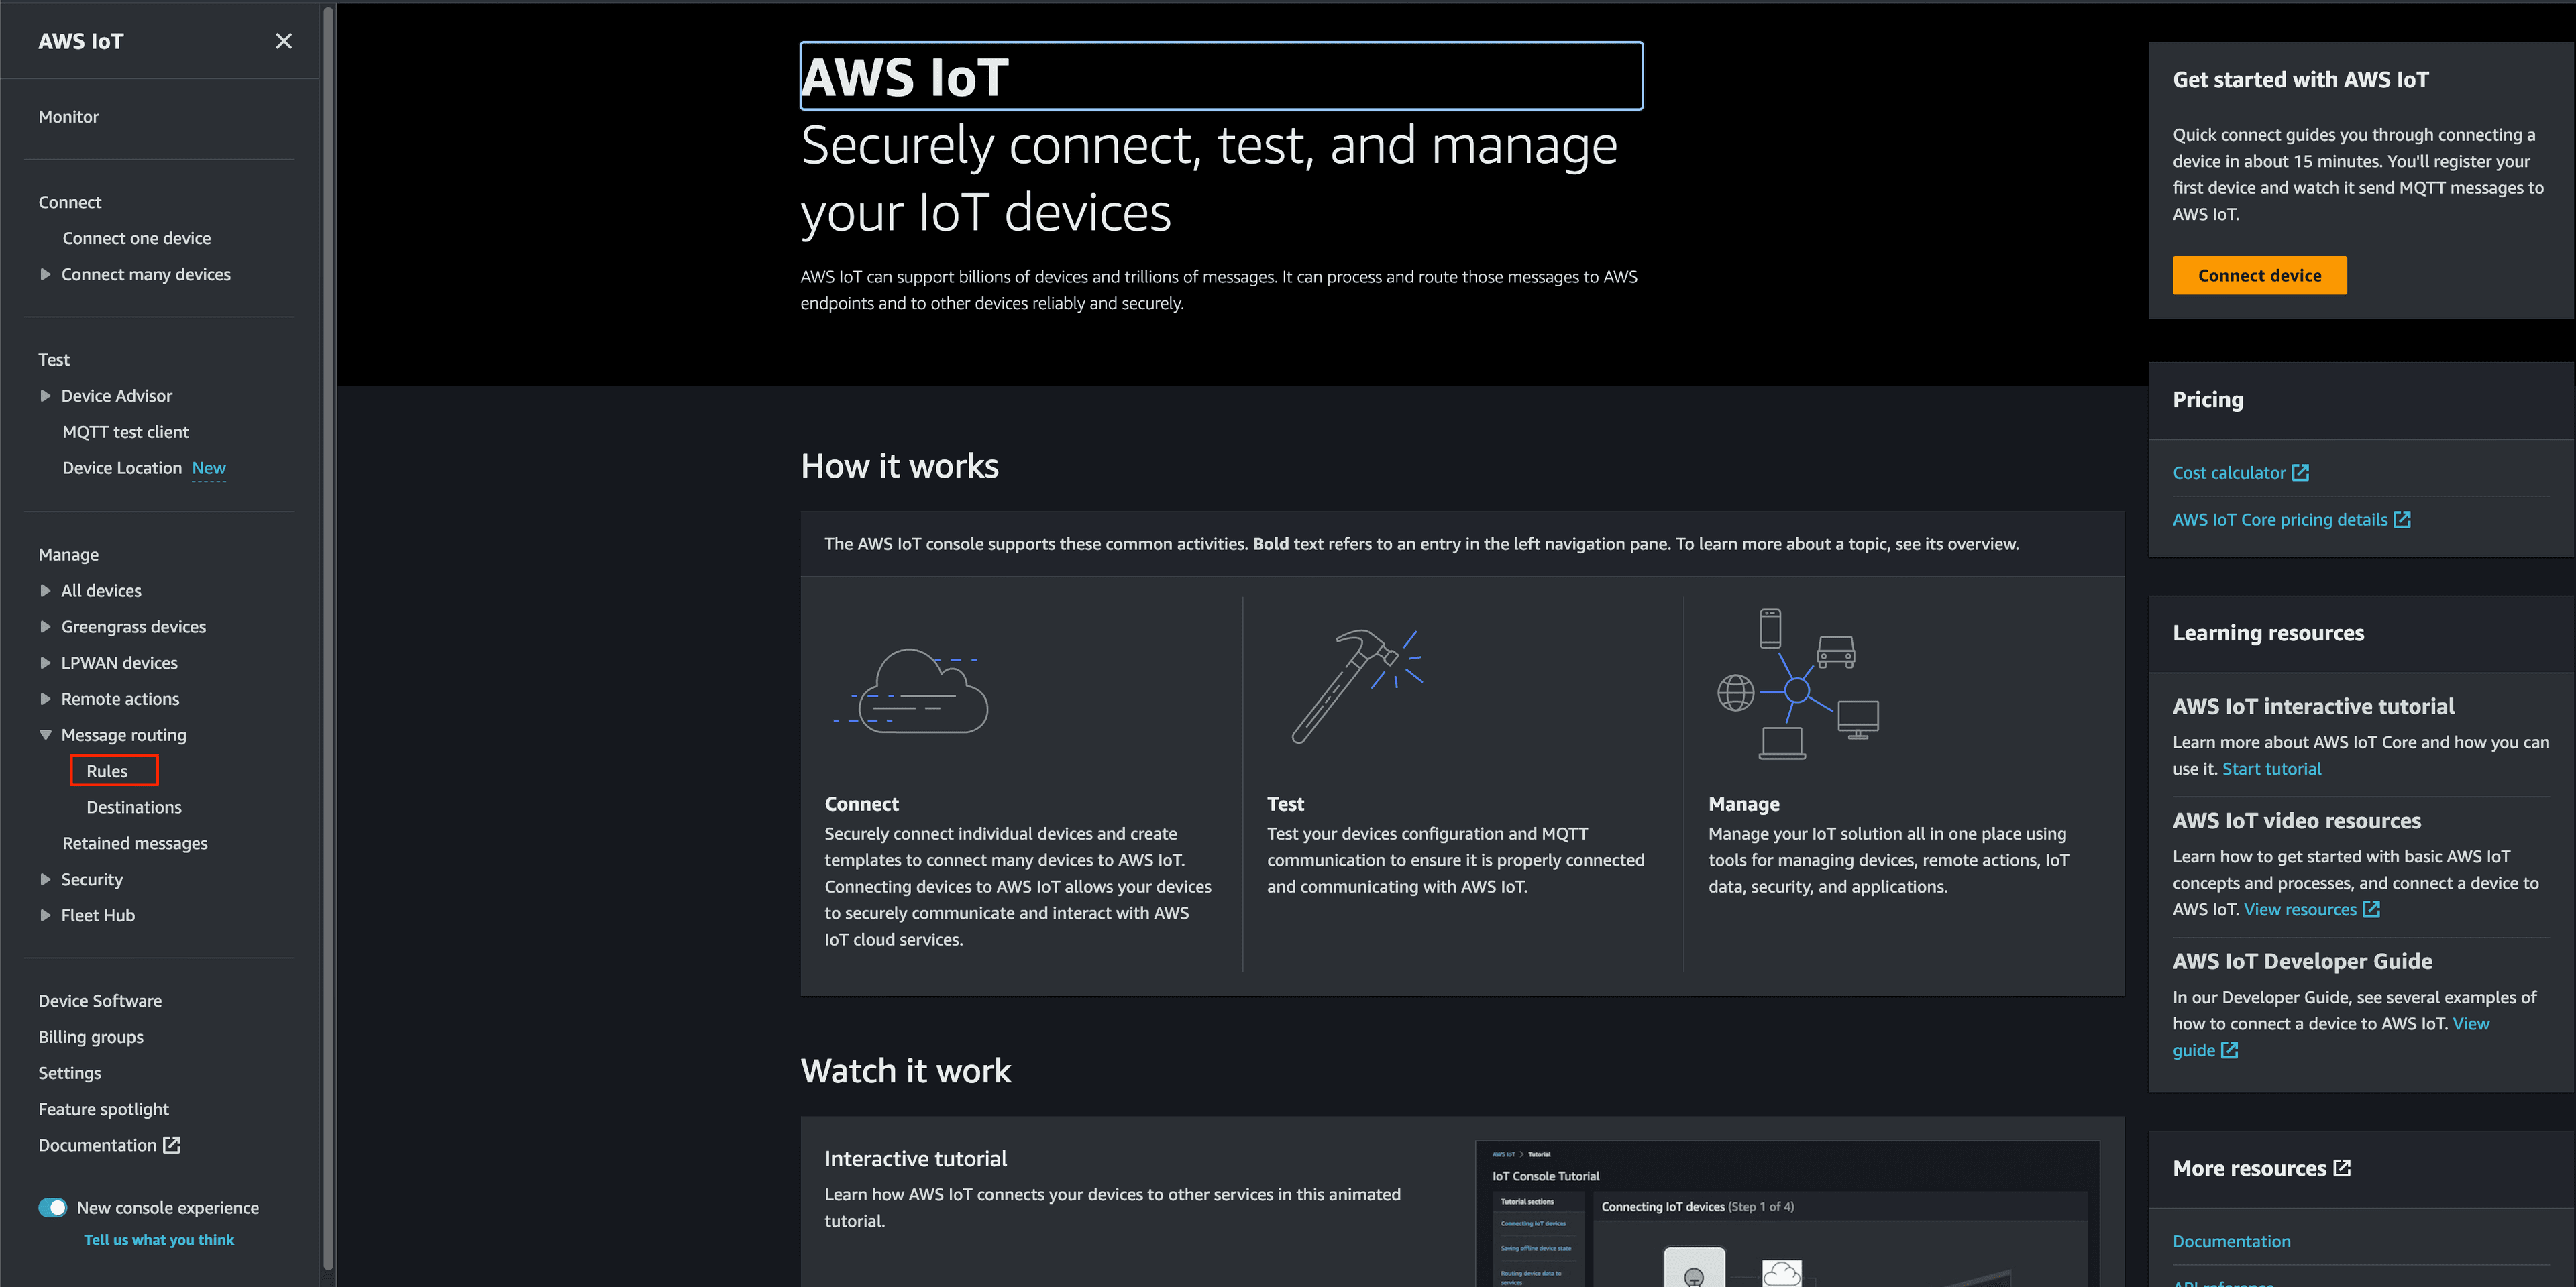
前往 IoT Core 控制台,选择 Message routing(消息路由),然后选择 Rules(规则)。

点击 Create rule(创建规则)。
.e371fc3dcd23858555033a4d595aa221bad24a46.png)
我们将规则命名为 AssetTrackingRule,然后点击 Next(下一步)。
.7ea32d08159506074f4f268c08d81e5154cda68e.png)
现在我们需要使用 SQL 语句。我们将使用的主题为 assets/trackers。输入 SELECT * FROM 'assets/trackers'。
.ef3c8aab178b33333fb70f583715bd10bcd37984.png)
然后点击 Next(下一步)。
现在是时候设置我们的位置操作了。从 Choose an action(选择操作)下拉列表中选择 Location(位置)。
.efcd75d39f916a8c8fcf7d5e9b91dbd4ada6fafd.png)
点击 Create a Tracker(创建跟踪器),输入名称 AssetTracker。
.6f6b6ae641e4844fbbb3174217baa4bc92ea0035.png)
点击 Create tracker(创建跟踪器)。
现在,我们可以配置有效负载到规则的映射。为此,我们将使用 IoT Core 中的替换模板。从跟踪器名称下拉列表中选择 trackerAsset01,然后对于下列字段,请复制并粘贴相应的值:
Device ID(设备 ID): thing123
Longitude(经度): ${longitude}
Latitude(纬度): ${latitude}
Timestamp value(时间戳值): ${timestamp()}
最后,我们需要创建一个新的 IAM 角色,向 IoT Core 规则引擎授予更新 Amazon Location Service 跟踪器资源的权限。点击 Create new role(创建新角色),将角色命名为 AssetTrackerIoTRule,然后点击 Create(创建)。
.141cad7adcaca5fb2886f07c0e3e2e689ff72582.png)
.7dd42a481e89741f1f76d76624e0744349ec44ee.png)
点击 Next(下一步)。
.0b89e742b4f6d09efd89b56bd5eb2ab89e42aa65.png)
现在点击 Create(创建)。
我们现已创建好 IoT Core 规则,可以开始发送消息了。
发送 MQTT 消息
现在,我们将向 Amazon IoT Core 和 MQTT 主题发送设备位置。此操作将模拟从 IoT 设备(如资产跟踪器)发出的消息。
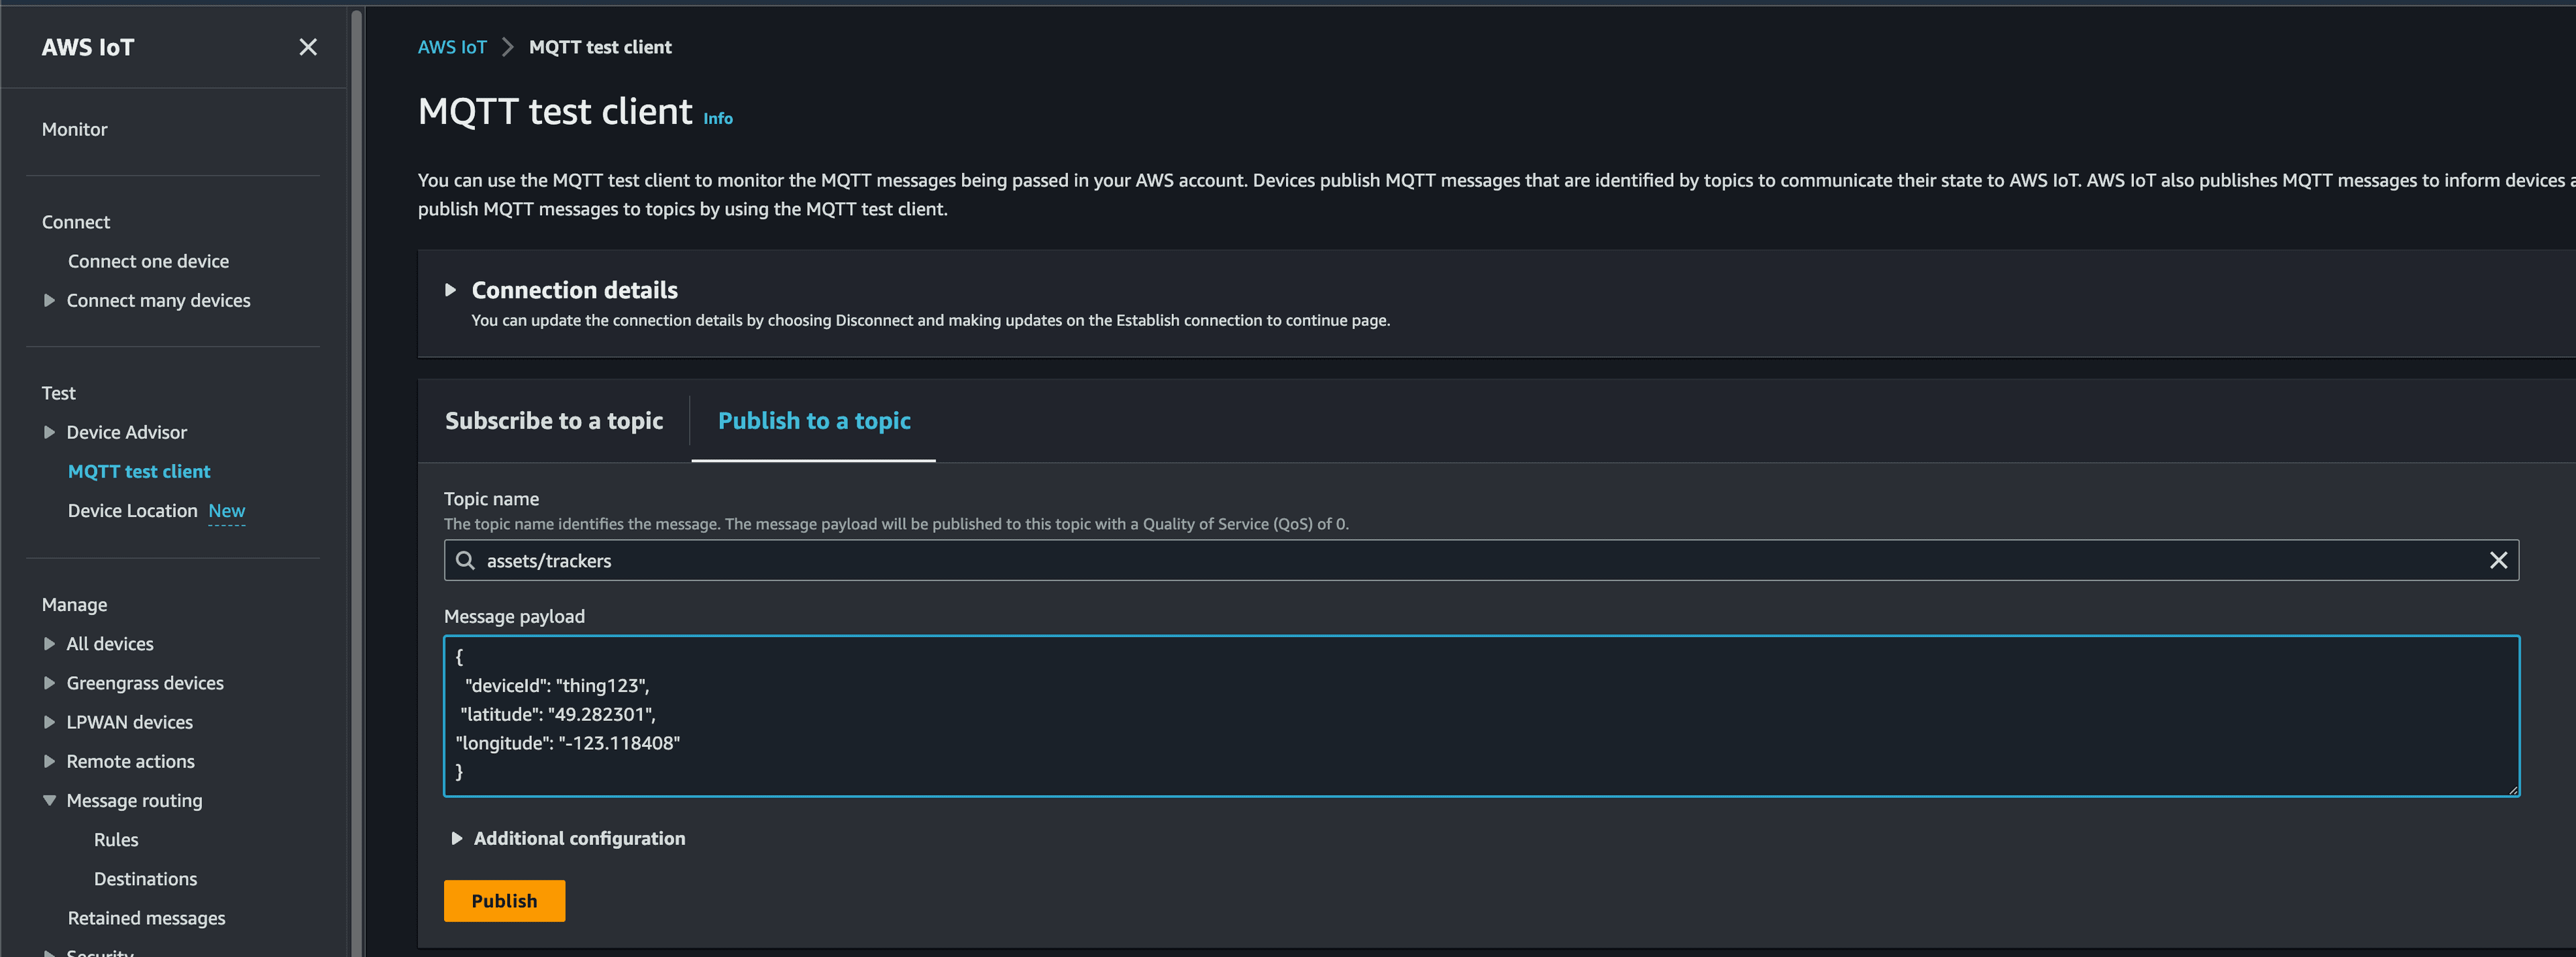
在 IoT Core 控制台上,前往 MQTT test client(MQTT 测试客户端),选择 Publish to a topic(发布到主题)选项卡。
在 Topic name(主题名称)中输入 assets/tracker
在 Message payload(消息有效负载)中输入以下内容,发送我们的第一个地点:
{
 "deviceId": "thing123",
 "latitude": "49.282301",
"longitude": "-123.118408"
}然后点击 Publish(发布)。

返回 Cloud9 和正在运行的应用程序。刷新应用程序,您应当会在地图上看到刚刚发送的地点。
.57b3ef596de733ee0d7182478f2f64958a5d595d.png)
现在我们输入另一个地点。在 MQTT test client(MQTT 测试客户端)页面上,输入以下内容,然后点击 Publish(发布):
{
 "deviceId": "thing123",
 "latitude": "49.282144",
 "longitude": "-123.117574"
}刷新页面后,您将看到第二个位置图标,它与上一个地点之间有一条连线。
.24c0475b4cd74c880116857238f2c9bdec7d0dd6.png)
清除亚马逊云科技环境
为删除学习本教程的过程中创建的资源,我们需要完成以下步骤。
删除 Cloud9
为了避免 Cloud9 实例产生费用,我们需要删除该环境。按照此处的步骤说明移除 AssetTracking 环境。
删除 Amazon Location Service 跟踪器
删除 IoT Core 规则
前往 IoT Core 控制台,选择 Message Routing(消息路由)和 Rules(规则)。然后选择 AssetTrackingRule,再点击 Delete(删除),确认您要删除它。
后续步骤
您的资产跟踪解决方案现已构建完毕,可以仔细思考将位置信息发送到 Amazon IoT Core 的方式。若想了解实物资产跟踪设备,请查看 Amazon Partner Device Catalog;若想了解规模化设置更多模拟设备,请查看亚马逊云科技提供的 IoT Device Simulator 解决方案,该解决方案能够模拟移动设备。最后,若想了解有关 Web 应用程序构建方式的更多信息,请查看 Amplify Geo 文档。
总结
恭喜您!您刚刚使用 Amazon Amplify、Amazon Location Service 和 Amazon IoT Core 构建了一个简单的资产跟踪应用程序。


