Microsoft Workloads on AWS
Accelerate IIS for Windows Server deployments with AWS Launch Wizard
With our goal to enhance the customer experience of deploying enterprise workloads on AWS, we are excited to introduce one of our latest offerings – AWS Launch Wizard for Internet Information Services (IIS). To enable quick and simple deployments for IIS, Launch Wizard consolidates necessary configuration details into one wizard and orchestrates the provisioning of the underlying AWS resources.
Overview of Solution
AWS Launch Wizard for IIS provides a console-based experience to guide you through the deployment, configuration, and sizing of Windows Server workloads running IIS on AWS, adhering to the AWS Well-Architected Framework. Along with the focus on ease of use, Launch Wizard deployments incorporate best practices for high availability, fault tolerance and security – resulting in a fully functional, production-ready IIS application.
The infrastructure provides a foundation for running IIS-based Microsoft solutions, such as Microsoft SharePoint and .NET Framework web applications, enabling you to easily architect and expand your environment as your business requirements evolve.
Launch Wizard IIS deployments currently support two template models, sourced from the Internet Information Services on AWS Quick Start:
- Deploying into a new Amazon Virtual Private Cloud (VPC) – This model builds out all necessary AWS infrastructure in order to provision IIS resources, with the option to use either Microsoft Active Directory on Amazon Elastic Compute Cloud (Amazon EC2) or AWS Directory Service for Microsoft Active Directory for domain services.
- Deploying into an existing Amazon VPC – This model utilizes your existing networking infrastructure to only provision IIS resources, intended to establish connectivity with an existing Active Directory environment.
Both deployment options consist of Amazon EC2 instances running Windows Server 2019 Core in an Amazon EC2 Auto Scaling group. The instances are deployed in separate subnets across multiple Availability Zones for high availability.
The automations in the solution are provided by AWS Systems Manager, AWS CloudFormation, and Windows PowerShell Desired State Configuration (DSC). Amazon EC2 instances are configured using lifecycle hooks, Amazon EventBridge, and AWS Systems Manager Automation.
AWS Launch Wizard is available at no additional charge. You only pay for the AWS resources that are provisioned to run your workload. To learn more about using AWS Launch Wizard to accelerate your IIS for Windows Server deployments, visit the overview documentation.
In this post, we will use the first deployment scenario of launching into a new VPC, configuring self-managed Microsoft Active Directory on EC2, with a single Remote Desktop Gateway (RDGW) host, and using an internal Elastic Load Balancing (ELB) scheme.
AWS Launch Wizard for IIS – Getting Started
Step 1: Select the application and deployment type.
To get started with an IIS deployment, in the Launch Wizard console, select Choose application.

Figure 1 – Launch Wizard console screen – Choose Application.
Select the dropdown option for Microsoft IIS for , followed by the Deploy into a new VPC option for Deployment Types, and finally, choose Create deployment.
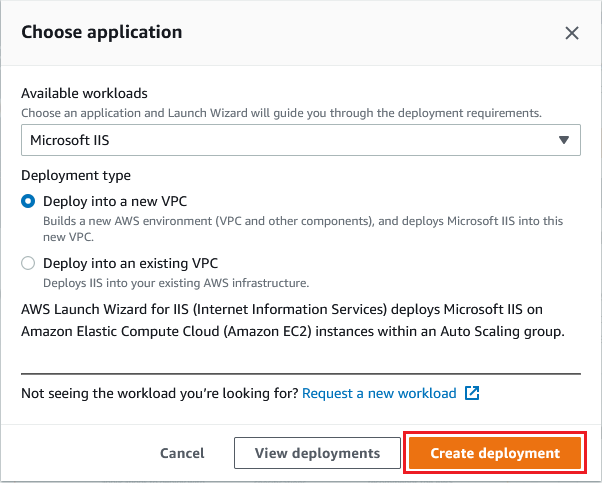
Figure 2 – Choose Microsoft IIS as application, select deployment type, and create deployment.
Step 2: Review and ensure your IAM permissions are sufficient to deploy the workload.
Next, you’ll be directed to the Review permissions page, the first step in the deployment configuration wizard. Here, you can verify that your current user role has sufficient AWS Identity and Access Management (IAM) permissions for this deployment. Choose Next.
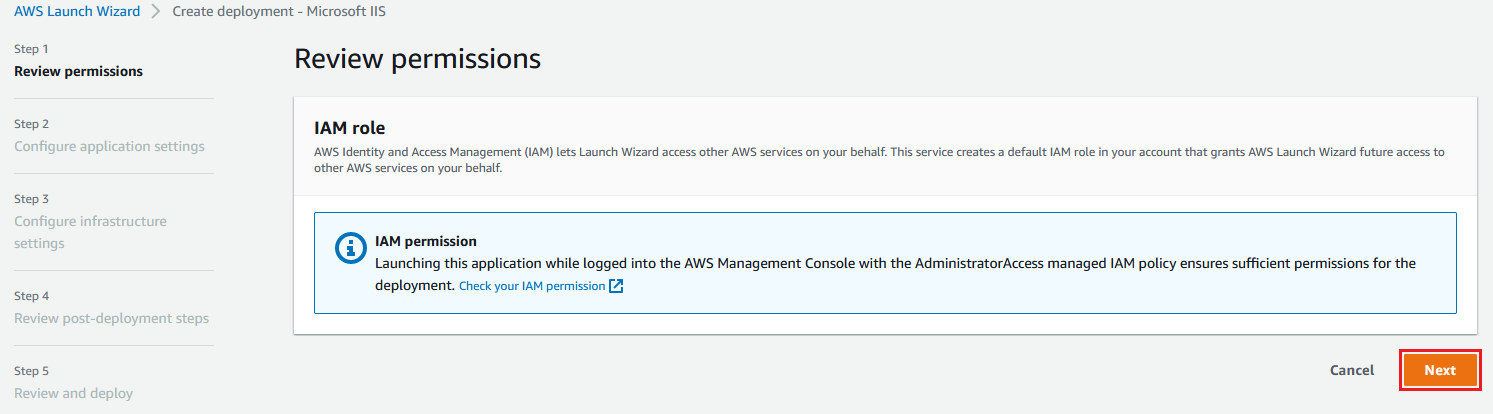
Figure 3 – Review IAM permissions.
Step 3: Configure application settings.
The Configure application settings step enables you to configure all features of this workload, including general settings, configurations for Network, Active Directory, RD Gateway, Auto Scaling group/ELB, as well as adding your own unique IIS webpage.
General settings
- Enter a custom Deployment name for your workload.
- Select an existing or create a new Amazon Simple Notification Service (SNS) topic ARN to receive notifications of application state changes, if desired.
- By default, if a deployment fails, any provisioned resources will be deleted. You can enable the setting to prevent this behavior from occurring by selecting the checkbox in the Deactivate rollback on failed deployment section.
- Add any custom tags for the deployed resources in the Tags section.
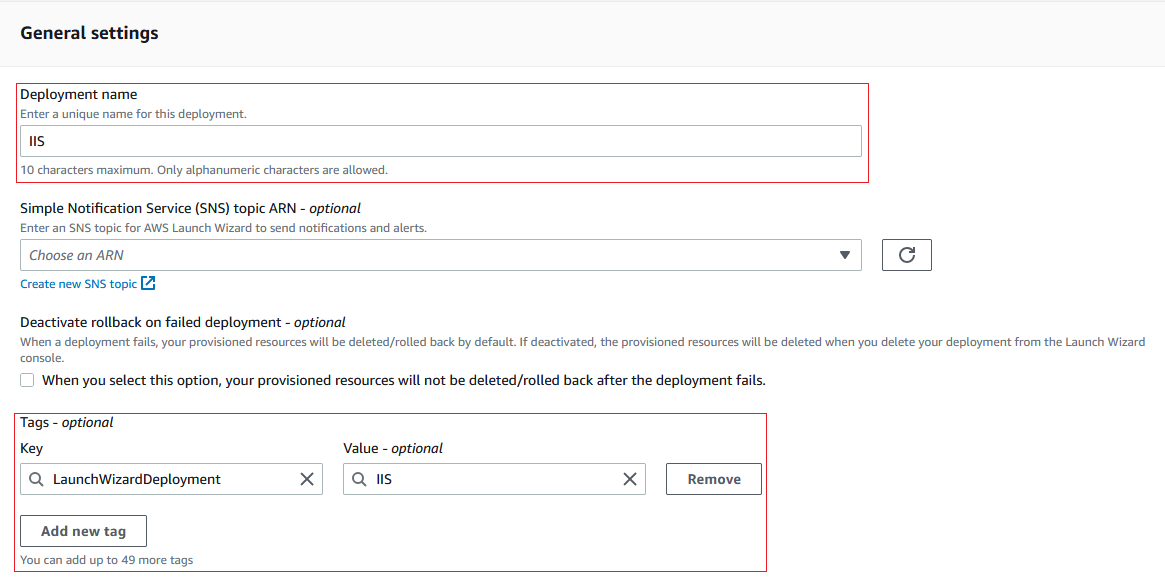
Figure 4 – AWS Launch Wizard for IIS – General Settings section.
Network configuration
- Select or create a new key pair for Key pair name. This will be used for securely accessing any EC2 resources deployed.
- Select the Number of Availability Zones you’d like to use for this deployment. Next, choose the specific Availability Zones your resources will reside in.
- Enter the VPC CIDR block, followed by the all CIDR ranges for the private and public subnets. The default selections allow these entries to be skipped if you prefer an even quicker deployment.
For Allowed Remote Desktop Gateway external access, enter the CIDR IP range that is permitted to access the RD Gateway instances. If you are unsure of which range to use at this time, you can identify your public IP address, and add ‘/32’ to the end to indicate a single IP address.
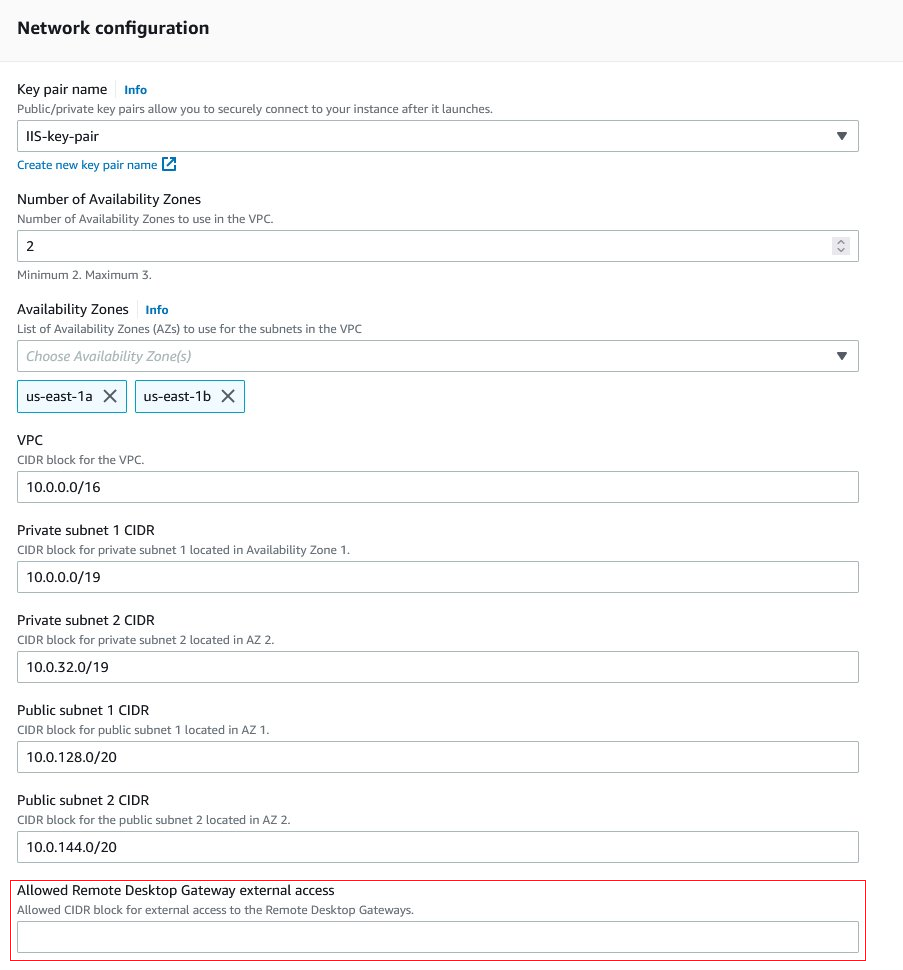
Figure 5 – AWS Launch Wizard for IIS – Network configuration section.
Active Directory configuration
- For Active Directory scenario type, select Microsoft AD on Amazon EC2 from the dropdown.
- Enter a user name for Domain administrator user name, and a password for Domain administrator password.
- Enter values for the Domain NetBIOS name and Domain DNS name. For example, you could use “example.com” for Domain DNS name and “example” for the Domain NetBIOS name.
- If desired, update the Domain Controller NetBIOS Name and Domain Controller private IP addresses for each of the domain controllers to use values other than the defaults.
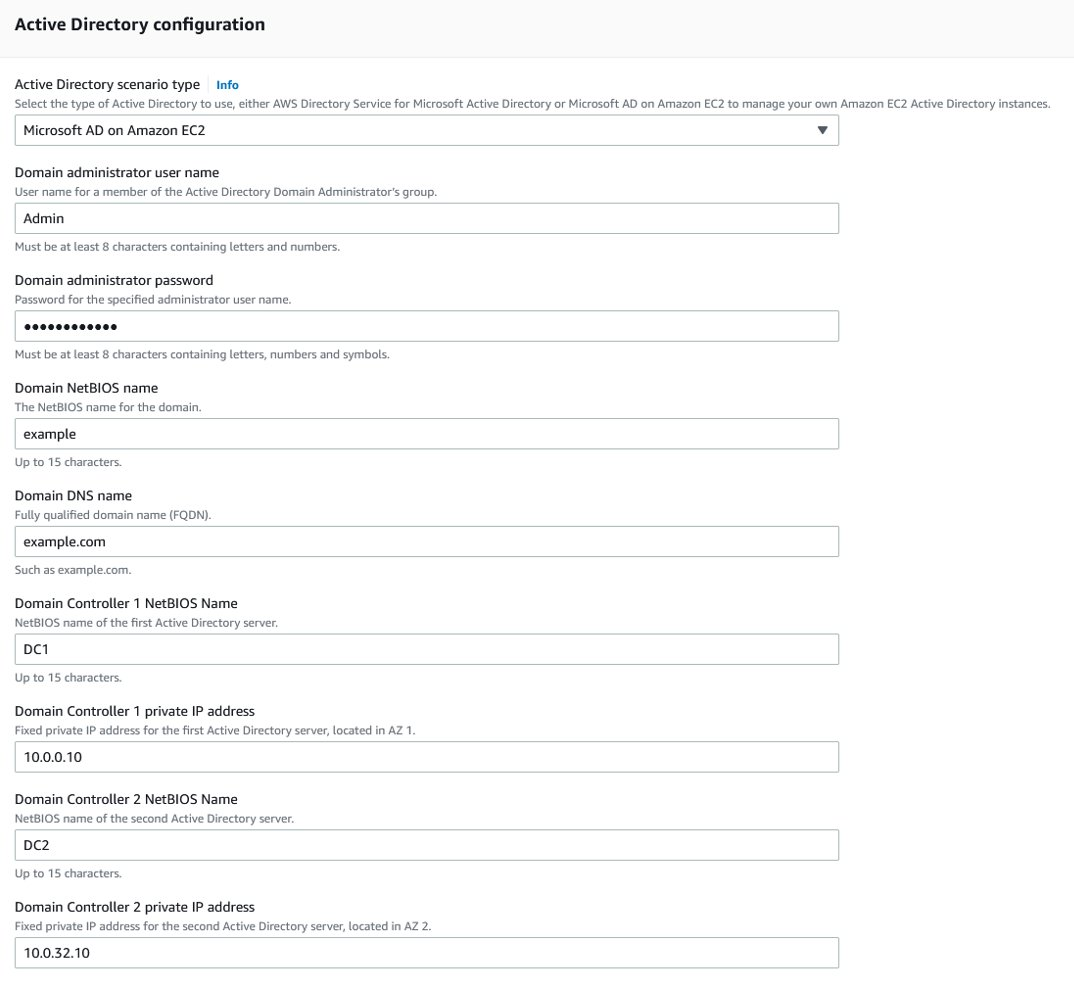
Figure 6 – AWS Launch Wizard for IIS – Active Directory configuration section.
Microsoft Remote Desktop Gateway configuration
The Remote Desktop Gateway uses the Remote Desktop Protocol (RDP) over HTTPS to establish a secure, encrypted connection between remote users and Windows-based EC2 instances, without needing to configure a virtual private network (VPN) connection. This helps reduce the attack surface on your Windows-based EC2 instances while providing a remote administration solution for administrators.
To reduce administrative overhead, or to take the approach of maintaining a minimal deployment, you can alternatively use Session Manager port forwarding sessions or RDP with Fleet Manager to securely access your EC2 instances directly. For the purpose of this walk-through, we will use a single RDGW instance to serve as a bastion host.
Enter 1 as the Number of Remote Desktop Gateway hosts to deploy.

Figure 7 – AWS Launch Wizard for IIS – Microsoft Remote Desktop Gateway configuration section.
IIS Webpage configurations
In this section, you can optionally set the webpage location by providing the location of a custom HTML resource that you have stored in Amazon S3. If you decide not to specify a file, you can leave both fields empty, and a sample page will be used instead.
- Enter the S3 bucket name in S3 Bucket Webpage Location.
- Enter the S3 prefix and file name in S3 Key Webpage Location.
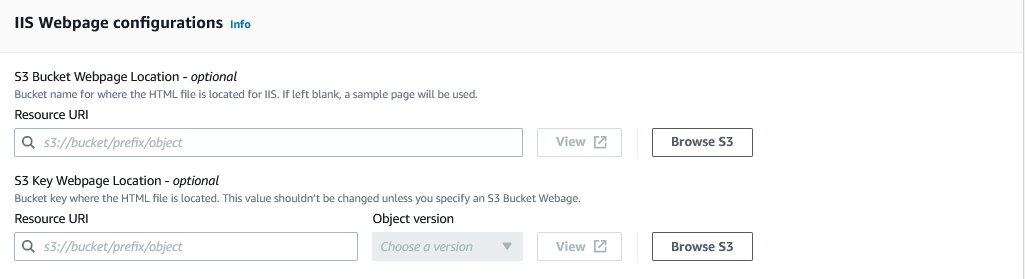
Figure 8 – AWS Launch Wizard for IIS – IIS Webpage configurations section.
Auto Scaling group / Application Load Balancer configuration
- For Desired capacity of the Auto Scaling group, adjust the capacity as needed.
- Enter values for both Auto Scaling group maximum instance size and Auto Scaling group minimum instance size.
- Enter the IP range that is permitted to access the Elastic Load Balancer in the Web Access CIDR field. Using the internal ELB scheme, you can enter the VPC CIDR to allow intra-VPC connectivity.
- Select the internal option for the Elastic Load Balancing scheme field. You can find more information on the scheme details in our documentation.
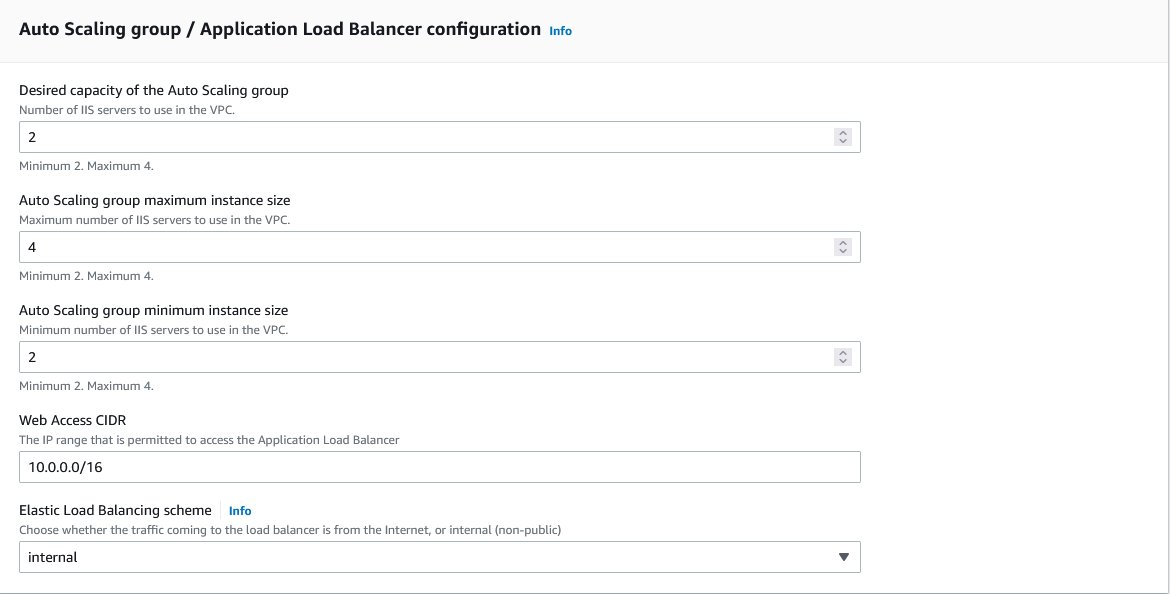
Figure 9 – AWS Launch Wizard for IIS – Auto Scaling group and Application Load Balancer configuration.
Step 4: Configure the infrastructure settings to select the instance types utilized in the deployment.
On the following page, you will be prompted to select the appropriate instance types used for each EC2 resource included in the deployment.
The wizard provides you with two options to select the instance type per resource:
- Infrastructure suggestions – Instance types are suggested based on the specifications provided in the related fields for vCPU count, Network performance, and Memory. To select different instance types, you can customize each specification by choosing a different value from the corresponding dropdown.
- Static values – You can manually select the instance types from a predefined list of values representing the available offerings for this deployment.
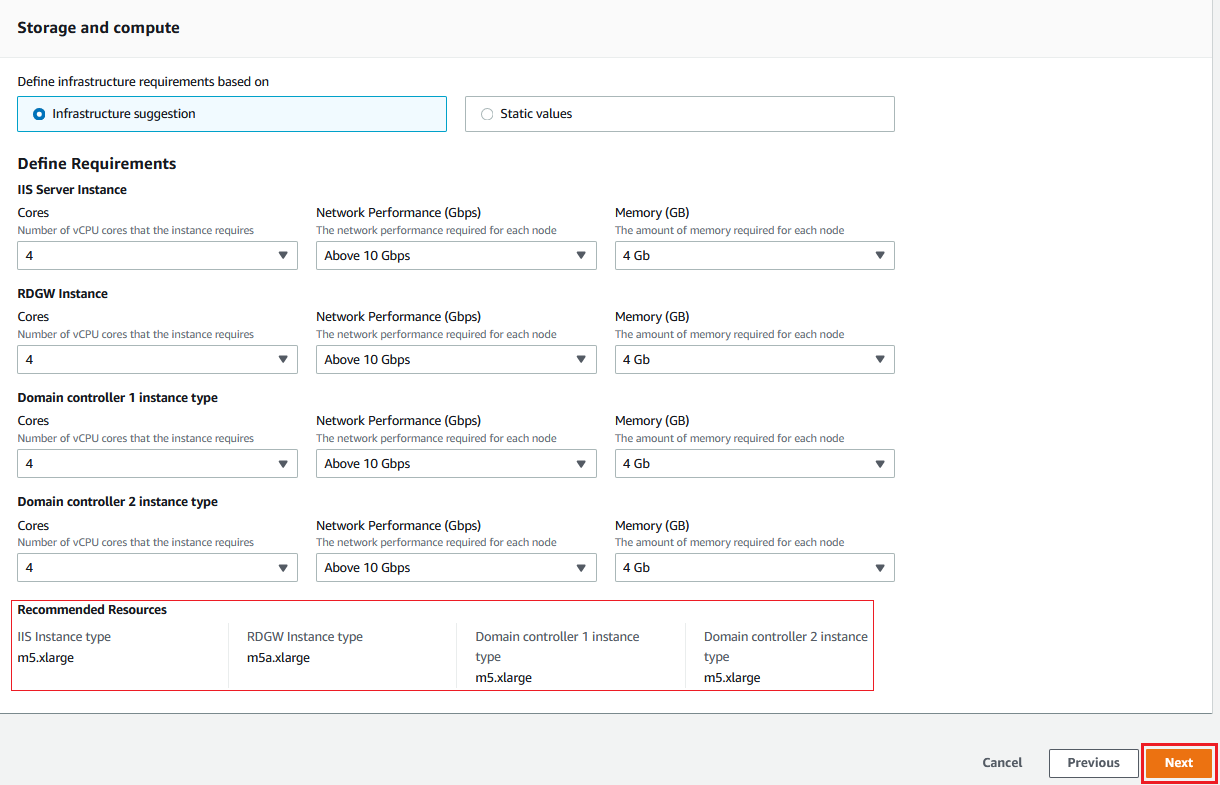
Figure 10 – AWS Launch Wizard for IIS – Storage and compute section.
After selecting the proper instance types for your environment, choose Next.
Step 5: Review post-deployment steps.
For applications offered by Launch Wizard, there may be additional actions or configuration needed to complete the deployment. You can select the Learn more link provided in the wizard to review any recommended post-deployment steps.
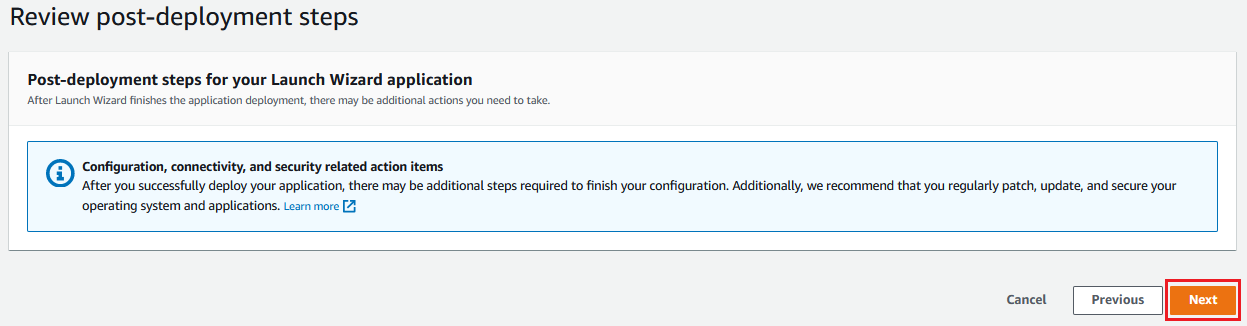
Figure 11 – AWS Launch Wizard for IIS – post-deployment steps review section.
Choose Next.
Step 6: Review and deploy
The Review and deploy step provides a consolidated review of all configuration details entered to this point. You can review each section to determine whether any updates or modifications need to be made.
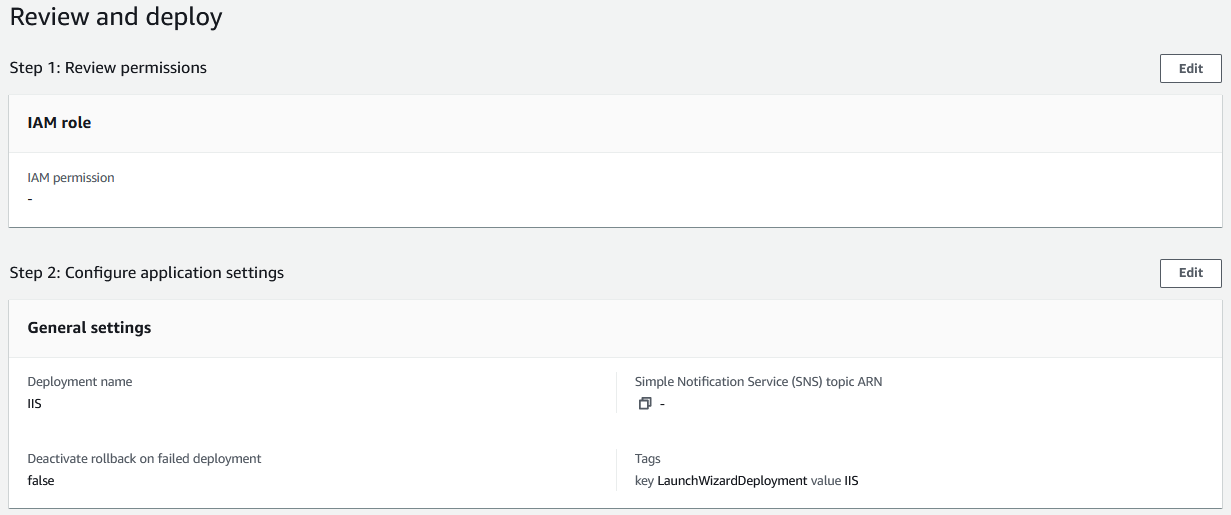
Figure 12 – AWS Launch Wizard for IIS – Review and deploy section.
If you decide to make any changes, choose Previous, update values as necessary, and return to the review page. When you choose Deploy, you agree to the terms of the Acknowledgment. Launch Wizard then validates the inputs and notifies you of any issues that need to be addressed.
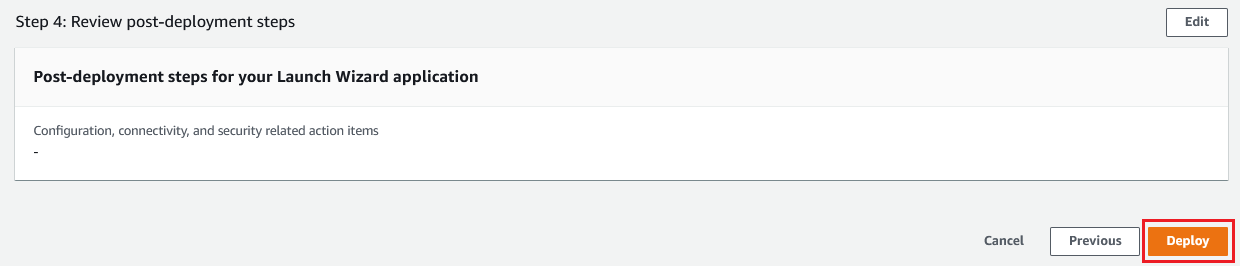
Figure 13 – AWS Launch Wizard for IIS – Deploy and review section – Deploy.
At this time, you will be directed back to the Microsoft IIS Deployments console. On average, a typical IIS deployment takes between 50-70 minutes to complete, depending on the options configured. While waiting, you can monitor the progress of the deployment by refreshing the page, or by selecting the application and reviewing the Deployment events history.
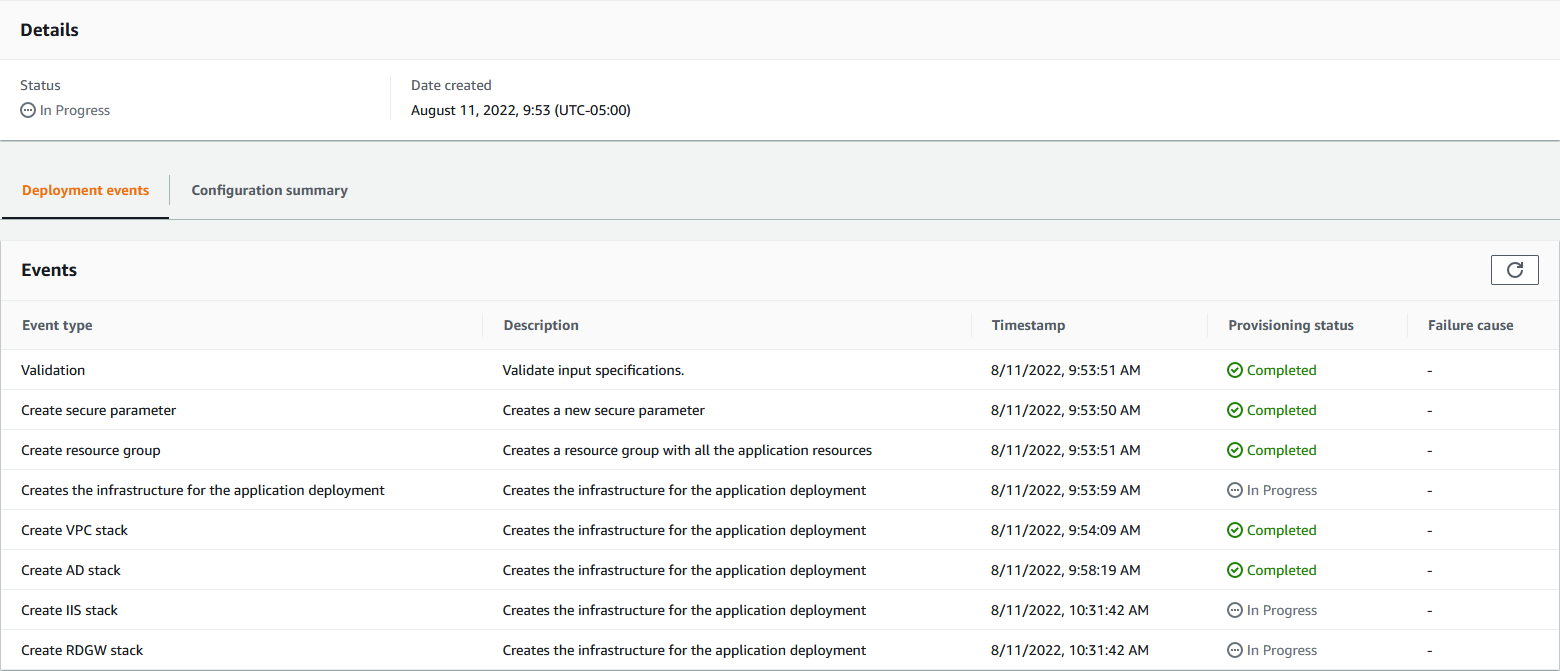
Figure 14 – AWS Launch Wizard for IIS – Deployment events list.
Step 7: Post-deployment steps and testing your IIS application
Once the deployment completes successfully, the Launch Wizard console will display a status of Completed.
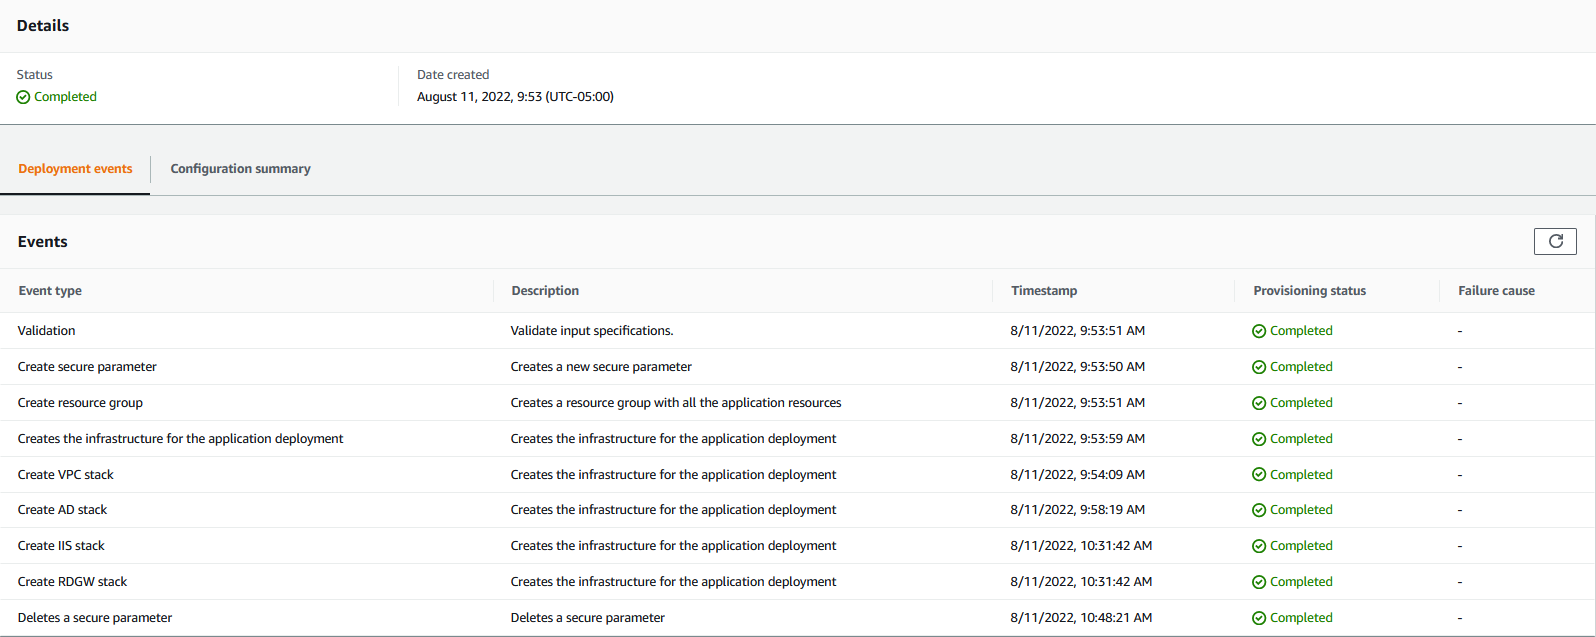
Figure 15 – AWS Launch Wizard for IIS – Deployment events console with completed status.
At this point, we recommend installing any available Windows Updates on all EC2 resources to ensure your systems are up-to-date with the latest security patches. For guided details, please review our public documentation for post-deployment steps.
After updating each instance, you can now test your new IIS application. You will need to obtain the web URL for the Elastic Load Balancer. Navigate to the CloudFormation console and select the root stack to open the details page. Ensure the option for View nested is enabled in the Stacks column, then locate the nested stack for EC2WebAutoScaleStack. The full stack name is represented using the following format:
- LaunchWizard-<Deployment Name>-IISStack-<random string>-EC2WebAutoScaleStack-<random string>
From the Outputs tab, there will be an entry for ELBUrl. Copy the value; it is the address for your IIS webpage.
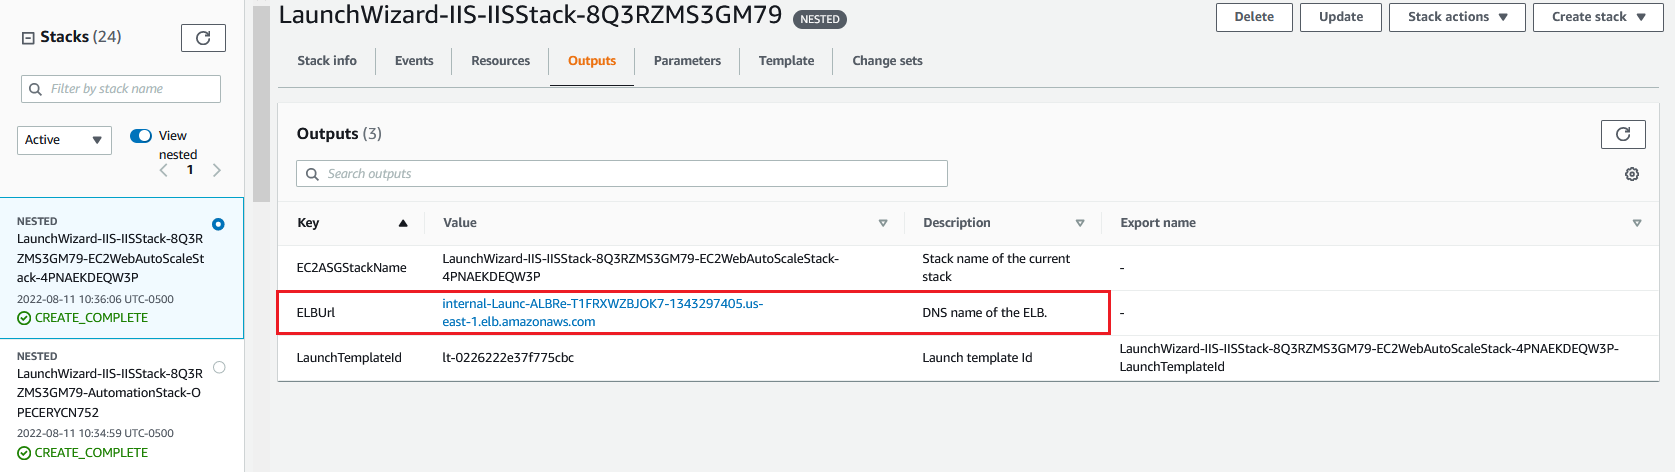
Figure 16 – AWS Launch Wizard for IIS – Determining ELB URL from CloudFormation stack.
If you’ve closed the existing RDP session, connect back to the RDGW instance, following along with steps 1 and 2 in the documentation. In a web browser, paste the Elastic Load Balancer URL copied from the stack output. The default test webpage, or the custom webpage specified during configuration, will now be displayed.
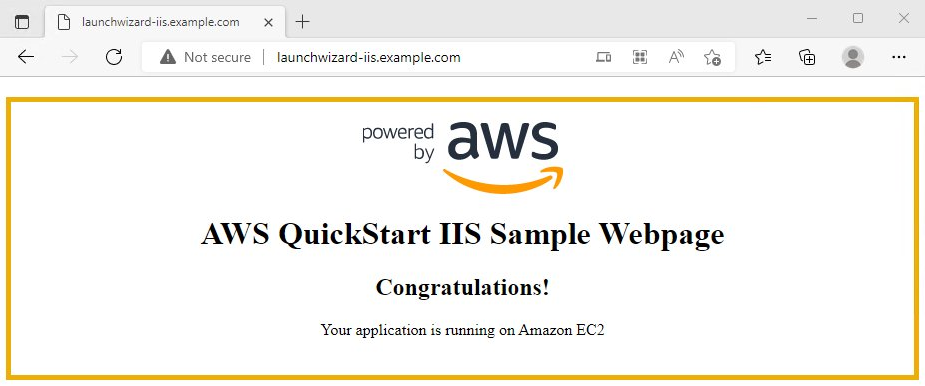
Figure 17 – AWS Launch Wizard for IIS – Example IIS webpage.
Cleaning up your resources
When your testing is complete, follow these steps to clean up the resources created in this walk-through to avoid incurring unintended charges.
- Navigate to AWS Launch Wizard, choose Deployments and then choose Microsoft IIS.
- Select the Application name (IIS) and choose Delete.

Figure 18 – AWS Launch Wizard for IIS – Delete IIS deployment from console.
3. Confirm when prompted to delete the Application by entering delete.
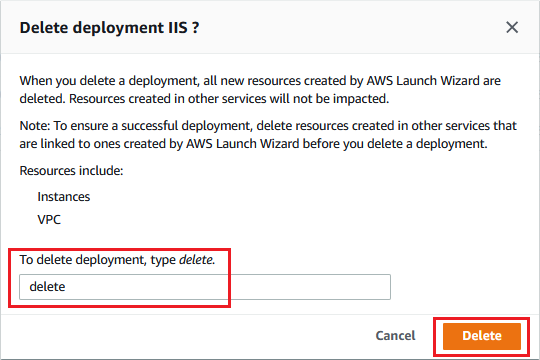
Figure 19 – AWS Launch Wizard for IIS – confirm deletion of IIS deployment.
4. Refresh the page in your browser and check the Provisioning status – initially, it will display Delete in Progress. Once all resources have been removed, the status will change to Deleted.

Figure 20 – AWS Launch Wizard for IIS – Provisioning status showing ‘Deleted’ for IIS.
Summary
In this post, we showed you how to use AWS Launch Wizard for Internet Information Services to quickly deploy a highly available IIS application ready for production. As the infrastructure architecture follows AWS best practices, you can continue building on top of all existing resources to define your environment to your standard.
In addition to IIS, AWS Launch Wizard also supports many more enterprise applications, such as SAP-based workloads, Microsoft SQL Server, Microsoft Active Directory, Microsoft Exchange Server, and Remote Desktop Gateway (RD Gateway) as a stand-alone workload.
To learn more about other available Launch Wizard enterprise application deployments, see the AWS Launch Wizard documentation. For best practices of running Windows on AWS, please review the best practices for Windows on Amazon EC2 documentation.
AWS can help you assess how your company can get the most out of cloud. Join the millions of AWS customers that trust us to migrate and modernize their most important applications in the cloud. To learn more on modernizing Windows Server or SQL Server, visit Windows on AWS. Contact us to start your modernization journey today.