Desktop and Application Streaming
Enabling federation with Entra single sign-on and Amazon AppStream 2.0
This post was updated in August 2020 by Jeremy Schiefer and July 2024 by Michael Spence. Entra ID was previously named Azure AD.
You can use single sign-on with Amazon AppStream 2.0 with many identity services that are compliant with SAML 2.0. This post explains how to configure federated user access for AppStream 2.0 using Microsoft Entra single sign-on (SSO) for Enterprise applications.
Solution overview
This post illustrates configuring a SAML 2.0 federation, using Entra ID single sign-on, so users can access their assigned applications via the My Apps portal or a direct link. The steps to proceed through this post are:
- Create an Entra ID Enterprise application using seamless SSO.
- Create the SAML identity provider (IdP).
- Configure an IAM policy.
- Create an IAM role.
- Configure the Entra ID SSO application.
- Add users and groups.
- Assign an icon and verify your configuration.
Prerequisites
This post assumes that you have the following:
- An Entra user account with the Cloud Application Administrator or Application Administrator role.
- Familiarity with AppStream 2.0
Create an Entra ID single sign-on Enterprise application
- Open the Azure portal navigation pane, choose or search for Enterprise applications.
- At the top of the Enterprise applications | All applications window, choose + New application.
- In the Browse Microsoft Entra Gallery section, select + Create your own application.
- Name your application, for example, ExampleApp, select Integrate any other application you don’t find in the gallery (Non-gallery) and select Create.
- When the application is created, go to Manage, and select Single sign-on.
- In the Select a single sign-on method section, select SAML.
- In the SAML Certificates section (Figure 1), download the Federation Metadata XML file for your application. If there is no download link, create a certificate by selecting the pencil icon and New Certificate. If there is a certificate with a status of Active, select the drop-down menu and select, Download federated certificate XML.
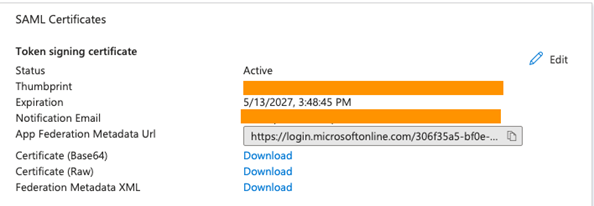
Figure 1 – SAML Certificates.
Create the SAML Identity provider
Next, create the SAML provider in the AWS Identity and Access Management (IAM) console. You can also create it using the AWS Command Line Interface (AWS CLI). For more information, see Setting Up SAML.
- In the IAM console, choose Identity providers, and select Add provider.
- On the Configure Provider page, for the Provider Type, choose SAML.
- For the Provider Name, enter something meaningful to you, such as EntraSSO.
- In the Metadata document, select Choose file and upload the metadata document that you previously downloaded, and select Add provider.
- Choose the identity provider (IdP) that you created to get the Amazon Resource Name (ARN) of the IdP. The ARN is required to configure claims rules later in this post.
On the summary page, copy the value for the provider ARN. In commercial AWS Regions, the ARN is in the following format: arn:aws:iam::account-id:saml-provider/provider-name. In AWS GovCloud (US) Regions, the ARN is in the following format: arn:aws-us-gov:iam::account-id:saml-provider/provider-name.
Configure an IAM Policy
Next, create a policy with permissions to stream the AppStream 2.0 stack. This makes sure that users have only the permission to stream applications from a specific stack.
- In the IAM console, choose Policies, Create Policy, and select JSON. Figure 2 shows the policy that gives users permissions to an AppStream 2.0 stack, named ExampleStack.
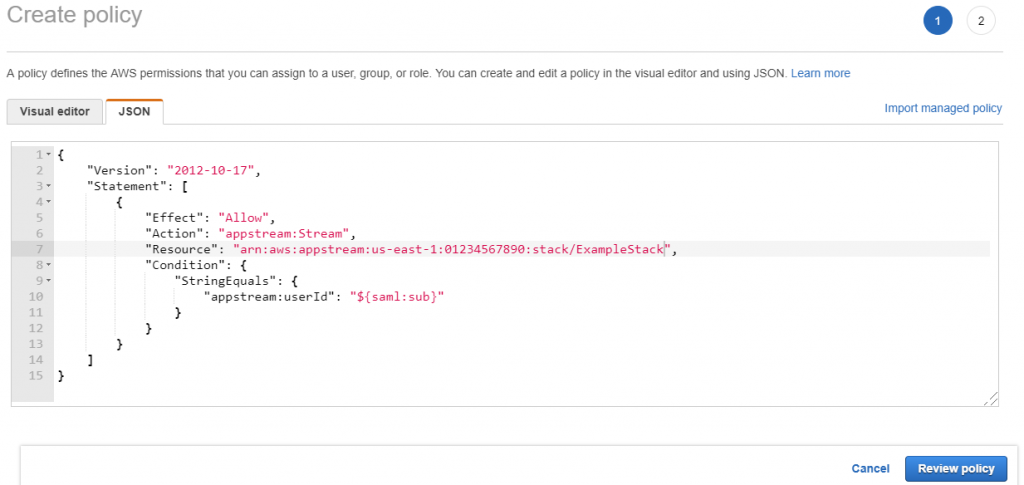
Figure 2 – IAM policy.
- For Region Codes, use one of the following values based on the AWS Region your AppStream 2.0 stack is in.
- After you’ve specified the policy, choose Review policy.
- For the Policy Name, enter a descriptive name, such as AppStream2_ExampleStack.
- For the Description, enter the level of permissions.
- Choose Create Policy and you should see the notification as shown in Figure 3.

Figure 3 – IAM policy successful creation.
Create an IAM Role
Next, create the role that your Entra ID users assume when federating to AppStream 2.0.
- In the IAM console, choose Roles, Create role.
- For the trusted entity type, choose SAML 2.0 federation.
- Under SAML provider, choose the SAML IdP that you created earlier.
- Do not choose either of the two SAML access level methods for AppStream 2.0.
- For the Attribute, choose SAML:aud and enter
https://signin.thinkwithwp.com/saml. - Do not add any conditions.
- Choose Next, Permissions.
- Choose the IAM policy you created in the previous step, and choose Next, Tags.
- Add any optional tags. Choose Next: Review.
- Enter a Role Name and Role Description that identifies the role, and choose Create Role.
- In the IAM console, in the navigation pane, choose Roles. Locate the role that you created, and choose it to open the role properties.
- Choose the Trust Relationships tab, and then choose Edit Trust Relationship.
- Under Trusted Entities, verify that the IdP that you created is listed.
- Copy the Role ARN. The ARN is required to configure claims rules later in this post. In commercial AWS Regions, the ARN is in the following format:
arn:aws:iam::account-id:role/role-name. In AWS GovCloud (US) Regions, the ARN is in the following format:arn:aws-us-gov:iam::account-id:role/role-name.
Configure the Entra ID SSO Application
With the IAM role created, you can now complete the setup in the Azure portal.
- Open the Azure portal, and in the navigation pane, choose or search for Enterprise applications.
- Choose the name of the Enterprise application you created in the first step.
- Under Manage choose Single sign-on, SAML-based Sign-on.
- In the Basic SAML Configuration section click the pencil and set the following fields:
- Identifier (Entity ID):
urn:amazon:webservices. This is the entity ID passed during the SAML exchange. Azure requires that this value be unique for each application. For additional AppStream 2.0 stacks, you can append a number to the string; for example,urn:amazon:webservices2. - Reply URL:
https://signin.thinkwithwp.com/saml. - Sign on URL: <Blank>
- Relay State: The Relay State is unique to your account, AWS Region, and AppStream 2.0 stack. The format is
https://relay-state-region-endpoint?accountId=aws-account-id-without-hyphens&stack=stack-name. For a list of AppStream 2.0 relay state region endpoints, see Step 6: Configure the Relay State of Your Federation.
- Identifier (Entity ID):
- In the Attributes & Claims section select the pencil to edit. Under Required claim – Claim name, select Unique User Identifier (Name ID) . This is the key that is used to identify your users in the SAML assertion. If you are planning to take advantage of a domain-joined fleet, make sure this matches the domain username of the user. Generally
user.mailoruser.userprincipalnameworks. - Remove Additional claims. By default, Azure populates several SAML attributes for a new application. These attributes are not needed for the federation to AppStream 2.0. You can remove them by choosing the three dots next to each and choosing Delete.
- After removing the default attributes, add the following claims. select + Add new claim and add the following claims:
Name Namespace Source Source attribute Role https://thinkwithwp.com/SAML/AttributesAttribute This is the role ARN discussed earlier in this post, followed by a comma and then the provider ARN. For the example stack, this would be the following: arn:aws:iam::01234567890:role/ExampleStack,arn:aws:iam::01234567890:saml-provider/EntraSSO.RoleSessionName https://thinkwithwp.com/SAML/AttributesAttribute SomeString. Note: you can provide any string value in place ofSomeString.SAML_SUBJECT https://thinkwithwp.com/SAML/AttributesAttribute SomeString. Note: you can provide any string value in place ofSomeString.SessionDuration https://thinkwithwp.com/SAML/AttributesAttribute Enter the number of seconds the session should be valid for. This can be between 900 (15 minutes) and 43200 (12 hours).
Add users and groups
- On the Enterprise application menu for the new application, choose Manage and then Users and groups, and on the next screen, choose the + Add user/group button.
- In the Add Assignment dialog box, choose Users and groups.
- In the Users and groups dialog box, select all of the users and groups you want to access your AppStream 2.0 stack.
- Choose the Select button, and then select the Assign button.
Assign an icon and verify your configuration
- On the Enterprise application menu, go to the Properties section.
- Choose a file to use as a logo and upload it using the text box.
- Note the User access URL, which your users use to access the stack directly.
- Make sure that everything is working by opening a separate browser or an Incognito or Private window in your current browser.
- Paste the User access URL into the new browser and log in as a user assigned to the application.
That’s it! Your users are now able to access AppStream 2.0 through Azure AD Single Sign-On.
 |
Jeremy Schiefer is a Principal Security SA with Amazon Web Services. He is a member of the End User Computing community and has authored several blogs and workshops. Jeremy is passionate about security, 3D printing, and Internet of things (IoT). |
 |
Michael is a Senior Solutions Architect based out of Tennessee. He has extensive experience in enterprise cloud migrations. He is currently working with AWS partners in the WWPS focused on migrations. He has a Master of Science degree in Software Engineering from East Tenn. State University and believes in the quote: “The most damaging phrase in the language is ‘We’ve always done it this way’.” – Adm. Grace Hopper |