Desktop and Application Streaming
Enable federation with AWS Single Sign-On and Amazon AppStream 2.0
September 18, 2024: This post has been updated by Peter-John Morgenrood and Marco Souza.
July 18, 2024: AWS Single Sign-On is now known as AWS IAM Identity Center. For more information, see What is IAM Identity Center?
This post demonstrates how you can use AWS IAM Identity Center to set up identity federation to your Amazon AppStream 2.0 stacks. IAM Identity Center is offered at no extra cost for AWS customers. By using IAM Identity Center SAML 2.0 support, you can provide your users access to their AppStream 2.0 applications using their existing identity credentials, while also benefiting from the security of user authentication by your identity provider (IdP). You can control which users have access to AppStream 2.0 stacks by using your IdP within IAM Identity Center.
If you’re not using IAM Identity Center, see AppStream 2.0 Integration with SAML 2.0 for more information on direct federation from your IdP to AppStream 2.0. However, if you’re using IAM Identity Center, either with an integrated Active Directory or by managing users directly in Identity Center, you can use SAML 2.0 to federate with AppStream 2.0. This post will focus on using IAM Identity Center for AppStream 2.0 federation.
IAM Identity Center supports two main use cases, and you can use either or both. Multi-account permissions let you centrally manage account access by defining role templates (permission sets) that are assigned to users in specified accounts. Behind the scenes, IAM Identity Center service will create managed IAM roles inside these accounts that will grant respective permission to access the accounts through a single sign-on portal. You can also use Identity Center to manage access to AWS managed applications such as Amazon QuickSight, AWS IoT SiteWise, or to customer-managed applications that use SAML 2.0.
With IAM Identity Center, you can bring your own identities to AWS by connecting your IdP or by creating users and groups directly in Identity Center if you don’t have an IdP.
You can use IAM Identity Center to set up identity federation to AppStream 2.0 stacks. If your AppStream 2.0 fleets are connected to an Active Directory domain, you can connect Identity Center to that same domain or use the built-in users feature of Identity Center. You can then assign stacks to Active Directory users or groups. If your AppStream 2.0 stacks aren’t domain joined, you can use the built-in user management capabilities of IAM Identity Center to create users or groups and provide them access to AppStream 2.0 stacks. This post describes how to do both.
In this post, you:
- Learn about IAM Identity Center Directory options.
- Connect Identity Center to your identity source.
- Create an Identity Center application for AppStream 2.0.
- Create an AppStream 2.0 IdP.
- Create an AppStream 2.0 stack stream access role.
- Attach an inline policy to the AppStream 2.0 stream access role.
- Create Identity Center attribute mappings.
- Assign users and test the solution.
Prerequisites
This post assumes that the following prerequisites are in place:
- IAM Identity Center prerequisites are met
- (Optional) If using Active Directory, IAM Identity Center can integrate with an existing self-managed Active Directory Forest or AWS Managed Microsoft Active Directory. See Option 2 for details.
- Familiarity with AppStream 2.0.
- An existing AppStream 2.0 stack.
- Permissions required to configure an AWS IAM SAML 2.0 Identity Provider.
Configure IAM Identity Center identity sources
IAM Identity Center offers several identity source options to choose from. Let’s review the available choices:
Option 1: IAM Identity Center directory
By default, when you first enable IAM Identity Center, you’re provided with a default directory for creating users and groups. This can be a convenient option if you don’t have an existing identity source (Active Directory) and want to manage your AppStream 2.0 users directly within IAM Identity Center.
Option 2: Active Directory
IAM Identity Center also supports integrating with your existing Active Directory, through one of the following options:
- AWS Managed Microsoft AD.
- A self-managed Active Directory using a one or two-way trust relationship between an AWS Managed Microsoft AD and a self-managed Active Directory.
- AD Connector if using a self-managed Active Directory.
Note: IAM Identity Center doesn’t support Simple AD as a connected directory.
Option 3: External IdP
If you already have a well-established external IdP that meets your needs, it may be more straightforward for you to connect Amazon AppStream 2.0 directly to that existing IdP. For more information, see AppStream 2.0 Integration with SAML 2.0. This avoids the additional step of setting up IAM Identity Center and allows you to use the integration and user management that you already have in place with the external IdP. However, if you want to centralize identity management across your AWS services or if you don’t have an existing IdP, using IAM Identity Center can be a suitable and convenient option. To use both an external IdP and IAM Identity Center, see Configure SAML and SCIM.
Connect to an Identity Center directory
By default, when you first enable IAM Identity Center, you’re provided with a default directory for creating users and groups without a need for an Active Directory. The default directory can be used to grant users access to a domain-joined AppStream 2.0 fleet (exampledomain.local) and avoid additional setup or cost of AD Connector. The default directory is useful for testing. You can optionally set the Active Directory UserPrincipalName as the email address for the Identity Center user (user1@exampledomain.local). This will allow users to authenticate to AppStream 2.0 using domain credentials, without having to change your identity source in the IAM Identity Center console.
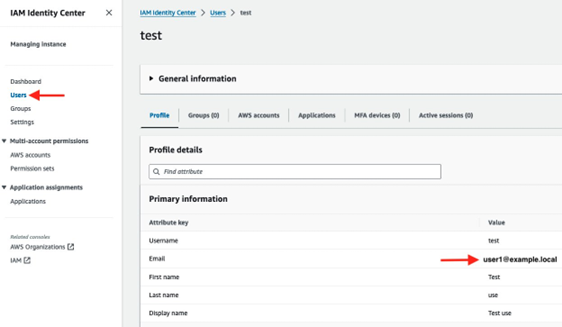
Figure 1: IAM Identity Center user creation.
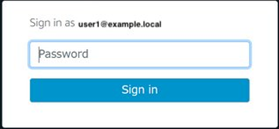
Figure 2: AppStream 2.0 domain-joined fleet prompting for AD password.
When using the IAM Identity Center directory with a domain-joined AppStream 2.0 fleet, user and application management is handled within the Identity Center console. This approach can be convenient for proof-of-concept environments or testing access across different VPCs and domains, though it requires managing password resets in both Active Directory and Identity Center.
For example, you could connect to a Dev fleet in VPC-A that’s joined to the dev-domain.local domain, and then, using the same IAM Identity Center user, change their email address to user1@prod-domain.local to access a Prod fleet joined to the prod-domain.local domain in VPC-B. This allows you to test access across different environments without setting up separate AWS accounts for each.
Use Active Directory as the identity source
To use Active Directory as the identity source, you’ll need to change the identity source in IAM Identity Center, then map attributes and assign users and groups.
Change the identity source to an existing Active Directory
- Open the AWS Management Console and go to IAM Identity Center.
- In the navigation pane, choose Settings. Note that AWS Organizations supports IAM Identity Center in only one Region at a time. If you can’t access settings, check that your console is in the correct Region and that no other Identity Center configurations exist.

Figure 3: Go to IAM Identity Center settings.
- In the details section, under Identity Source, choose Actions and select Change identity source. When switching between Active Directory and other sources, you can switch directories within IAM Identity Center at any time. However, doing so removes all existing permissions to AWS accounts and applications that you previously granted to users and groups in IAM Identity Center. For more information, see Considerations for changing your identity source.

Figure 4: Change identity source
- Next, choose Active Directory, and select the directory ID of an existing Managed Microsoft AD or Active Directory Connector. Choose Next.
- On the Confirm change page, you will see a warning about the identity source change. To proceed, enter ACCEPT, and then choose Change identity source.
- When complete, a message stating You successfully changed the identity source from IAM Identity Center to AWS Managed Active Directory ‘d-xxxxxxx’ appears with confirmations that assignments were removed and that the existing identity source is disconnected and the newly selected source is connected.
You have now successfully connected your Microsoft Active Directory to IAM Identity Center.
Configure AD to IAM Identity Center attribute mappings
- To find the current attribute mappings, in the IAM Identity Center console, choose Settings in the left navigation pane. On the Settings page, choose the Identity source tab, choose Actions, and then select Manage Sync. Under Manage Sync, choose View attribute mapping.

Figure 6: Attribute mappings.
- For AppStream 2.0 stacks connected to an Active Directory domain, the
NameIDvalue needs to be in one of two formats:EXAMPLE\username(using thesAMAccountNameattribute)username@example.com(using theuserPrincipalName[UPN] attribute)
- Ensure the username attribute mapping in IAM Identity Center is configured to populate the
NameIDvalue in one of these formats, depending on your Active Directory setup. This allows AppStream 2.0 to match the user’s identity and grant access to the appropriate resources.- If you’re using the
sAMAccountNameformat, you can specify the domain by using either the NetBIOS name or the fully qualified domain name (FQDN). ThesAMAccountNameformat is required for Active Directory one-way trust scenarios. For more information, see Step 5: Create Assertions for the SAML Authentication Response. - IAM Identity Center supports mapping to the Active Directory UPN. This is the default mapping between Identity Center and Microsoft Active Directory for SAML subject
${user:email}.
- If you’re using the
Set up AD Configurable Sync with the users and groups that you will assign AppStream access to
- In the IAM Identity Center console, choose Settings from the navigation pane.
- On the Settings page, select the Identity source tab, choose Actions, and then select Manage Sync.
- On the Manage Sync page, choose the Users tab, and then choose Add users and groups.
- On the Users tab, under User, enter the username and choose Add.
- Select the check box to the left of the username and then choose Submit.
- In the Manage Sync page, the user that you specified appears in the Users in sync scope list.
- Repeat steps 1 through 6 for all the users that need AppStream 2.0 stack access.
This post uses the AppStream 2.0 stack name ExampleStack, in the US East (N. Virginia) Region. Adapt the naming to meet your needs when testing this solution. You can also add Active Directory security groups, which simplifies managing AppStream 2.0 stack access directly from Active Directory.
Add Active Directory security groups
- In Active Directory, create a security group. In this example the group is named
AWS-0123456789-ExampleStack. - In this example, we created a test user named
test@domain.localand granted group membership toAWS-0123456789-ExampleStack.
Figure 7: Test user added to a group.
- The test user and other users assigned to this security group can now connect to ExampleStack, and access can be managed from Active Directory.
- In the IAM Identity Center console, choose Settings from the navigation pane.
- On the Settings page, choose the Identity source tab, choose Actions, and then select Manage Sync.
- On the Manage Sync page, choose the Groups tab, and then choose Add users and groups.
- On the Groups tab, under Group, enter the security group name and choose Add.
- Select the check box to the left of the security group and then choose Submit.
- In the Manage Sync page, the group that you specified appears in the Groups in sync scope list.
For more information about how to manage Active Directory users and groups using IAM Identity Center, see Using Active Directory as an identity source.
Using the IAM Identity Center Directory
AppStream 2.0 users can be created and managed using the IAM Identity Center dedicated directory. While this method doesn’t seamlessly support AppStream 2.0 domain-joined fleets, it is technically possible to change the email address of the user to match the domain name (see Figure 1 above) You can use IAM Identity Center directory to enable users to access their AppStream 2.0 resources using SAML 2.0 without needing an independent directory. In the following example, users are created and assigned to the AppStream 2.0 Example Stack application using a directory group.
Create users
- In the IAM Identity Center console, choose Users from the navigation pane.
- On the Users tab, choose Add user.
- Complete the user details and choose either to send the user an email with password set up instructions or generate a one-time password that the user can reset at first sign in.
- Complete the wizard to add the user.
- Repeat steps 1 through 4 for all the users who need AppStream 2.0 stack access.
Add a group
- Open the IAM Identity Center console.
- Choose Groups.
- Choose Create group.
- Enter a Group name and Description – optional. The description should provide details on what permissions have been or will be assigned to the group. Under Add users to group, locate the users you want to add as members. Then select the check box next to each of them.
- Choose Create group.
After you add this group to your Identity Center directory, you can assign single sign-on access to this group. For more information, see Assign user access to AWS accounts.
Connect AppStream 2.0 to IAM Identity Center as a SAML application
- In the IAM Identity Center console, choose Applications from the navigation pane.
- Choose Add application.
- On the Select application type page, select I want to select an application from the catalog, search for AppStream, select Amazon AppStream 2.0 and choose Next.

Figure 8: Select Amazon AppStream 2.0 as the application type.
- Edit the display name to fit your needs. In this example, the display name is Example Stack. This name appears in the user portal.
- (Optional) Enter a description.
- In the IAM Identity Center metadata section, under the IAM Identity Center SAML metadata file section, choose Download. This is the metadata file that is used to create the IAM Identity Provider later in this process.

Figure 9: Download the IAM Identity Center metadata.
- In the Application Properties section, keep Application start URL blank and enter the AppStream 2.0 Relay State URL for
ExampleStack. The format ishttps://relay-state-region-endpoint?stack=stackname&accountId=account-id-without-hyphens. For example,https://appstream2.us-east-1.thinkwithwp.com/saml?stack=ExampleStack&accountId=012345678910. For more information, see Configure the Relay State of Your Federation. - In the Application metadata section, select Manually type your metadata values and enter the following values:
- Application ACS URL:
https://signin.thinkwithwp.com/saml - Application SAML audience:
urn:amazon:webservices
For AWS GovCloud (US), enter the following values:
- Application ACS URL:
https://signin.amazonaws-us-gov.com/saml - Application SAML audience:
urn:amazon:webservices:govcloud
Note: The application Assertion Consumer Service (ACS) URL is used to identify where the service provider accepts SAML assertions.
- Application ACS URL:
- Choose Submit.
At this point, the screen should look like Figure 10 that follows. Also, the following message appears: Configuration for ‘ExampleStack’ has been saved. You can now review attribute mappings for this application.

Figure 10: Configuration complete.
Create the AppStream 2.0 identity provider in IAM
- Sign in to the IAM console.
- Choose Identity providers in the navigation pane.
- Choose Add Provider.
- For the Provider Type, select SAML.
- Name the provider. In this example, the provider is named
IAM_IdCtr_ExampleStack. - For Metadata Document, select Choose File, and upload the metadata document that was saved in step 6 of To connect AppStream 2.0 to IAM Identity Center as a SAML application.
- Choose Add Provider. A message stating that you have finished creating a SAML provider should display.
- Select the IdP that was just created (
IAM_IdCtr_ExampleStack) and note the provider Amazon Resource Name (ARN). For example, in this post the ARN isarn:aws:iam::012345678910:saml-provider/IAM_IdCtr_ExampleStack. For AWS GovCloud (US), the ARN format isarn:aws-us-gov:iam::govcloud-account-id-without-hyphens:saml-provider/idp-name.
Create the AppStream 2.0 stack stream access role
Next, create a SAML 2.0 federation IAM role. This establishes the trust relationship between IAM and the IdP (IAM Identity Center). Steps to create this role are available in Create a SAML 2.0 Federation IAM Role, or you can use the following procedure.
Create the AppStream 2.0 stack stream access role
- In the IAM console, choose Roles from the navigation pane.
- Choose Create Role.
- Choose the type of trusted entity, and then choose SAML 2.0 federation.
- Under SAML 2.0 provider, choose the Identity Provider created in the preceding procedure (To create the AppStream 2.0 identity provider in IAM). For this post, use
IAM_IdCtr_ExampleStack. Do not choose either of the two SAML 2.0 access methods (Allow programmatic access only or Allow programmatic and AWS Management Console access). - For Attribute, choose SAML:sub_type.
- For Value, enter
persistent. - Choose Next.
- On the Add permissions page, choose Next. Proceed without selecting any policies.
- Name the role. In this post, the role is named ExampleStackRole. A description is optional.
- Choose Create role. A message stating that the role ExampleStack has been created should display.
- Choose the role and note the role ARN. In this example, the role ARN is
arn:aws:iam::012345678910:role/ExampleStackRole. For AWS GovCloud (US), the ARN format isarn:aws-us-gov:iam::govcloud-account-id-without-hyphens:role/role-name.
Attach an inline policy to the AppStream 2.0 Stream access role
Next, attach an inline policy to the AppStream 2.0 role. Steps to create the inline policy are available at Embed an Inline Policy for the IAM Role, or use the following procedure:
- In the IAM console, choose Roles in the navigation pane.
- Select the role created in preceding procedure (To create the AppStream 2.0 stack stream access role). In this post the role was named
ExampleStackRole. - On the permissions tab, under Permissions policies, on the right side, choose Add Permissions and then Create inline policy.
- Select the JSON tab. Replace the JSON with a policy matching the following inline policy example template. Replace
region-code,account-id-without-hyphens,stack-name,govcloud-account-id-without-hyphens, andgovcloud-stack-name. The stack name is case sensitive.{ "Version": "2012-10-17", "Statement": [ { "Effect": "Allow", "Action": "appstream:Stream", "Resource": "arn:aws:appstream:region:account-id-without-hyphens:stack/stack-name", "Condition": { "StringEquals": { "appstream:userId": "${saml:sub}" } } } ] }For the AWS GovCloud (US-West) Region, use
"Resource": "arn:aws-us-gov:appstream:us-gov-east-1:govcloud-account-id-without-hyphens:stack/govcloud-stack-name".For the AWS GovCloud (US-West) Region, use
"Resource": "arn:aws-us-gov:appstream:us-gov-west-1:govcloud-account-id-without-hyphens:stack/govcloud-stack-name". - Choose Next
- Name the policy. In this example, we named it
ExampleStackAccess. - Choose Create policy.
Create IAM Identity Center attribute mappings
With the IdP, IAM role, and permissions in place, go back to the IAM Identity Center console and configure the attribute mappings.
- In the navigation pane, choose Applications.
- Choose the application that was created in To connect AppStream 2.0 to IAM Identity Center as a SAML application. In this post the application was named ExampleStack and can be found on the Customer managed tab.
- Select Actions and then choose Edit attribute mappings.
- As elsewhere in this post, we used the AppStream 2.0 application template and so the two following attributes will already be populated:
- User attribute in the application: Subject
Maps to this string value or user attribute in IAM Identity Center:${user:email}
Format: persistent - User attribute in the application:
https://thinkwithwp.com/SAML/Attributes/RoleSessionName
Maps to this string value or user attribute in IAM Identity Center:${user:email}
Format: unspecified
- User attribute in the application: Subject
- Choose Add new attribute mapping and configure the new attribute as follows:
- User attribute in the application:
https://thinkwithwp.com/SAML/Attributes/Role - Maps to this string value or user attribute in IAM Identity Center:
arn:aws:iam::012345678910:role/ExampleStackRole,arn:aws:iam::012345678910:saml-provider/IAM_IdCtr_ExampleStack - Format: unspecified
The format used for Maps to this string value or user attribute in IAM Identity Center is
role-arn,identity-provider-arn. Use the ARNs that were noted in previous steps to construct this. Note that there is no space before or after the comma. - User attribute in the application:
- Choose Save.
Assign users and test
To test, assign a user or a group from your directory to the application.
- In the IAM Identity Center dashboard, choose Applications in the navigation pane.
- Select the application that was created. In this post, the application was named
ExampleStack. - Choose Assign users and groups.
- Select the users or groups and choose Assign users.
- On the IAM Identity Center dashboard, find the access portal URL and sign in. For example, enter the username
testuser@domain.local, and enter the applicable password. - Select the Example Stack application.

Figure 11: Search for and select the Example Stack application.
- Confirm successful sign-in to AppStream 2.0.

Figure 12: Successful sign-in.
Conclusion
In this post, you learned how to configure federation between IAM Identity Center and Amazon AppStream 2.0. Identity Center is available across several commonly used AWS Regions. It’s important to note that the Identity Center metadata is unique for each application. If you configure multiple applications, each one will require its own dedicated IAM IdP. For more details on setting up AppStream 2.0 SAML, see Setting Up SAML.
About the Authors
 |
Peter-John is a Senior Cloud Support Engineer at the AWS office in Cape Town, South Africa. As an AWS accredited subject matter expert, he specializes in supporting enterprise customers who are using AppStream 2.0 and FSx for Windows. With extensive experience helping organizations maximize their use of these AWS services, Peter-John is known for his deep technical knowledge and customer-centric approach. |
 |
Marco is a Cloud Support Engineer II at the AWS office in Dublin, Ireland. Marco is an AWS accredited subject matter expert, who specializes in supporting enterprise customers who are using AppStream 2.0. |
|
This post was updated and co-authored by Ese Alofoje. Ese is a Cloud Support Engineer II at AWS. He specializes in Amazon WorkSpaces. Outside of work, Ese enjoys spending time with his family. |
 |
Matt Guanti is a Cloud Support Engineer at AWS. He specializes in Amazon AppStream 2.0 and Amazon EC2 Windows. Outside of work, Matt enjoys playing golf, taking his dog Toby on adventures, and is an avid fan of The Office. |