Containers
How to Run WebAssembly on Amazon EKS
WebAssembly (Wasm) is a revolutionary technology that promises to bring near-native performance to web applications. However, its potential extends far beyond the browser, enabling developers to run Wasm workloads in various environments, such as cloud-native platforms like Amazon Elastic Kubernetes Service (Amazon EKS). In this post, you can explore how AWS empowers users to harness the full potential of Wasm by providing a seamless integration with Amazon EKS.
Understanding Wasm
Wasm is a binary instruction format designed to run alongside JavaScript in web browsers. It offers several benefits, such as improved performance, better security, and the ability to run code written in multiple programming languages on any platform. Although initially designed to run applications in a web browser, Wasm’s versatility has led to its adoption in various domains, such as cloud computing, edge computing, and even blockchain.
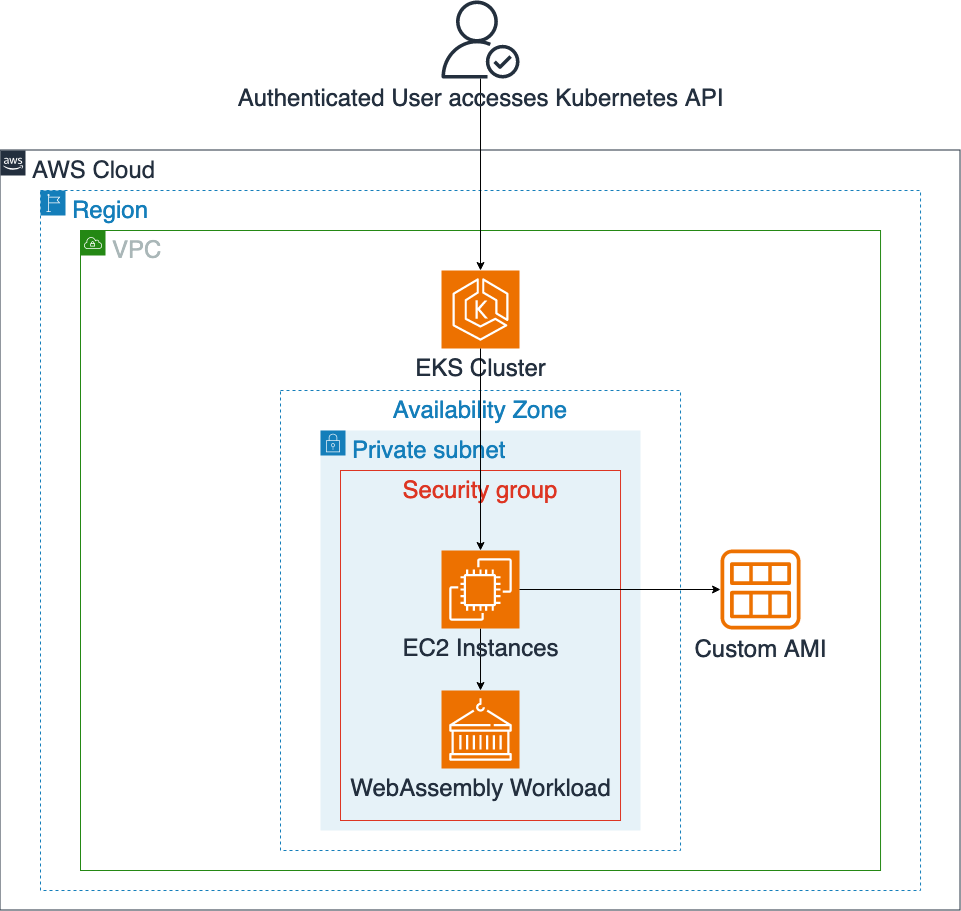
Figure 1: Solution overview
Amazon EKS is a fully managed Kubernetes service that simplifies the deployment, management, and scaling of containerized applications. By using Amazon EKS, users can focus on building and running their applications without worrying about the underlying infrastructure.
The project you build uses HashiCorp Packer to build custom Amazon EKS Amazon Machine Images (AMIs) with the necessary binaries and configurations to enable Wasm workloads. These AMIs are based on Amazon Linux 2023 and make sure of a consistent and reproducible environment for running Wasm applications.
HashiCorp Terraform is used to provision and manage the EKS cluster infrastructure. By using Terraform’s declarative approach, users can deploy and maintain their Wasm-enabled EKS clusters, making sure of consistency and reproducibility across different environments.
The project includes a RuntimeClass definition that enables the EKS cluster to recognize and execute Wasm workloads. This RuntimeClass acts as a bridge between the Kubernetes control plane and the Wasm runtime, making sure of seamless integration and efficient resource management.
To demonstrate the functionality of Wasm on Amazon EKS, the project includes example workloads to deploy. These deployments serve as a starting point for you to understand the process of running Wasm applications on Amazon EKS and can be extended or modified to suit their specific requirements.
The Wasm runtimes in use are Spin and WasmEdge.
Note that building the AMI and the EKS cluster does not qualify for the AWS Free Tier. You are charged for instances created during this process, as well as for the EKS cluster itself.
A step-by-step guide
Install the necessary tools on your system:
- AWS Command Line Interface (AWS CLI) (version 2.15.0 or later): Follow the instructions at “Installing AWS CLI” to install the AWS CLI.
- Packer (version 1.10.0 or later): Follow the instructions at “Installing Packer” to install HashiCorp Packer.
- Terraform (version 1.7.0 or later): Follow the instructions at “Install Terraform” to install HashiCorp Terraform.
- Kubectl (version 1.29.x): Follow the instructions at “for your OS” to install the Kubernetes command-line tool.
- Finch: Follow the instructions at “Installing Finch” to install Finch.
Clone the repository to your local environment.
Set up authentication in the AWS CLI. You need administrator permissions to set up this environment.
To test if your AWS CLI is working and you’re authenticated, run the following command:
The output should look similar to the following:
Building the AMIs
You must have a default VPC in the AWS Region where the AMIs are created, or provide a subnet ID through the subnet_id variable. The remaining variables are optional and can be modified to suit, either through the al2023_amd64.pkrvars.hcl file or by passing through -var ‘key=value’ on the Packer CLI. See the variables.pkr.hcl file for variables that are available for customization.
Before running the commands to create the AMIs, do the following:
- Set the
regionvariable inside thepacker/al2023_amd64.pkrvars.hclfile and in thepacker/al2023_arm64.pkrvars.hclfile.
To build the AMIs, run the following commands on your CLI from inside the repository:
The builds should take about 10 minutes (depending on the instance you choose). After finishing, you should see output similar to this:
Note the AMI-IDs, as you are going to need them in the next step.
Building the EKS cluster
To build the EKS cluster, you must first do the following:
- Update the
regioninside theterraform/providers.tffile to the same Region you have set for Packer inside thepacker/al2023_amd64.pkrvars.hclfile. - Set the
custom_ami_id_amd64parameter and thecustom_ami_id_arm64parameter inside theterraform/eks.tffile to the matching AMI-IDs from the output of Packer.
To build the cluster, run the following commands on your CLI from inside the repository (you must confirm the last command):
The output of terraform apply tells you what Terraform is currently creating. You can use the AWS console (WebUI) to check the progress for individual items. The process should take 15-20 minutes to complete on average.
The output should look similar to this:
Running an example workload with the Spin runtime
When your cluster has finished creating, run the following command to configure kubectl for access to your cluster:
After that, run the following commands to first create RuntimeClasses for both Spin and WasmEdge, and then an example workload that uses Spin as the runtime:
Check if the pod has started successfully (this may take a few seconds the first time you run it):
Now let’s see if it works:
If you now access http://localhost:8080/hello in a browser, then you should see a message saying “Hello world from Spin!”.
This means the Spin runtime is working inside your cluster!
Building a hello-world image and running it with the WasmEdge runtime
For the next example, you are going to build your own image using Finch and then run it in a deployment.
To build and run the image, run the following commands:
Check if the pod has started successfully (this may take a few seconds the first time you run it):
Now let’s see if it works:
If you now access http://localhost:8081 in a browser, then you should see a message saying “Hello world from WasmEdge!”.
This means the WasmEdge runtime is working inside your cluster!
Let’s scale up this deployment:
You should now see 20 pods of your deployment running in the cluster.
Notice how you did not do a multi-architecture build for the container image, but only specified wasi/wasm as the platform, yet your pods run on both ARM64 and AMD64 nodes.
This is what Wasm and Amazon EKS enable you to do!
Congratulations! You can now run Wasm workloads with both the Spin and the WasmEdge runtime on Amazon EKS!
Cleaning up
To clean up the resources that you created, run the following commands from inside the repository (you have to confirm the second command):
This takes around 15 minutes to complete again
After that you still have to delete the custom AMIs and their snapshots. For this you run the following commands:
The first command retrieves the snapshot IDs associated with the custom AMI you created. The second command deregisters the custom AMI. The third command is a loop that deletes each snapshot associated with the custom AMI.
Conclusion
By providing a comprehensive solution for running Wasm workloads on Amazon EKS, AWS empowers users to use the benefits of this innovative technology while maintaining data sovereignty and adhering to their unique security and compliance requirements. The provided code repository simplifies the deployment process, making sure of a consistent and reproducible environment for running Wasm applications at scale. Whether you’re exploring the potential of Wasm for web development, cloud computing, or any other domain, AWS offers a robust and secure platform to unlock its full potential.