AWS Contact Center
Getting started with step-by-step guides for Amazon Connect
Aug 27, 2024: This blog was updated for up-to-date product capabilities.
Onboarding new contact center agents presents a common hurdle in training them to skillfully use their workspace. Agents initially require more effort to serve customers while working toward proficiency. With average annual attrition rates of 30-45%, enhancing agent productivity right away is a top priority. Even after reaching proficiency, agents must have continuous access to the latest updates and best practices for customer service excellence.
Step-by-step guides in Amazon Connect empower companies to create customizable experiences that set their agents up for customer service success from day one. Contact center administrators can now create no-code, UI-based workflows to guide agents through common situations like making reservations, managing payments, and submitting orders. These workflows appear natively in the Amazon Connect agent workspace or can be embedded in your own homegrown desktop. Step-by-step guides dynamically walk agents through each step of fulfilling customer requests, eliminating guesswork or reliance on past experience.

Figure 1: Step-by-step guides for the Amazon Connect agent workspace
In this blog, you will learn how to get started with step-by-step guides for Amazon Connect. First, you will take a look at some key concepts to understand how step-by-step guides work. Then you will walk through deploying a sample step-by-step guide experience. Lastly, you will explore how to further customize your guides to meet your specific business need by leveraging other contact flow blocks or creating custom views. By the end of this blog you will have all the insights you need to get started designing your own step-by-step guides in Amazon Connect.
Key Concepts
There are a few key concepts to know before creating step-by-step guides in your contact center. These concepts allow you to build out workflows with no coding experience in the same environment where you create other Amazon Connect flows. Specifically, we will discuss flows, views, and the ‘show view’ flow block.
Flows
Similar to other customer experiences within your contact center, your step-by-step guide experience is created using Amazon Connect flows. Flows is a drag-and-drop workflow designer that contact center managers can use to create, personalize, and automate back office processes and end-to-end customer and agent experiences across channels. With using flows, you can easily integrate different features of Amazon Connect using the workflow designer and customize the experience from start to finish. What differentiates a “step-by-step guides flow” is the use of the Show View flow block.
Once you have built your views and built your step-by-step guides flow, you are ready to set up a trigger in your other flows. You can define which flow to trigger when the contact lands in the agent workspace by using the Set event flow block before the contact reaches the queue. The following events are supported for guides:
- Default flow for agent UI: Specifies the flow to be invoked when a contact comes into the agent workspace. You can use this event to set up a step-by-step guide to be displayed to the agent in this scenario. This can be used to provide agents with workflows to be completed during the life of the contact.
- Disconnect flow for agent UI: Specifies the flow to be invoked when a contact that is open in the agent workspace ends. You can use this event to set up a step-by-step guide to be displayed to the agent in this scenario. This can be used to give agents the opportunity to enter disposition codes at the end of a contact.
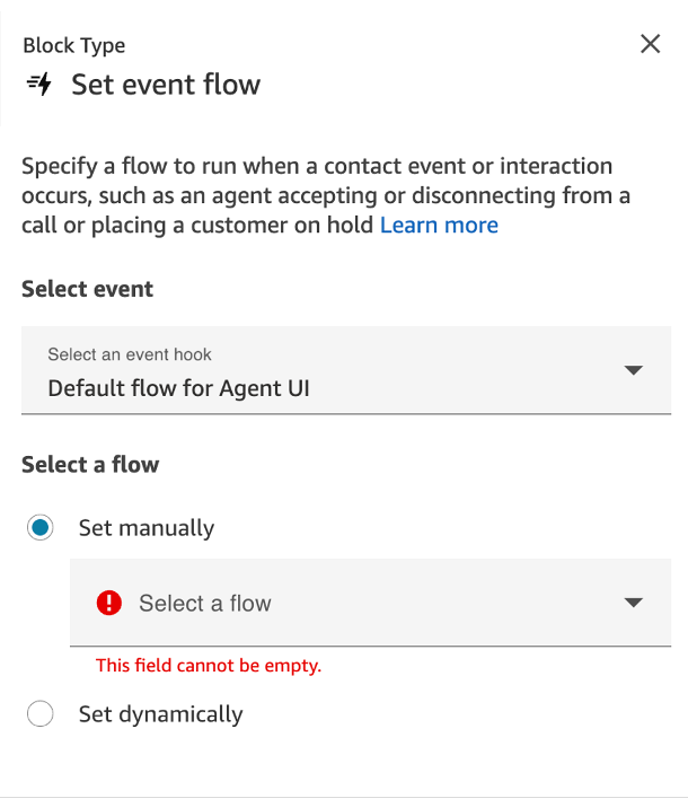
Figure 2: Example of configuring the Default flow for Agent UI event hook using the Set event flow block
Views
Think of views as the visual containers at our disposal for helping agents through a process. For instance, say an agent needs to book a round trip flight for a customer. This requires collecting to and from airport details to schedule flight, traveler information, and asking about additional add-ons. Each step could be a different view.
There are two types of views — Amazon Web Services (AWS)-managed views and customer-managed views. AWS-managed views are a set of pre-configured views that you can use to display information to agents in the agent workspace. You can use these AWS-managed views for common use cases that require less customization. Amazon Connect includes a set of 5 kind of views that are the AWS-managed. Learn more about these views in the Administrator guide.
Customer-managed views give you the flexibility to customize the look and feel of views based on your requirements. Every contact center might have a different set of requirements, so you can use the no-code UI builder to create a view that fits your requirements. All the same components (such as form inputs, cards, or icons) that are used in the AWS-managed views can be leveraged in customer-managed views, but now you have the ability to update the styling, formatting, and layout of the view. At the bottom of this blog under Building a customer managed view, there is a sample you can deploy.
Show View flow block
To tell the agent workspace to display a view, you will use the Show View block. This block can be found in the flow editor under Integrate. Using the flow editor embeds views within the larger contact experience allowing you to take advantage of other Amazon Connect features such as Customer Profiles, Cases and other AWS services such as AWS Lambda.
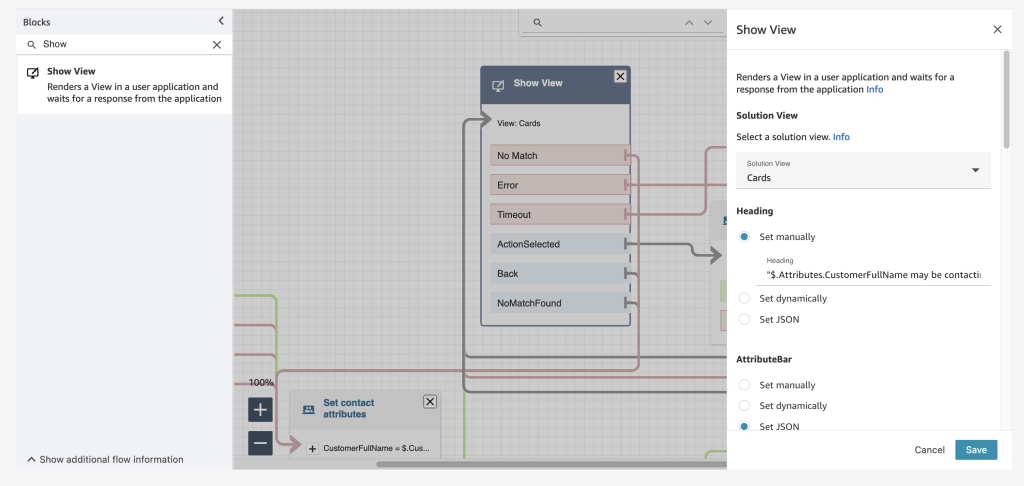
Figure 3: Example of the Show View block within the Flow editor
As you publish your views, you will notice those views populate in the drop down inside of the Show View block. You will use the Show View block to select which view you want to display. Once you have selected your view, you will then need to properly configure any dynamic value settings inside the Show View block and also configure your branching based on any actions the agent can take from the View. You will leverage JSON to properly pass in the right parameters to your rendered view.
Deploying a sample step-by-step guide
To make better sense of these concepts, you can create a sample step-by-step guide within an existing Amazon Connect instance. In this example, a customer wants to book a new car rental reservation. With step-by-step guides, you will be able to provide agents with a set of potential options using the Cards View. Then, you can use the Form View to collect the information needed to set up the reservation. Once all the necessary data is provided and submitted, a Confirmation View will be used to show that the application has been processed.
Prerequisites:
- An AWS Account.
- An Amazon Connect instance with administrator access.
- Working knowledge of Amazon Connect Flows and queues.
Step 1: Configure security profiles
In order to use step-by-step guides and create views, additional security profile permissions will be needed. To add these permissions:
- Navigate into your Amazon Connect instance > Users > Security Profiles.
- Select the security profile to which you want to grant permission to create and access step-by-step guides.
- Select Channels and Flows.
- Select the All checkbox next to the Flows type.
- Select the All checkbox next to the Views type.
- Keep in mind, agent profiles may not need any or all parts of this permission. This permission is to allow the user to execute actions on Views such as View, Edit, Create, Remove.
- Select Agent Applications.
- Select the All checkbox next to the Custom Views type. This permission is to allow the user to access step-by-step guides in the agent workspace or your custom agent application.
- Select Save.
- Repeat steps 2-9 for all the security profiles which which you want to use step-by-step guides.
Step 2: Create the guide flow
Step-by-step guides for the Amazon Connect agent workspace takes advantage of the visual flow editor within your Amazon Connect instance. When using AWS-managed views, you can import and export these flows just like any other flow. To import the SBSGuides_Travel flow:
- Download the flow here.
- Note: Depending on your browser you may need to right click the link and choose Save Link As in order to download the flow properly.
- Navigate into your Amazon Connect instance > Routing > Flows > Create flow.
- Select the drop-down arrow on the right and choose Import (beta) and import the downloaded flow.
- Select Publish.

Figure 4: Imported guide flow
This flow does the following:
- Activates logging behavior.
- Displays a Card View that has pre-defined workflows for this specific use case. The first Match Card (New car rental reservation) is the only one that has a workflow built. Here you can display cards to your agents based on different workflows that are relevant to the contact. In this example, we showcase a few workflows that are car rental / travel related. These workflows can be dynamic depending on the type of contacts you receive.
- Captures the selection of the agent and routes accordingly. Checking the value of this contact attribute informs you what to do next.
- To capture the action selected, use $.Views.ViewResultData.actionName.
- To capture the Match Card selected, use $.Views.ViewResultData.Id.
- If the Match Card name/id is “New car rental reservation” you are brought to a second Show View block to fill out a form to start this reservation. The form is made up of different form sections that contain smaller components to collect pick up details for this car reservation. For example: text input, date picker, and time picker.
- To capture what the agent input into these fields use $.Views.ViewResultData.FormData.<name_of_form_component>. You will see this across various Set contact attribute blocks in this contact flow. The main objective is to capture the input an agent is providing regarding this car reservation.
- For dropdowns, checkboxes, and radio buttons in this example, you may notice the Show View block response is in an array form. Therefore in order to access that data in your contact flow, you need to use: $.Views.ViewResultData.FormData.<name_of_form_component>.0
- Note this is different for customer managed views (see Customizing step-by-step guides below).
- Displays a Form View that captures drop off details for this car reservation.
- In between Views, you can validate the proper data was input by agent or run AWS Lambda functions to process this information with your backend data systems.
- Displays a Form View that captures car selection details for this car reservation.
- Displays a Form View that captures trip extras for this car reservation.
- Displays a Form View that displays a review and submit view for this car reservation.
- This view takes all the information that was captured throughout the workflow (stored as attributes) and displays it back to the agent for confirmation with customer.
- Displays a Confirmation View.
- This view lets the agent know that the car has been successfully reserved and advises them about next steps. They can also navigate back to the initial Card View if they need to go through another workflow.
With all these views, you can leverage your existing contact attributes from the original contact. Let’s say you have customer data stored in your contact attributes that display Customer Name. You can use the syntax $.Attributes.<name_of_attribute> to display dynamic data inside the Views you create. Following the same setup in your contact flow on Step 8 above, you can display contact attributes inside your View or use attributes to make routing decisions within your Guide flow allowing you to create dynamic agent experiences. In this example above, the customer name in the Attribute bar is hard coded, but you can adjust for your use case.
Step 3: Create the handler flow (inbound flow experience)
Step-by-step guide flows are specific to helping agents with customer support, so you won’t want to be sending contacts (e.g. chats/calls) to your SBSGuides_Travel flow. To isolate step-by-step guides from the routing logic of the contact experience, you will use a handler flow. The handler flow is the inbound contact flow that the original contact flows through. This is where you will define your routing experience, which queue to route to, and which guide flow to run when an agent is connected to the contact. To import a sample SBSGuides_Travel_Handler flow:
- Download the flow here.
- Note: Depending on your browser you may need to right click the link and choose Save Link As in order to download the flow properly.
- Navigate into your Amazon Connect instance > Routing > Flows > Create flow.
- Select the drop-down arrow on the right and choose Import (beta) and import the downloaded flow.
- Select Publish.

Figure 5: Sample inbound contact flow that uses Set event flow block to define which guide flow to run
This flow does the following:
- Activates logging behavior.
- Provides your customer experience. This is where you can play prompts, look up customer information, and set your working queue. In this example, we are only playing a prompt and setting a queue.
- Defines which guide flow to be run when the agent connects using the Set event flow block.
- Transfers to queue.
Step 4: Configure the handler flow
You must configure and fix unresolved resources for this flow to work in your specific environment.
- You should have the SBSGuides_Travel_Handler flow open from step 3.
- Select the Set event flow block.
- Update the flow to SBSGuides_Travel imported in step 2.
- Select Save.
- Select the Set working queue flow block.
- Reselect Basic Queue.
- Select Save.
- Note: You may still see a warning error on the Set working queue block even after this change.
- Publish your flow.
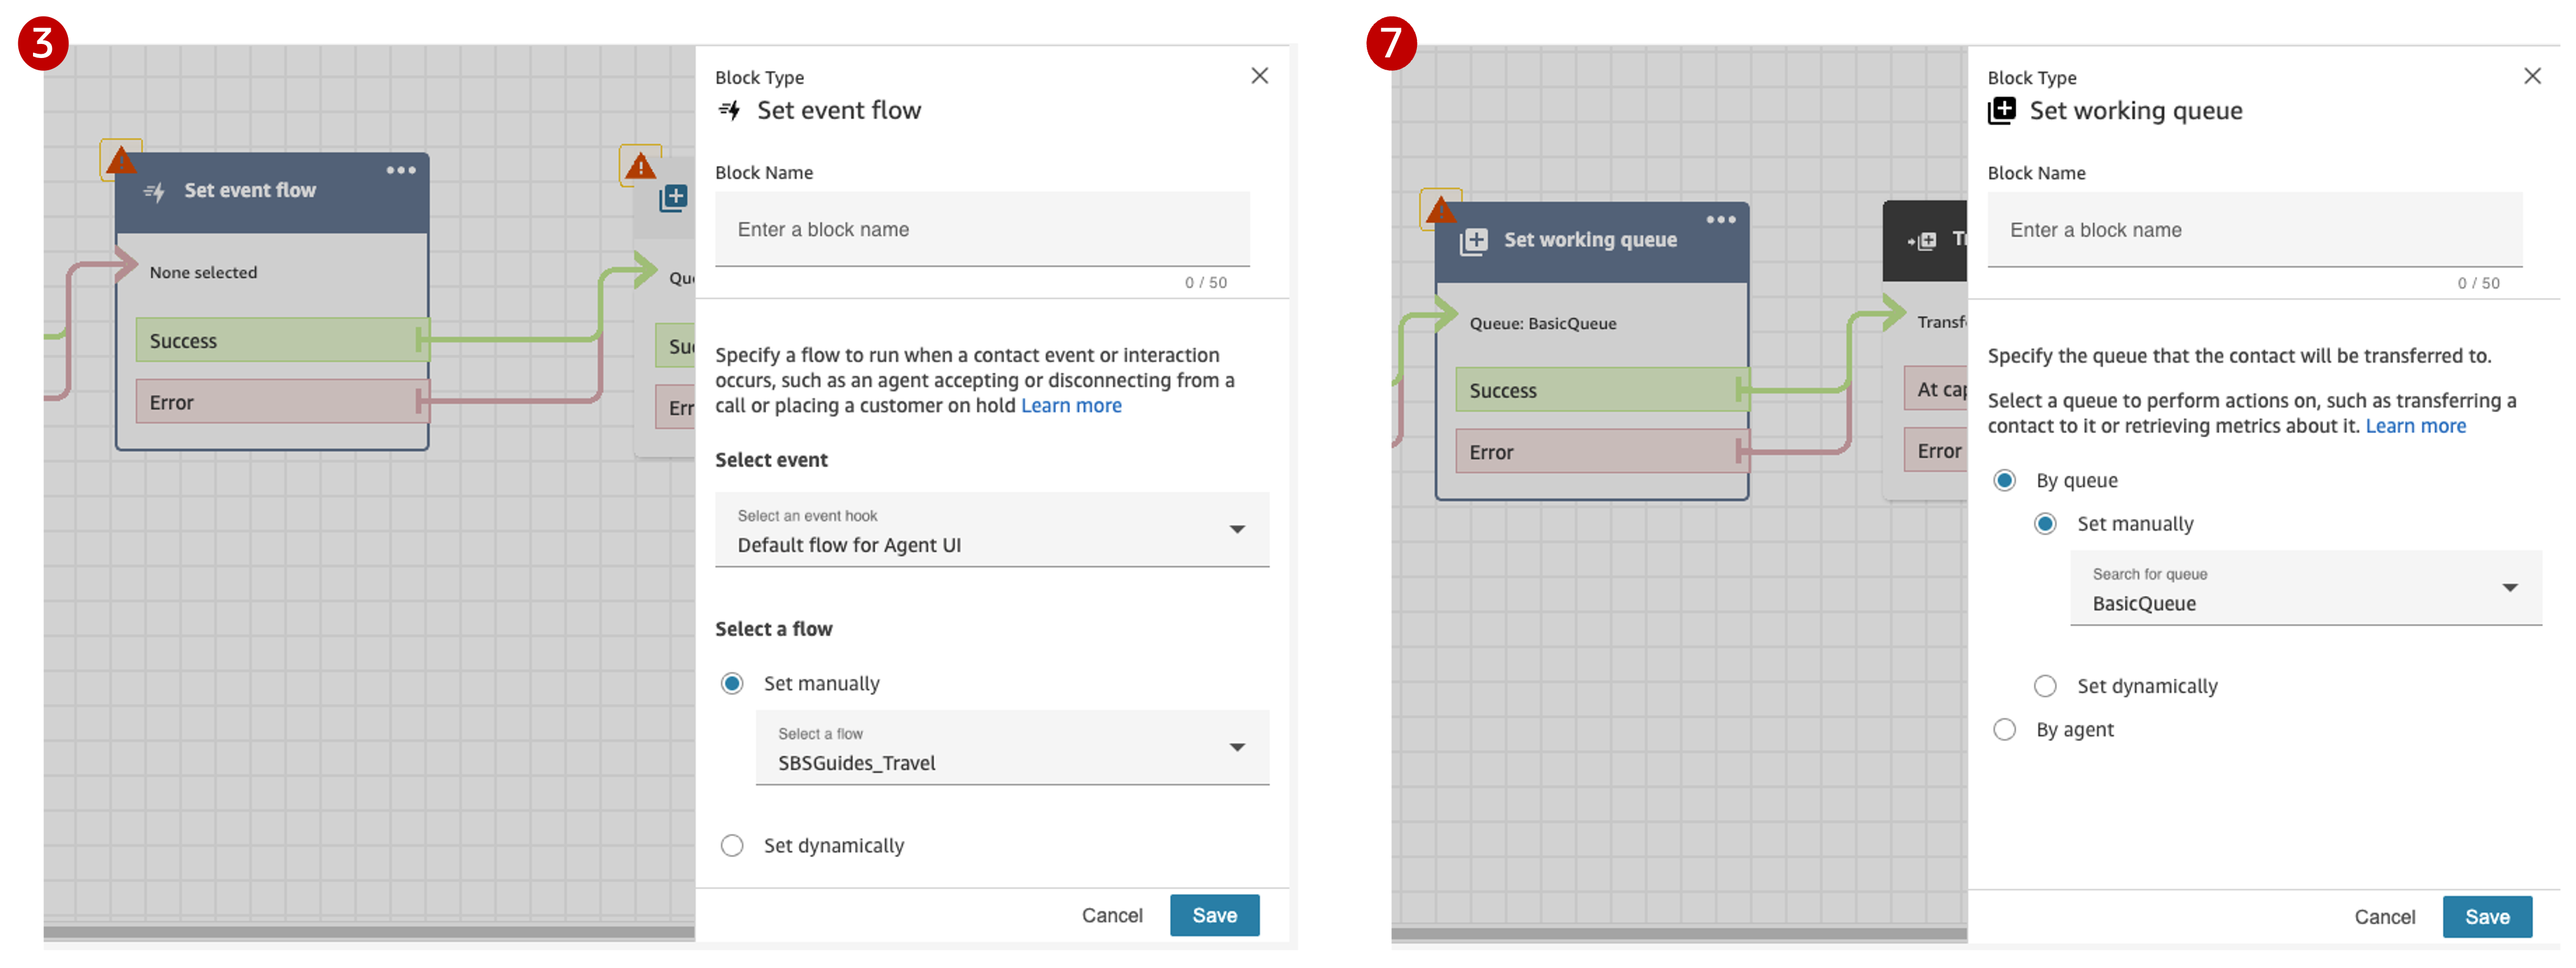
Figure 6: Updating the SBSGuides_Travel_Handler flow (step 3 and step 7)
Step 5: Configure routing
To test your new step-by-step guide, you need to associate your handler flow with a phone number used for the Voice channel. To do this:
- In the Amazon Connect instance, navigate to Channels > Phone Numbers and select the phone number you will be using to test the example.
- Set that number’s Contact Flow/IVR to the SBSGuides_Travel_Handler and select Save.
Step 6: Test the example
You are now ready to test out the new step-by-step guide. To do this:
- Log into the Amazon Connect agent workspace as an agent who can receive calls from the queue you set when configuring the SBSGuides_Travel_Handler flow.
- Make sure you are set to “Available”.
- Call the contact center using the phone number you configured in step 5. This should route directly to an agent on the queue assigned and pop up the step-by-step guide you created.
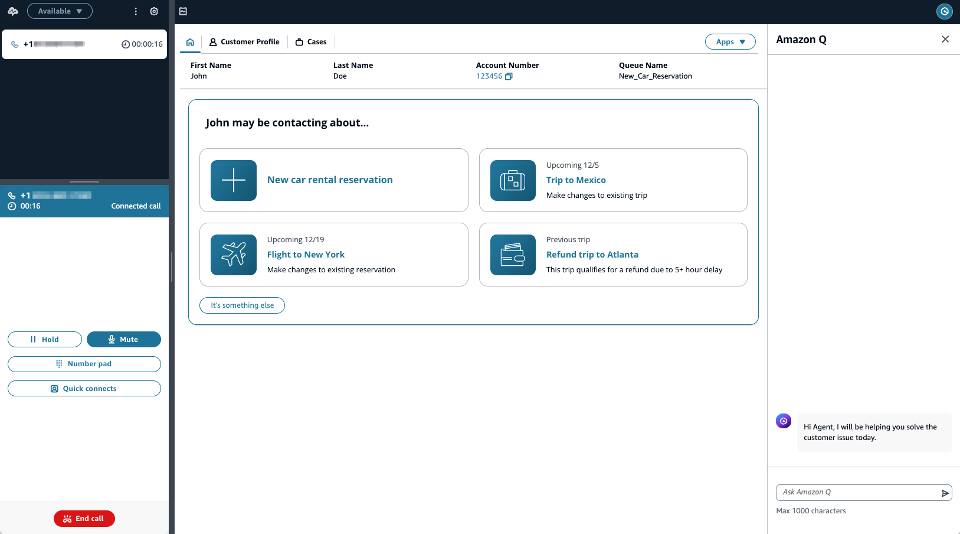
Figure 7: Example of the agent workspace view for the demo
Feel free to play around with the step-by-step guide and see the different options available to you. In this post you have only configured the “New car rental reservation” action but additional actions can easily be added by following a similar pattern:
- Define the Action name or Match Card ID name within the “Details” section of a Card View’s card definition.
- Check the value of $.Views.ViewResultData.actionName or $.Views.ViewResultData.Id depending on your use case (Solve Card Action or Match Card ID).
- Based on that value, setup routing logic in the contact flow to send the agent to the next relevant Show View block.
Customizing step-by-step guides
Now that we have a functional step-by-step guide, let’s explore how we can customize and expand from here. It is important to note that you can use other contact flow blocks inside a step-by-step guides flow. For example, you may need to look up customer information using a Customer Profile block or trigger a back-end process using an AWS Lambda function block. Below we will dive into how to integrate our step-by-step guides with AWS Lambda and customize visual styles.
Integrating with AWS Lambda
Like any other Flow you can integrate a step-by-step guides flow with AWS Lambda by using the Invoke AWS Lambda Function block. This is useful if you need to process data after the agent has entered it. For instance, when the agent files a claim you may want to save those claim details to a database or send a notification.
The Show View block’s output is saved under the $.Views.ViewResultData attribute. This attribute is a JSON object with different definitions depending on what view is used. For instance, you saw with the Cards View you were able to see what action the agent clicked by looking at $.Views.ViewResultData.actionName. Similarly, you can capture the data in form inputs by looking at the JSON output.
| AWS managed views | $.Views.ViewResultData.FormData.<name_of_component> |
| Customer managed views | $.Views.ViewResultData.<name_of_component> |
For more details on the format of $.Views.ViewResultData see the Output example under your specific type of view in the administrator guide.
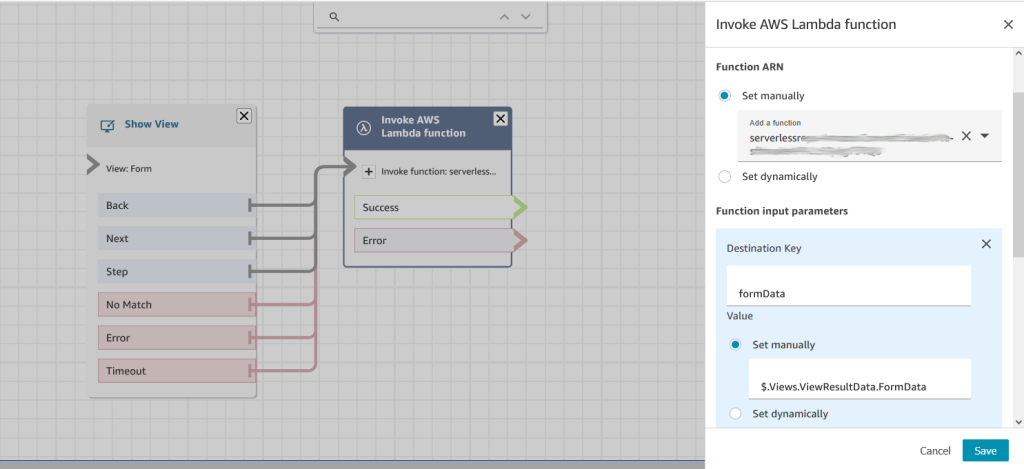
Figure 8: Example of passing in form data into your AWS Lambda function from within a contact flow
Using styles
You can stylize views how you want using standard CSS style sheets. In the Show View block there is a section for passing custom style elements to the view when using AWS-managed views. This changes the appearance of the view when it is triggered. These styles can be set manually or dynamically passed using contact attributes. A list of all the style elements available for customization can be found in our interactive guides documentation.
Building a customer managed view
To build your own customer managed view, you can leverage the no-code UI builder by navigating to Routing > Flows > Views > Create view. Here you can build a custom view that is tailored to your requirements. You can drag and drop components onto the canvas to construct the view and adjust the properties on the right pane to change values and update styling. If you select Template on the left pane, you will see a few templates available for use. Keep in mind, clicking on a template will remove any pre-existing content on the canvas.
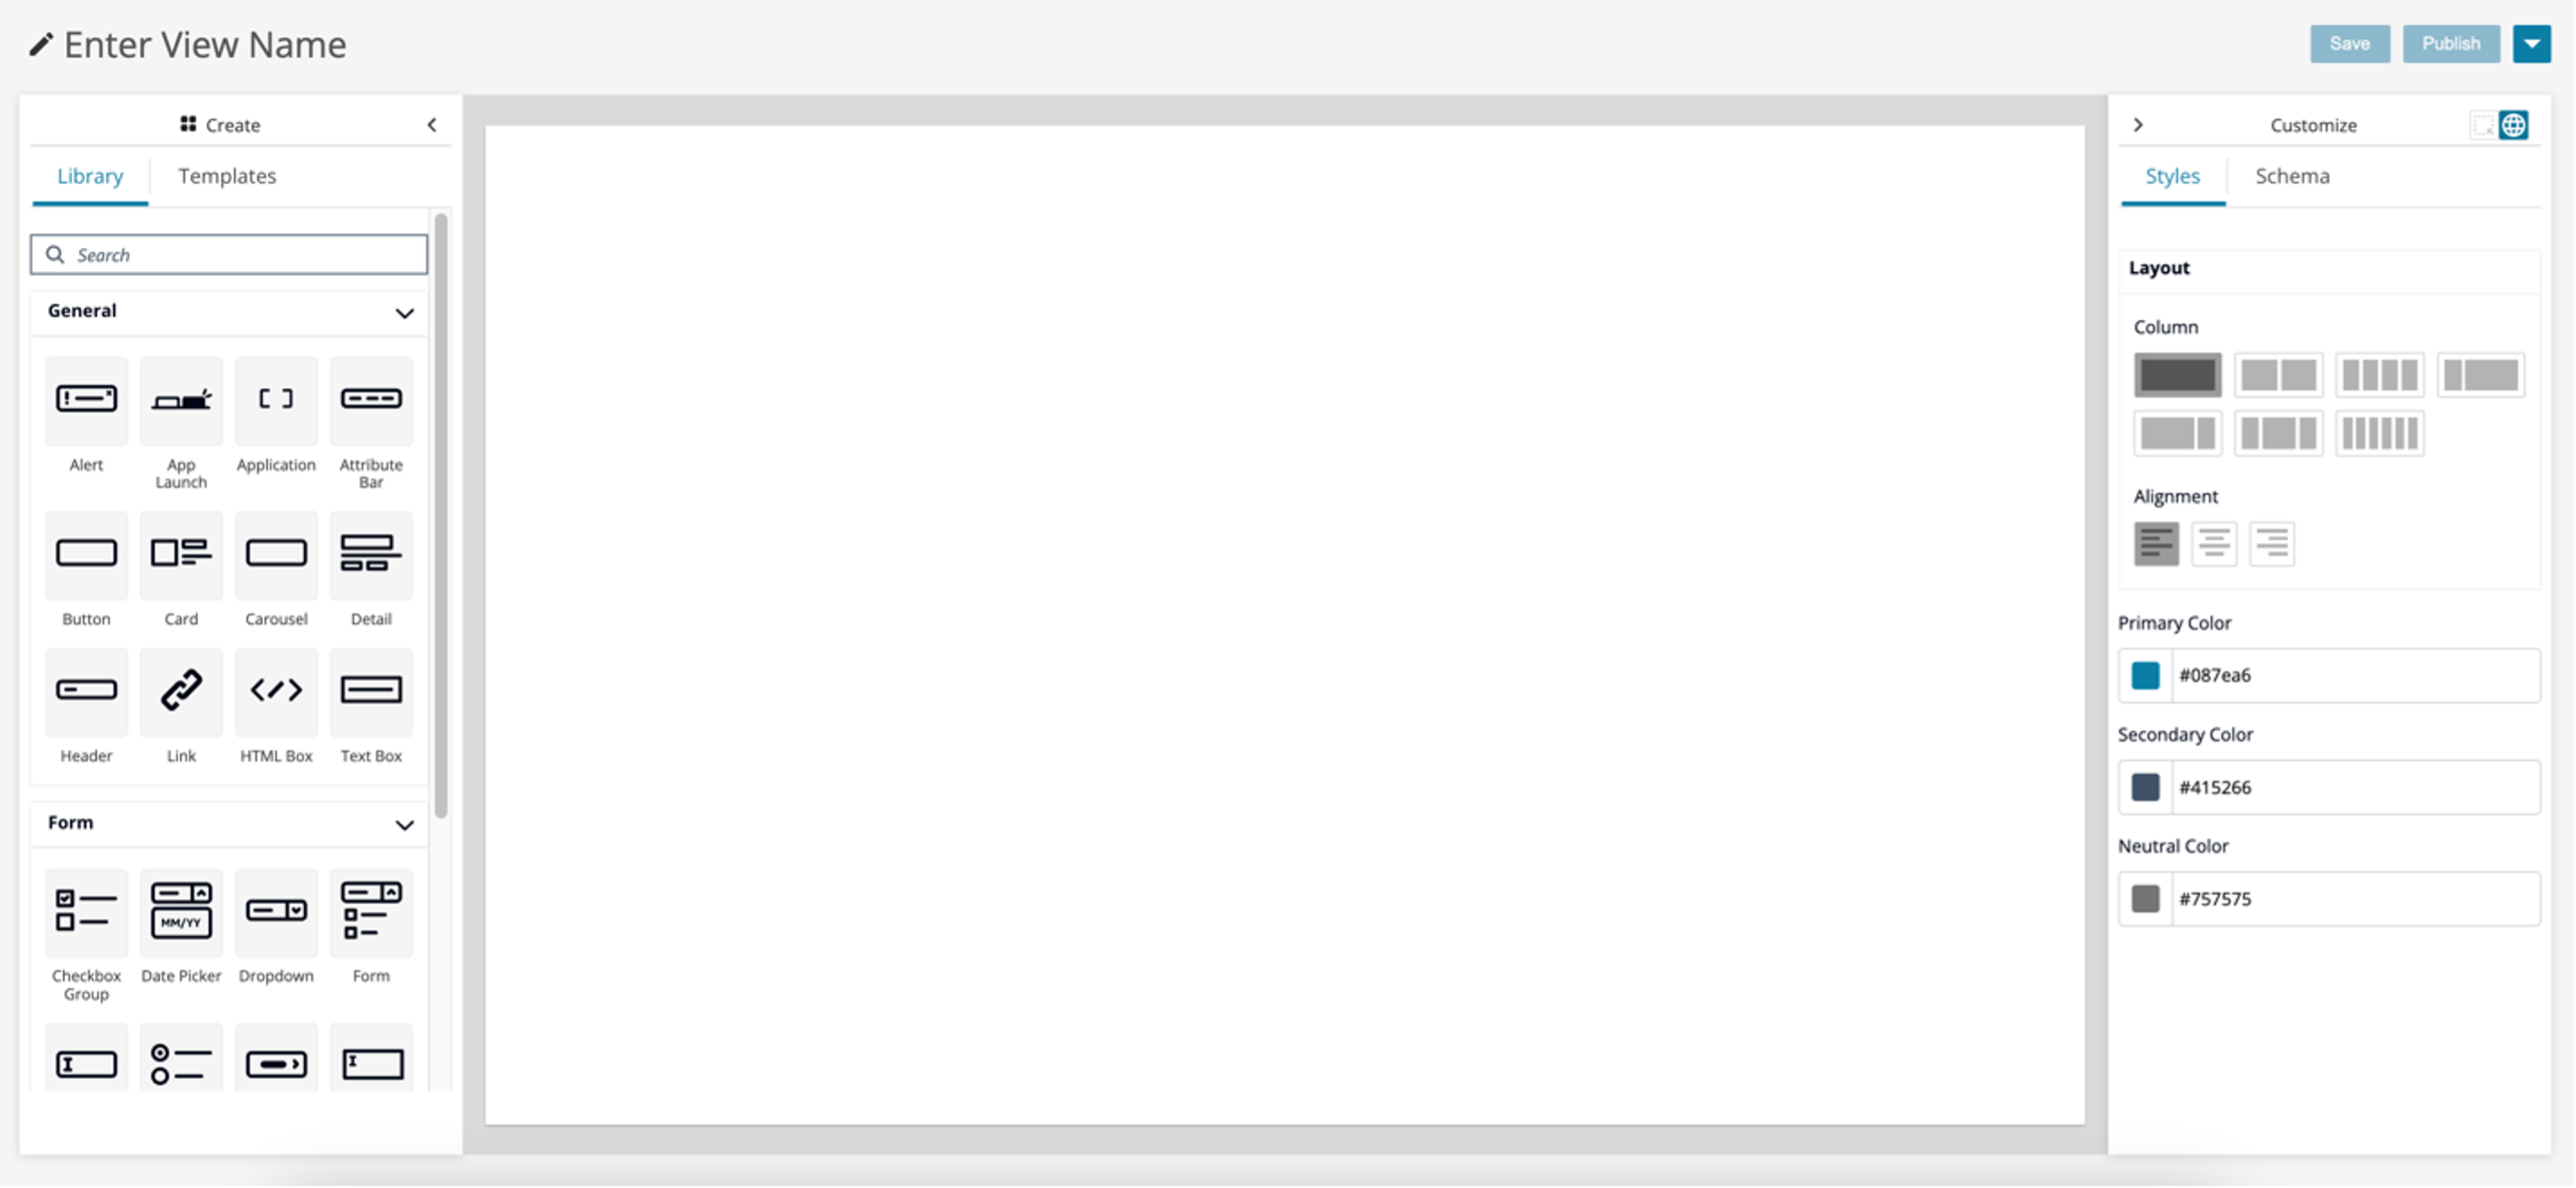
Figure 9: No-code UI builder
To start with a pre-built example as shown in the image below, you can deploy this customer managed View sample in your instance by Creating a stack on the AWS CloudFormation console.
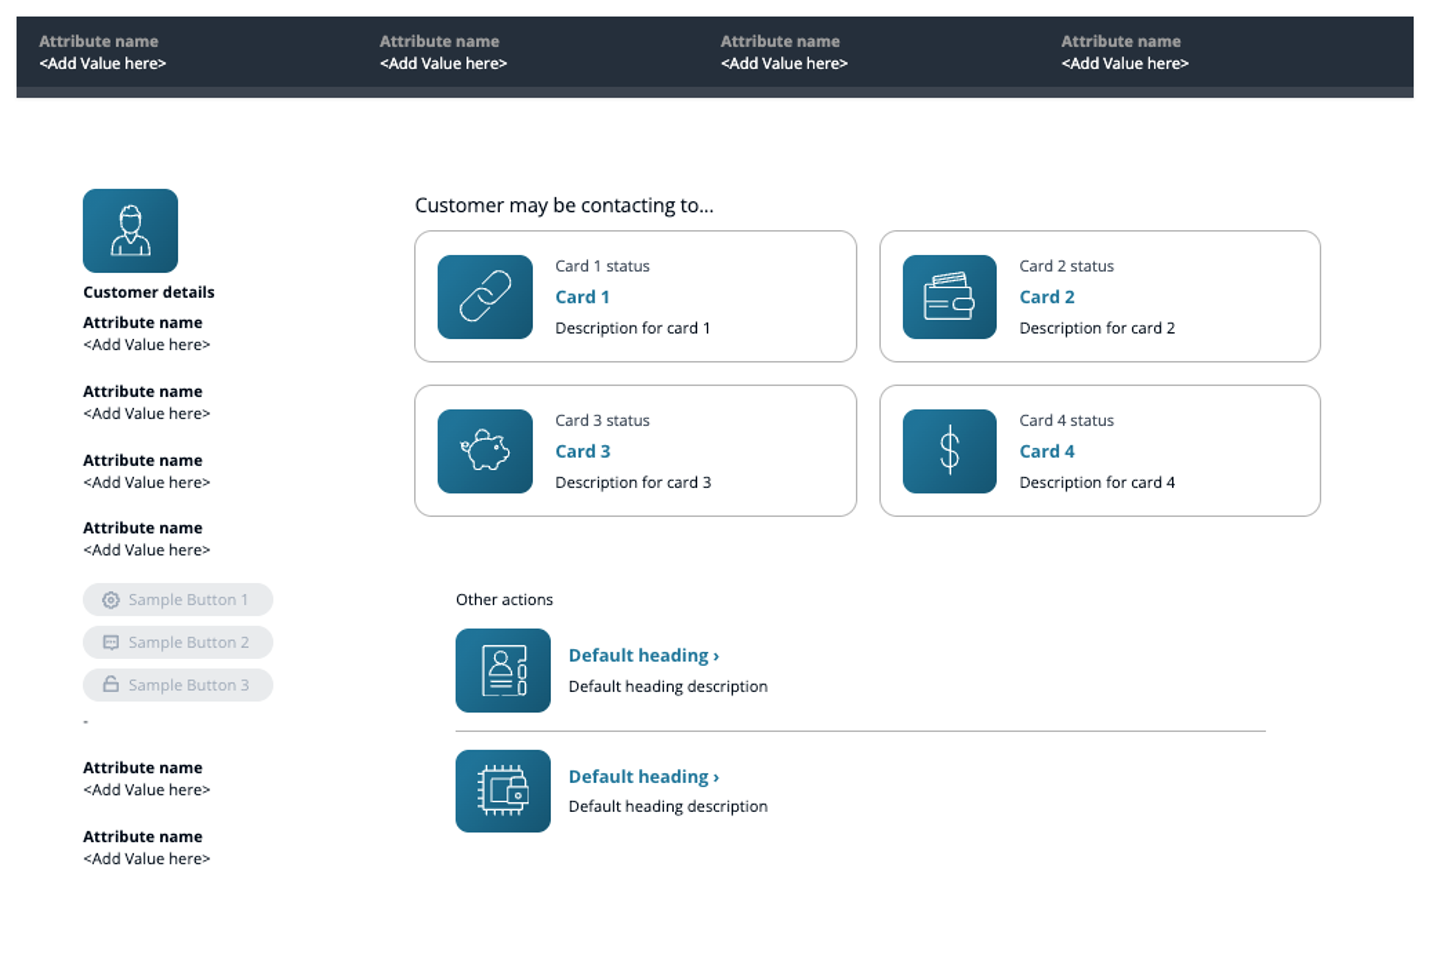
Figure 10: Sample customer managed view that can be deployed with template above
Cleanup
Once you have finished experimenting with the step-by-step guide you can clean it up by following these steps:
- In your contact center navigate to Channels > Phone Numbers and select the phone number you used to test the example.
- Set that number’s Contact flow/IVR to something other than the two flows deployed in this example and select Save.
- Using the AWS CLI run the delete-contact-flow command for both the SBSGuides_Travel flow and the SBSGuides_Travel_Handler flow.
- If you deployed the pre-built sample under the section, delete the stack from CloudFormation to remove the View resource that was created.
Conclusion
In this blog post, you had the chance to learn key concepts for step-by-step guides in Amazon Connect. Creating step-by-step guides for your contact center enables agents to take relevant steps to help out your customers without relying on months of learned experience. This approach can not only speed up the training of new recruits but also can ensure that all agents have easy access to the latest operational procedures and best practices. Using the no-code UI builder makes it easy to build out powerful step-by-step guides and making it easy for contact center administrators to continually refine and customize their views to reflect the most current workflows. With this feature built-in, you can more easily take advantage of native features available within Amazon Connect and the broader AWS ecosystem. To learn more about using step-by-step guides, review our Amazon Connect administrator guide or reach out to your AWS specialist.
Ready to transform your customer service experience with Amazon Connect? Contact us.
Author bio
 |
Freddy Jimenez (he/him) is a Senior Solutions Architect at AWS specialized in Amazon Connect based in Chicago, Illinois. He works with customers across various industries on leveraging Amazon Connect to revolutionize their customer experiences. He has deep expertise in the contact center technology space with experience in operations and professional services. Freddy finds joy in running, exploring new destinations through travel, and cherishing moments with his miniature Goldendoodle. |
 |
Danbee Park (she/they) is a Sr. Front End Engineer at Amazon Web Service (AWS) based in New York. She has developed connect services focusing on the agent experience. |