背景介绍
Amazon Redshift 是使用最广泛的云数据仓库。通过它您可以快速、简单而经济高效地使用标准 SQL 和现有商业智能 (BI) 工具分析您的所有数据。它还允许您使用高性能存储中的列式存储通过复杂的查询优化对 TB 级到 PB 级结构化和半结构化数据运行复杂的分析查询,并能大规模执行并行查询。随着新业务的发展人们对数据的实效性要求越来越高,离线数据都是每日或每小时才能就绪,分析人员无法及时的洞察数据,能够在数据产生后的分钟级甚至是秒级可用是数据分析平台建设的难题。
本文将针对在Amazon Redshift的使用场景下,探讨如何准实时或实时的摄入数据到Redshift,以使得数据立即可用,并可以依此来构建实时数仓架构。
Redshift摄入外部数据的常见方式
INSERT
Amazon Redshift 支持标准的数据操作语言 (DML) 命令(INSERT、UPDATE 和 DELETE),您可使用这些命令插入表中的行。使用单个 INSERT 语句填充表可能过于缓慢,所以只在数据量较少的情况下适用,并尽量避免单行插入,可以将多个行合并到一个语句中插入降低开销。
insert into customer values
(14, default, default, default),
(15, default, default, default);
COPY
推荐使用COPY进行数据加载,COPY命令可以从Amazon S3/Amazon EMR/Amazon DynamoDB/Remote Hosts等多个数据源将数据加载到Redshift中。COPY 命令能够同时从多个数据文件或多个数据流读取。Amazon Redshift 将工作负载分配到集群节点并且并行执行加载操作,包括对行进行排序和跨节点切片分配数据。
copy customer
from 's3://mybucket/mydata'
access_key_id '<access-key-id>'
secret_access_key '<secret-access-key'
delimiter '|';
Amazon Kinesis Data Firehose
Amazon Kinesis Data Firehose 是一项完全托管的服务,用于实时提供流式处理数据到目标如Amazon Redshift。使用 Kinesis Data Firehose,您无需编写应用程序或管理资源。对于Redshift目标,Kinesis Data Firehose 先将数据传输到您的 S3 存储桶,然后发出 Amazon Redshift COPY命令将数据加载到您的 Amazon Redshift 集群中。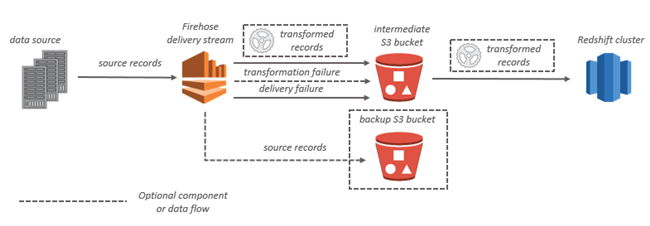
我们可以在Kinesis Data Firehose中设置到Redshift的传输流,配置包括缓冲区大小和缓冲时间等参数,在Firehose传输流配置中,我们可以看到Firehose为我们自动生成了COPY命令,如下图所示:
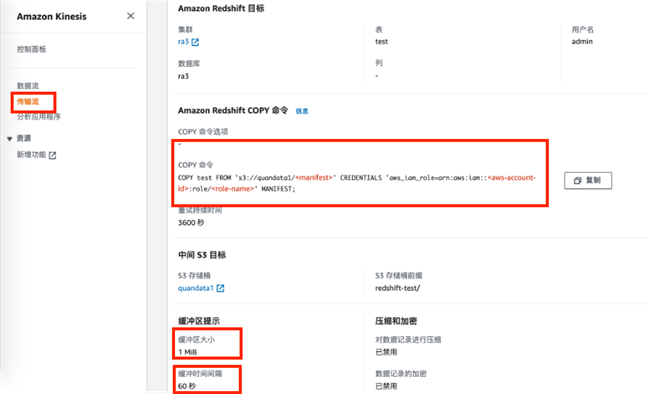
Kinesis Data Firehose会定时按设置的触发条件,使用下面命令将数据摄入到Redshift中。
COPY test FROM 's3://bucket/<manifest>'
CREDENTIALS 'aws_iam_role=arn:aws:iam::<aws-account-id>:role/<role-name>'
MANIFEST;
AWS DMS
AWS Database Migration Service (AWS DMS) 是一项云服务,可轻松迁移关系数据库、数据仓库、NoSQL 数据库及其他类型的数据存储。你可以利用AWS DMS将多种数据源的数据加载到Redshift中,DMS支持增量和全量数据加载,也支持CDC数据同步至Redshift。
AWS DMS 从源数据库读取数据并创建一系列逗号分隔值 (.csv) 文件。对于完全加载操作,AWS DMS为每个表创建文件。当文件上传到 Amazon S3,AWS DMS发送 COPY 命令,将文件中的数据复制到 Amazon Redshift。对于变更处理操作,AWS DMS将更改复制到 .csv 文件。AWS DMS接下来将更改文件上传到 Amazon S3 并将数据复制到 Amazon Redshift。
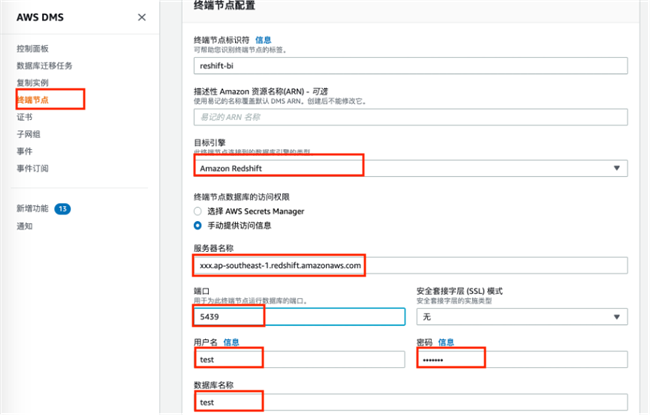
具体操作如下:首先配置目标终端节点,选择目标引擎为Amazon Redshift。
然后创建新的数据库迁移任务
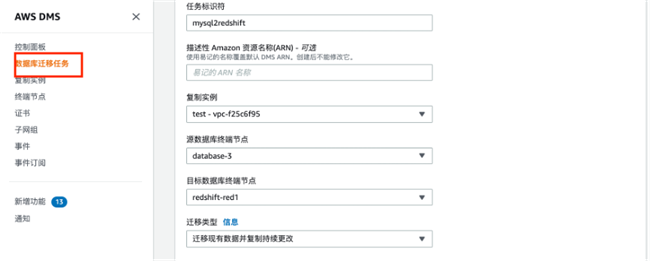
我们可以在DMS中选择是进行持续复制还是全量复制。在DMS中将Redshift作为目标的详细配置步骤可以参考:
https://docs.thinkwithwp.com/zh_cn/dms/latest/userguide/CHAP_Target.Redshift.html
AWS Glue
AWS Glue 是一项完全托管的 ETL(提取、转换和加载)服务,使您能够轻松而经济高效地对数据进行分类、清理和扩充,并在各种数据存储和数据流之间可靠地移动数据。在将数据移至 Amazon Redshift 集群时,AWS Glue 作业将文件上传到 Amazon S3 并向 Amazon Redshift 发出 COPY命令以实现最大吞吐量。
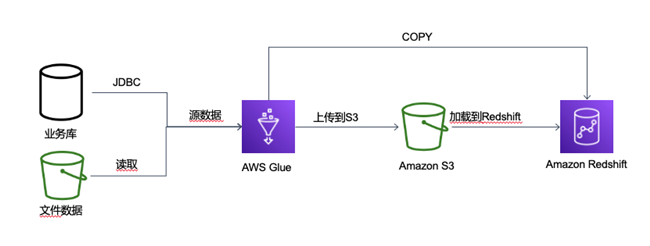
Glue中可以构建ETL脚本将数据写入到Redshift中。
my_conn_options = {
    "dbtable": "redshift table name",
    "database": "redshift database name",
    "aws_iam_role": "arn:aws:iam::account id:role/role name"
}
glueContext.write_dynamic_frame.from_jdbc_conf(
    frame = input dynamic frame,
    catalog_connection = "connection name",
    connection_options = my_conn_options,
    redshift_tmp_dir = args["TempDir"])
利用Redshift Federated Query实现数据实时摄入
除了通过手工构建数据加载管道之外,通过AWS的托管服务可以更容易的将数据加载到Redshift中,但上述数据加载的方式,除了INSERT外(无法应对大批量数据),底层都是采用COPY的方式进行数据加载。COPY命令本身需要消耗Redshift集群的资源进行数据的加载工作,更频繁的COPY命令会影响到其他查询或ETL作业的正常运行。另外也无法做到数据的实时摄入(最少分钟级)。
Amazon Redshift支持Federated Query,利用Federated Query功能可以直接查询存储在Amazon Aurora PostgreSQL/MySQL与Amazon RDS for PostgreSQL/MySQL数据库内的数据。Federated Query可实现实时数据集成并简化ETL处理流程和直接在Amazon Redshift中连接实时数据源并借此提供实时报告与分析结果。
借助Federated Query和简化的ETL流程,我们可以实现redshift的实时数据摄入能力,详细方案如下:
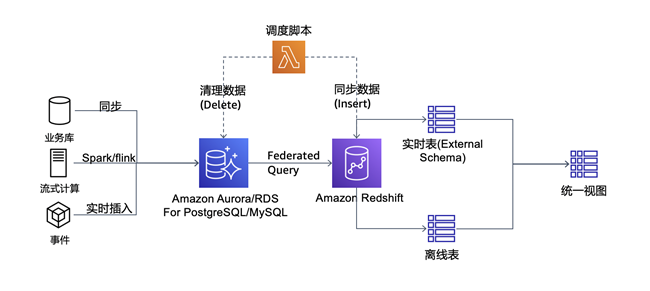
方案中,我们在Aurora for PostgreSQL中创建Redshift的实时摄入缓存表,并设置定时任务将PostgreSQL中最近插入的数据异步加载到Redshift中,源表的数据插入时间字段,我们根据时间字段加载最新数据。
在Redshift中进行Federated Query配置
在Redshift中进行Federated Query的配置,创建External Schema。
CREATE EXTERNAL SCHEMA pg
FROM POSTGRES
DATABASE 'postgres' SCHEMA 'public'
URI 'xxx.rds.amazonaws.com' PORT 5432
IAM_ROLE 'arn:aws:iam::xxx:role/xxx'
SECRET_ARN 'arn:aws:secretsmanager:xxx:secret:xxx';
配置Federated Query的其他前提步骤请参考下面链接:https://docs.thinkwithwp.com/zh_cn/redshift/latest/dg/getting-started-federated.html
Federated Query最佳实践请参考:https://thinkwithwp.com/cn/blogs/big-data/amazon-redshift-federated-query-best-practices-and-performance-considerations/
数据摄入方案初始配置
1、初始化需要实时摄入的源表和目标表
-- 如果在PostgreSQL中的源表没有时间字段,则在创建表的时候,默认填充时间字段为unix时间戳格式,建表的范例如下
CREATE TABLE realtime_offline (
  id int,
  update_time int NOT NULL
  );
-- 如果源表有时间字段,则直接在Redshift中利用源表结构创建Redshift中的表
CREATE TABLE realtime_offline AS (SELECT * FROM pg.realtime_online LIMIT 0)
2、在PostgreSQL中创建分区触发器,根据时间字段自动将数据插入到分区表中(利用分区表可以加快Federated Query对PostgreSQL的查询性能,如果数据量不大,也可以通过定期删除PostgreSQL中旧数据的方式提高查询性能)
-- 创建分区函数,按update_time字段换算成每分钟1个分区,根据数据量调整分区规则
CREATE OR REPLACE FUNCTION realtime_online_partition_trigger()
    RETURNS TRIGGER AS
$$
DECLARE
    date_text                TEXT;
    DECLARE insert_statement TEXT;
BEGIN
    SELECT NEW.update_time/60*60 INTO date_text;
    insert_statement := 'INSERT INTO realtime_online_'
                            || date_text
        || ' VALUES ($1.*)';
    EXECUTE insert_statement USING NEW;
    RETURN NULL;
EXCEPTION
    WHEN UNDEFINED_TABLE
        THEN
            EXECUTE
                                'CREATE TABLE IF NOT EXISTS realtime_online_'
                                || date_text
                            || '( like realtime_online)'
                        || ' INHERITS (realtime_online)';
            RAISE NOTICE 'CREATE NON-EXISTANT TABLE realtime_online_%', date_text;
            EXECUTE
                                'CREATE INDEX realtime_online_timestamp_'
                                || date_text
                            || ' ON realtime_online_'
                        || date_text
                    || '(update_time)';
            EXECUTE insert_statement USING NEW;
            RETURN NULL;
END;
$$
    LANGUAGE plpgsql;

-- 创建主表触发器 挂载分区Trigger
CREATE TRIGGER insert_realtime_online_partition_trigger
    BEFORE INSERT
    ON realtime_online
    FOR EACH ROW
EXECUTE PROCEDURE realtime_online_partition_trigger();
3、在Redshift中创建统一视图,方便上层应用通过视图查询Redshift和PostgreSQL中的数据
CREATE OR REPLACE VIEW public.realtime_view AS
SELECT * FROM public.realtime_offline
where update_time < (select max(update_time)
                   from public.realtime_offline
)
UNION ALL
SELECT * FROM pg.realtime_online
where update_time >= (select max(update_time)
                    from public.realtime_offline
)
with no schema binding;
配置定时更新和同步脚本
定时脚本可以按固定频率执行,每次执行任务有两个操作:定时加载新的数据、在PostgreSQL中删除过期数据
1、先获取当前系统unix时间(根据字段时间格式修改,本方案使用unix时间戳格式填充记录插入时间字段)
date +%s
#替换后面SQL中的1630854036
2、摄入外部数据,为避免当前时间戳的数据正在写入,我们提取对比当前时间提前(120s)的数据,此时间可根据实际情况调整。
INSERT INTO realtime_offline SELECT * FROM pg.realtime_online
WHERE update_time > (SELECT MAX(update_time) FROM realtime_offline) AND update_time <= 1630854036-120;
3、根据实际业务需求,在PG数据库中删除较早的历史数据
-- 如果PG的源表是分区表,则按时间戳删除历史分区表
DROP TABLE realtime_online_1630854000;
-- 如果PG的源表不是分区表,则按时间戳删除历史数据
DELETE FROM realtime_online WHERE update_time < 1630854036-120;
我们可以将上述的步骤通过python脚本来实现并通过Lambda部署的方式,利用CloudWatch Event按规定频率调度运行
import string
import time
import psycopg2

def sync_data(rs_host,rs_database,rs_user,rs_password,rs_port,curr_time,rs_table_name,pg_table_name):
    conn = psycopg2.connect(host=rs_host,port=rs_port,database=rs_database,user=rs_user,password=rs_password)
    cursor=conn.cursor()
    #sql='select 1'
    sql="insert into " + rs_table_name + " select * from pg." + pg_table_name + " where update_time > (SELECT MAX(update_time) FROM " + rs_table_name + ") and update_time <= " + str(curr_time) + "-120;"
    print(time.ctime() + ": " + sql)
    cursor.execute(sql)
    conn.commit()
    print(time.ctime() + ": " + "sync data sql exec completed")
    cursor.close()
    conn.close()

def delete_data(pg_host,pg_database,pg_user,pg_password,pg_port,curr_time,pg_table_name):
    conn = psycopg2.connect(host=pg_host,port=pg_port,database=pg_database,user=pg_user,password=pg_password)
    cursor=conn.cursor()
    sql="delete from " + pg_table_name + "where update_time < " + str(curr_time) + "-120;"
    print(time.ctime() + ": " + sql)
    cursor.execute(sql)
    conn.commit()
    print(time.ctime() + ": " + "delete data sql exec completed")
    cursor.close()
    conn.close()

def delete_table(pg_host,pg_database,pg_user,pg_password,pg_port,curr_time,pg_table_name):
    conn = psycopg2.connect(host=pg_host,port=pg_port,database=pg_database,user=pg_user,password=pg_password)
    cursor=conn.cursor()
    sql1 = "SELECT inhrelid::regclass FROM pg_catalog.pg_inherits WHERE inhparent = \'" + pg_table_name + "\'::regclass;"
    cursor.execute(sql1)
    tables = cursor.fetchall()
    for table in tables:
        if (int(str(table[0])[-10:]) < curr_time-3600):
            sql2 = "drop table "+ table[0]
            print(time.ctime() + ": " + sql2)
            cursor.execute(sql2)
    conn.commit()
    print(time.ctime() + ": " + "drop table sql exec completed")
    cursor.close()
    conn.close()

if __name__=='__main__':
    pg_host = 'xx'
    pg_user = 'xx'
    pg_database = 'xx'
    pg_password = 'xx'
    pg_port = '5432'
    rs_host = 'xx.ap-southeast-1.redshift.amazonaws.com'
    rs_user = 'xx'
    rs_database = 'xx'
    rs_password = 'xx'
    rs_port = '5439'
    pg_table_name = "realtime_online"
    rs_table_name = "realtime_offline"
    t = time.time()
    curr_time = int(t)
    try:
        sync_data(rs_host,rs_database,rs_user,rs_password,rs_port,curr_time,rs_table_name,pg_table_name)
        delete_table(pg_host,pg_database,pg_user,pg_password,pg_port,curr_time,pg_table_name)
        #delete_data(pg_host,pg_database,pg_user,pg_password,pg_port,curr_time,pg_table_name)

    except Exception as e:
        print(e)
变更数据的摄入
Redshift COPY命令无法直接针对更新数据进行同步加载,我们可以通过简单的ETL语句实现更新语义。
create temp table stage (like target);
insert into stage select * from source where source.filter = 'filter_expression';

begin transaction;
delete from target using stage where target.primarykey = stage.primarykey;
insert into target select * from stage;
end transaction;
drop table stage;
基于Glue构建的数据加载pipeline中,我们同样可以利用SQL执行ETL将变更数据更新至Redshift中。
post_query="begin;delete from target_table using stage_table where stage_table.id = target_table.id ; insert into target_table select * from stage_table; drop table stage_table; end;"

datasink4 = glueContext.write_dynamic_frame.from_jdbc_conf(
frame = datasource0,
catalog_connection = "test_red",
connection_options = {"preactions":"drop table if exists stage_table;create table stage_table as select * from target_table where 1=2;","dbtable": "stage_table", "database": "redshiftdb","postactions":post_query},
redshift_tmp_dir = 's3://s3path',
transformation_ctx = "datasink4"
)
针对Federated Query场景下数据加载过程,如果数据源有数据库INSERT和UPDATE,可以使用如下范例语句。
BEGIN;
CREATE TEMP TABLE staging (LIKE ods.store_sales);
INSERT INTO staging SELECT * FROM pg.store_sales p
    WHERE p.last_updated_date > (SELECT MAX(last_updated_date) FROM ods.store_sales)
DELETE FROM ods.store_sales USING staging s WHERE ods.store_sales.id = s.id;
INSERT INTO ods.store_sales SELECT * FROM staging;
DROP TABLE staging;
COMMIT;
如果需要对CDC数据摄入方式的完全同步,我们可以借助DMS,DMS可以解析CDC数据中INSERT、UPDATE、DELETE语句同步到Redshift中,除了DMS之外,我们也可以借助第三方的ETL工具来实现。
总结
对比总结几种数据摄入方式如下:
|
吞吐量 |
CDC支持 |
是否需要编写脚本 |
调度方式 |
摄入时延 |
| INSERT(DML) |
低 |
是 |
是 |
借助第三方 |
秒级别 |
| COPY |
高 |
否 |
是 |
借助第三方 |
分钟级别 |
| Kinesis Data Firehose |
高,COPY实现 |
否 |
否 |
自动 |
分钟级别 |
| DMS |
高,COPY实现 |
是 |
否 |
自动 |
分钟级别 |
| Glue |
高,COPY实现 |
否 |
可自动生成 |
内置调度 |
分钟级别 |
| Federated Query |
中 |
否 |
是 |
借助第三方 |
毫秒级别 |
综合对比几种数据摄入方式,在数据量较大的离线数据加载场景下,推荐使用COPY,COPY可以使用整个集群的资源实现数据的并行加载,并根据集群资源和数据量控制加载频率。对于数据源为流式数据的场景下,可以使用Kinesis Data Firehose内置机制自动的实现数据加载至Redshift。对于CDC场景可以通过DMS读取RDS等数据库的binlog变更日志,通过DMS解析后转换成加载语句加载至Redshift中。对于想实现数据实时摄入、秒级延迟的场景,可以借助Amazon Redshift Federated Query,通过Aurora for Postgresql/MySQL作为实时数据摄入缓存表接收数据,然后异步合并到Redshift中,从而实现数据的实时可用。
参考链接
https://docs.thinkwithwp.com/zh_cn/redshift/latest/dg/merge-replacing-existing-rows.html
https://docs.thinkwithwp.com/zh_cn/redshift/latest/dg/getting-started-federated.html
https://thinkwithwp.com/premiumsupport/knowledge-center/sql-commands-redshift-glue-job/
https://thinkwithwp.com/cn/blogs/big-data/amazon-redshift-federated-query-best-practices-and-performance-considerations/
本篇作者


