AWS Quantum Technologies Blog
Accelerate quantum software development on Amazon Braket with Claude-3
This post was contributed by Yaroslav Kharkov, Zia Mohammad, Matt Beach, Eric Kessler
From early-career open source contributors to seasoned enterprise software engineers, developers are increasingly using generative AI assistants to automate repetitive tasks and accelerate their development cycles by up to 30%.
In this blog post, we show you how to build a customized code assistant for Amazon Braket to accelerate quantum programming with generative AI. The Braket code assistant provides you with a chat interface integrated into the JupyterLab Integrated Developer Environment (IDE) on Amazon Braket notebook instances, and is powered by your choice of large language models (LLMs) through Amazon Bedrock.
The code assistant serves as a tool for both beginners and advanced users building quantum workloads. With the code assistant, customers can ask quantum computing questions such as: “Write a Python script to generate n-qubit GHZ circuit” or “Submit a random quantum circuit to the SV1 simulator, local simulator, and the IQM Garnet device. Then compare the measurement results”. Each question provides a working code snippet with detailed comments in a matter of seconds.
LLM customization via Retrieval Augmented Generation
While many out-of-the-box generative AI tools are effective for common programming languages such as Python or Java, they often need additional customization for a new programming language or specialized software library. LLM customization is especially challenging for quantum programming, which requires expert knowledge across multiple disciplines, including quantum computing concepts such as quantum circuits, algorithms, hardware platforms, data structures, and software development kits (SDKs). Today, quantum computing software constitutes only a small portion of publicly available code. Therefore, it is underrepresented in the training data, making LLMs prone to hallucinations when being asked questions about quantum programming. To address these hallucinations, there are a few common techniques for customization of LLMs. For this post, we’ll focus on Retrieval Augmented Generation (RAG) to customize a quantum computing code assistant for Amazon Braket.
Retrieval Augmented Generation (RAG)
RAG combines the generative capabilities of LLMs with information retrieval techniques to access data from external data sources or documents. In the case of a code generation task, the external data might contain a software documentation and/or working code snippets. During RAG, the chunks of information most relevant to the particular query are retrieved from the knowledge base, and added to the LLM context window during response generation. Adding relevant information to the query during response generation provides the LLM prior knowledge for the question at hand, and helps steer the model towards the correct solution. RAG is an effective method for LLM customization for code generation tasks, as it grounds the model using factual data, such as developer documentation.
The main advantage of RAG compared to other popular customization methods such as LLM fine-tuning, is that RAG does not require re-training of the base LLM. Re-training of an LLM is a computationally expensive process requiring large amounts of domain-specific data and access to the model weights. In contrast, for RAG-based system we only need to connect the LLM with the knowledge base by providing files with documentation, which can be updated with new releases of the Amazon Braket SDK.
Building an Amazon Braket code assistant with Amazon Bedrock
Amazon Bedrock, the AWS service to build and scale generative AI applications, recently announced release of the new family of Claude 3 models – Haiku, Sonnet, and Opus from Anthropic. The Claude 3 models balance model speed and accuracy with Haiku being the smallest model size and Opus being the largest.
In this walkthrough, you will learn how to build your own Braket code assistant with Amazon Bedrock in a few steps. First, you will use Jupyter AI to integrate a Claude 3 model from Bedrock directly into the JupyterLab IDE of your Braket notebook. Second, you are going to learn how to use RAG to enhance the performance of the base model. In this post we leverage a compact version of the Amazon Braket documentation known as the Braket cheat sheet to provide additional information to the model during inference. Finally, we provide three examples, in which the code assistant generates snippets of Python code with parametric and non-parametric quantum circuits, submits quantum circuits to a quantum device or a simulator on Amazon Braket, and debugs existing code.
Before you get started, let’s take a look at the required prerequisites and permissions.
Step 1. Installing prerequisites and setting permissions
1a. To start building a RAG-powered code assistant, we need to unlock access to Amazon Bedrock LLMs and embeddings. In order to enable access to Claude 3 Sonnet model and Titan V2 embedding, navigate to Amazon Bedrock console page, select the “Model access” tab, choose the model and the embedding, and click “Request model access” for the selected models.
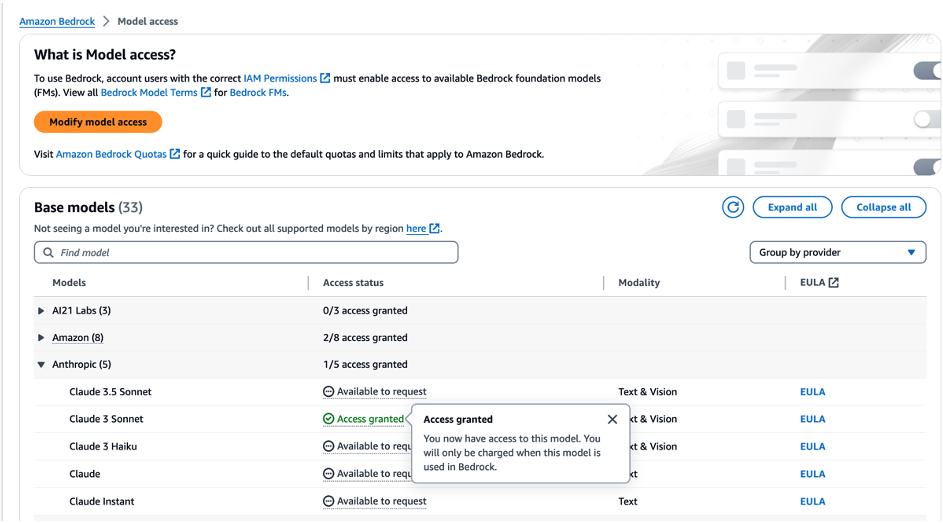
Figure 1. Enabling access to Claude 3 Sonnet LLM and Titan Text V2 embeddings on Bedrock.
After enabling the models, attach a new IAM policy to your notebook instance role to access Bedrock services from your notebook instance. In the AWS Management Console, navigate to IAM center, select AmazonBraketServiceSageMakerNotebookRole from the list of roles, and attach AmazonBedrockFullAccess policy to this role.
1b. Navigate to the Amazon Braket console and create a notebook instance. Select AmazonBraketServiceSageMakerNotebookRole from the list of available notebook instance permission roles at the “Access permissions” step.
Note: The notebook instance has to be created from one of the AWS Regions, where both Amazon Braket and Amazon Bedrock are supported: us-east-1, us-west-2, or eu-west-2.
1c. Within your notebook instance terminal window, ensure you are using JupyterLab v4 by entering the following command:
pip install JupyterLab JupyterLab-lsp --upgrade1d. Next, install the Jupyter-AI plugin and Langchain-AWS package to enable support of Bedrock’s chat completion and embedding models in Jupyter-AI chat by typing:
pip install jupyter_ai langchain-awsIgnore the error message related to pip dependencies conflicts for cloudpickle and aiobotocore packages, as these packages will not affect the functionality of the code assistant.
1e. A temperature value of zero will provide more accurate responses from Claude 3. This is done by creating the following configuration file with specified model hyperparameters and restarting the Jupyter server.
json='{"AiExtension": {"model_parameters": {"bedrock:anthropic.claude-3-sonnet-20240229-v1:0":{"model_kwargs":{"temperature":0.}}}}}'
 fname='/home/ec2-user/anaconda3/envs/JupyterSystemEnv/etc/jupyter/jupyter_jupyter_ai_config.json'

echo "$json" > "$fname"
Note: For more details on how to configure an LLM model in JupyterLab-AI, follow the steps from the Amazon Sagemaker documentation. The Jupyter-AI plugin will pick up your updated configuration parameters after restarting the Jupyter server.
1f. After installing the Jupyter-AI plugin and setting up the model config, restart the Jupyter server by typing:
sudo systemctl --no-block restart jupyter-server.service Step 2. Configuring your Jupyter-AI plugin
2a. As seen in Figure 2, refresh your browser and select the Jupyter-AI chat bot icon in the left-hand side panel. Click “Start Here” to configure your Jupyter-AI plugin.
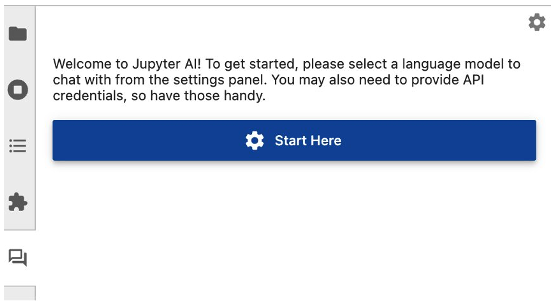
Figure 2. Jupyter-AI plugin seen on the left-hand side panel after the installation.
2b. Configure the Jupyter-AI plugin by selecting a completion and embedding model via Amazon Bedrock. As seen in Figure 3, below, click “Settings” and select the Amazon Bedrock Claude 3 Sonnet model and the Amazon Bedrock Titan v2 embedding. The embedding model defines the vectorization algorithm that converts chunks of text from the source documents for RAG to fixed length vectors of floating-point values known as embeddings.

Figure 3. Jupyter-AI plugin showing the Claude 3 Sonnet Language Model with Amazon Titan as the embedding model.
2c. To confirm you have correctly setup your model, type “Hi Claude! What is the model name?” to receive a response similar to the one seen in Figure 4.

Figure 4. Jupyter-AI plugin response when asked what model name is being used.
Step 3. Customize Claude 3 with Braket cheat sheet
After our initial setup, customize the Claude 3 model by using the Jupyter AI’s RAG capabilities to import the Braket cheat sheet. The Braket cheat sheet contains examples of how to use the Amazon Braket SDK to perform basic quantum operations, such as create new quantum circuits, append gates, submit quantum tasks to quantum processing units (QPUs) or simulators, retrieving task results, and access device properties.
3a. In your Amazon Braket notebook, create a cheat_sheet directory and download the Cheat Sheet markdown file locally by running the following command from the JupyterLab terminal:
cd /home/ec2-user/SageMaker && mkdir ./cheat_sheet
curl https://raw.githubusercontent.com/amazon-braket/amazon-braket-sdk-python/gen_ai/doc/genai_cheat_sheet.md > cheat_sheet/cheat_sheet.md
3b. To customize Claude 3 for quantum programming with Braket, we need to teach Claude 3 about the content of the Braket cheat sheet. Invoke the /learn command from the chat window by typing:
/learn -c 4000 cheat_sheet
The /learn command parses the cheat sheet text file, splits the text file into chunks and converts each chunk into embedding vectors. The command then saves the embedding vectors in a local vectorstore database on your notebook instance. The argument -c 4000 of the /learn command defines the chunk size (the default value is 500). We recommend using large value for the chunk size as it increases the probability that the relevant information will be contained in the retrieved chunk. We intentionally choose a large chunk size, which is sufficient to fit the entire Braket cheat sheet file in a single chunk, effectively reducing RAG to in-context learning. You can configure additional RAG hyperparameters by providing arguments to the /learn command, see Jupyter-AI documentation.
3c. Use the /ask command followed by the specific query pertaining to Amazon Braket.
/ask {Add your question about Amazon Braket SDK here}.
This command will retrieve relevant information from the Braket cheat sheet and add this information to the Claude 3 context window while generating the response. The combination of /learn and /ask commands enables the RAG functionality in Jupyter-AI chat assistant.
Note: The RAG in Jupyter-AI chat bot is only invoked with /ask command, but not with other commands such as /generate or /fix.
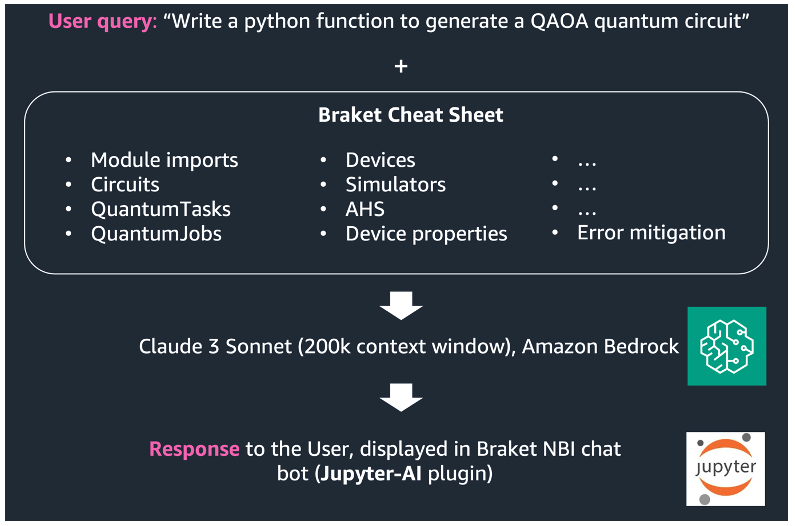
Figure 5. Combining Claude 3 and Braket cheat sheet to build RAG-enabled quantum programming assistant.
Start experimenting with the Amazon Braket code assistant
After setting up the Claude 3 model in the JupyterLab IDE, you are ready to start using the Amazon Braket code assistant. Request the code assistant to create a simple Bell circuit or try out one of the following three advanced examples.
Note: Each LLM API call will incur per token charges to your AWS account based on the Amazon Bedrock pricing plans. Using the Claude 3 Sonnet model for the following examples, the cost is approximately $0.03 USD per query, when accounting for 3000 input tokens and 1000 output tokens.
Example 1: Create a Greenberger–Horne–Zeilinger (GHZ) circuit and run on a simulator
A GHZ circuit is a canonical type of quantum circuit, which produces an entangled state of n qubits with equal superposition of |0..00> and |1..11> , a GHZ state. GHZ circuits are often used for quantum hardware benchmarking or as a subroutine of quantum algorithms.
Figure 6, shows the response of the code assistant to the following prompt:
/ask Write a function to generate an n-qubit GHZ circuit. Run the circuit on a local simulator and print the results.
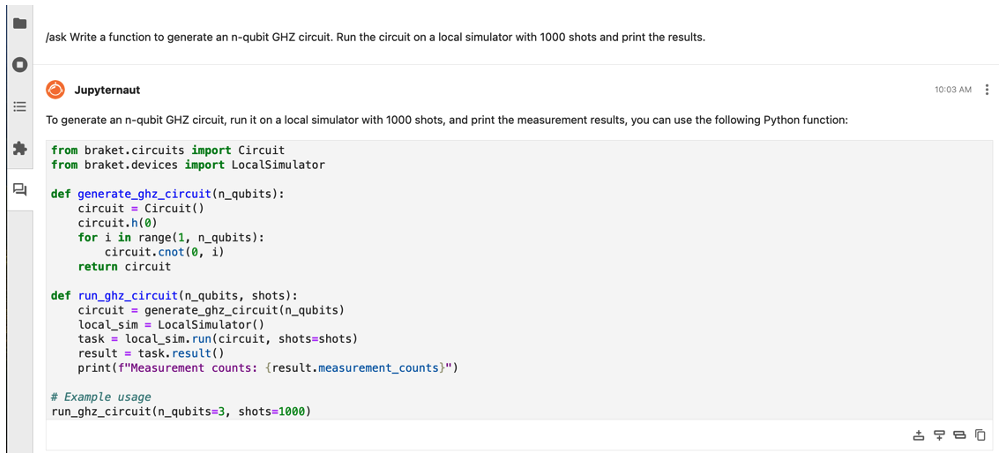
Figure 6. Leveraging the /ask command to create a GHZ circuit with n qubits.
After running the /ask command, The code assistant shows how to use the Amazon Braket SDK to create a GHZ state circuit with n qubits, run the GHZ circuit to the Braket local simulator, and print the results.
Claude-3 Output:
Here’s a breakdown of the code:
- The
generate_ghz_circuitfunction takes the number of qubits n_qubits as input and creates an n-qubit GHZ circuit using the Circuit class from thebraket.circuits module. - The function first creates an empty circuit using
Circuit(). - It applies a Hadamard gate to the first qubit using
circuit.h(0). - Then, it applies a CNOT gate from the first qubit to each subsequent qubit using a loop:
circuit.cnot(0, i). - The
run_ghz_circuitfunction takes the number of qubits n_qubits and the number of shots as input. - It calls
generate_ghz_circuitto create the GHZ circuit. - It creates a
LocalSimulatorinstance usingLocalSimulator(). - It runs the circuit on the local simulator with the specified number of shots using
local_sim.run(circuit, shots=shots). - It retrieves the result of the task using
task.result(). - Finally, it prints the measurement counts from the result using
print(f"Measurement counts: {result.measurement_counts}").
In the example usage, the function run_ghz_circuit is called with n_qubits=3 and shots=1000, which will generate a 3-qubit GHZ circuit, run it on a local simulator with 1000 shots, and print the measurement counts.
Note: When querying the base Claude 3 model without the Cheat Sheet, the LLM is prone to make mistakes and hallucinate. For example, when asking the Jupyter-AI to generate GHZ circuits with Amazon Braket, the response contained a reference to a CNOT(), whereas the correct gate name in the Braket SDK is cnot().
Example 2: Quantum approximate optimization algorithm (QAOA) ansatz with parametric gates
Quantum researchers often need to generate a quantum circuit ansatz to train a QAOA or a variational quantum eigensolver (VQE) algorithm. Figure 7, shows our Claude 3 code assistant generating a QAOA ansatz from a networkx graph, based on the following prompt:
/ask Write a function to generate a parametric QAOA circuit ansatz with p layers for a given networkx graph. Use parametric Rx, Rz gates and Cnot gate.
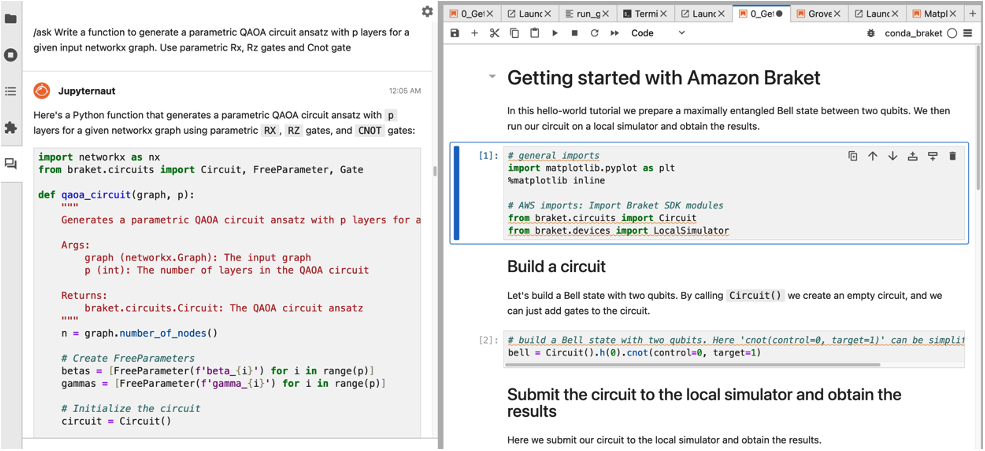
Figure 7. Example showing the generation of a parametric QAOA ansatz.
import networkx as nx
from braket.circuits import Circuit, FreeParameter, Gate


 def qaoa_circuit(graph, p):
     """
     Generates a parametric QAOA circuit ansatz with p layers for a given networkx graph.

     Args:
         graph (networkx.Graph): The input graph
         p (int): The number of layers in the QAOA circuit

     Returns:
         braket.circuits.Circuit: The QAOA circuit ansatz
     """
     n = graph.number_of_nodes()

     # Create FreeParameters
     betas = [FreeParameter(f'beta_{i}') for i in range(p)]
     gammas = [FreeParameter(f'gamma_{i}') for i in range(p)]

     # Initialize the circuit
     circuit = Circuit()

     # Initial layer of Hadamard gates
     for i in range(n):
         circuit.h(i)


     # Alternating layers of mixer and cost terms
     for layer in range(p):
         # Mixer layer
         for i in range(n):
             circuit.rx(i, 2 * gammas[layer])


         # Cost layer
         for i, j in graph.edges:
             circuit.cnot(i, j)
             circuit.rz(j, 2 * betas[layer])
             circuit.cnot(i, j)

     return circuit
This is a correct implementation! The function takes the graph object and the number of layers as the inputs and creates a parametric circuit as the output while the CNot gates are placed on the qubits corresponding to the graph edges. Additionally, Claude 3 decomposes the ZZ gate, for the cost term, into CNot and Rz gates, as stated in the original query.
Example 3: Fixing bugs and debugging errors
Running your code and receiving an error can be time intensive and sometimes frustrating to debug. The Braket code assistant can be used to fix bugs and debug errors. In this example, we copy a Python error message into the Jupyter-AI chat assistant using the /ask command. The code assistant is able to troubleshoot the problem and identify a common mistake where the number of qubits is passed as an input argument: circuit = Circuit(n_qubits).
Figure 8 shows how Claude 3 detects that the circuit constructor does not require you to specify a number of qubits.
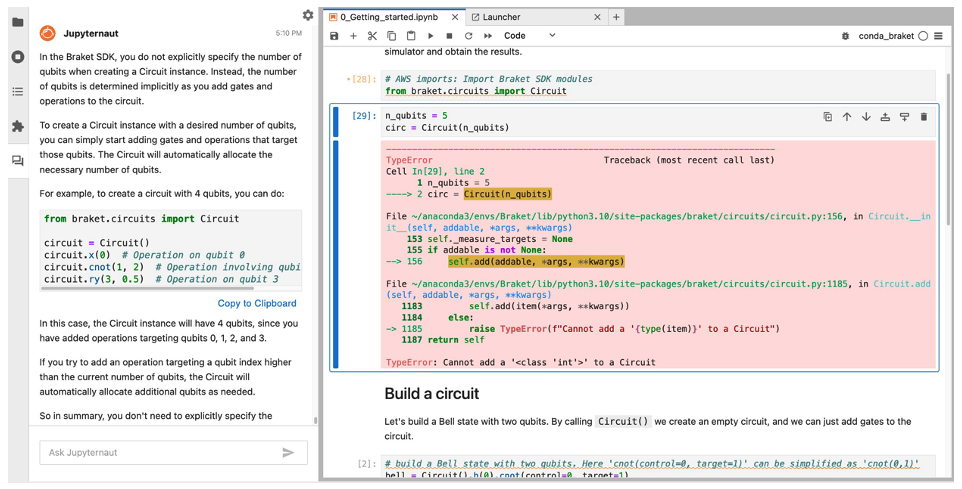
Figure 8. Debugging sample code with the Braket code assistant.
Next steps
The examples presented in this post scratch the surface of the possible applications of generative AI in quantum software development. While we demonstrated using the Braket cheat sheet for RAG, other documentation options are possible. For example, you can use the Braket Developer Guide, Qiskit—Braket Plugin documentation, or the Amazon Braket Examples Notebooks as the knowledge source for Jupyter-AI assistant. The Jupyter-AI plugin can ingest text files, PDFs, and Jupyter notebooks with the /learn command.
In order to teach the Braket code assistant about the Braket Developer Guide, you can execute the following command in a terminal window on your Braket notebook instance:
pip install pypdf
cd /home/ec2-user/SageMaker &&  mkdir braket_documentation && curl https://docs.thinkwithwp.com/pdfs/braket/latest/developerguide/braket-developer-guide.pdf > braket_documentation/braket-developer-guide.pdf
After executing the previous command, you can use the combination of /learn and /ask commands in the Jupyter-AI chat window as shown in the blog post. As you experiment with the Braket code assistant, ask queries about more advanced features such as pulse control or error mitigation. Here are a few more example prompts to try with the code assistant:
- List two-qubit gate edges on Garnet device.
- How to get adjoint of a quantum circuit?
- How to find queue position of a quantum task?
Conclusion
Generative AI is beginning to revolutionize software development and with Amazon Bedrock it is easier than ever to build your own AI applications – even for a highly specialized domain like quantum computing. In this blog post, we showed you how to build a customized quantum computing code assistant with Amazon Bedrock using a Claude-3 LLM enhanced by RAG.
We leveraged RAG to learn the data structures and syntax of the Amazon Braket Python SDK library, that resulted in a significant improvement of the accuracy of the LLM’s responses, compared to the base model. Additionally, we highlighted three advanced examples to generate quantum programs and showcase how AI-powered code assistants can accelerate quantum software development.
We are excited to see what you can build with AWS and Amazon Bedrock to make programming quantum computers on Amazon Braket more efficient and accessible. Advanced users can continue their journey by configuring the Braket code assistant to choose different LLM backends and embedding models, fine tune model hyperparameters such as temperature, or use other data sources such as the Braket Developer Guide for RAG.
At AWS, we focus on improving the developer and customer experience. We have a number of resources available for you to learn about generative AI on AWS. To dive deeper into quantum computing with Amazon Braket you can get hands-on with one of our open-source example notebooks.