为参考企业,即示例企业创建软件即服务 (SaaS) 门户。此示例企业支持感兴趣的客户创建账户,并注册 Web 版软件订阅。
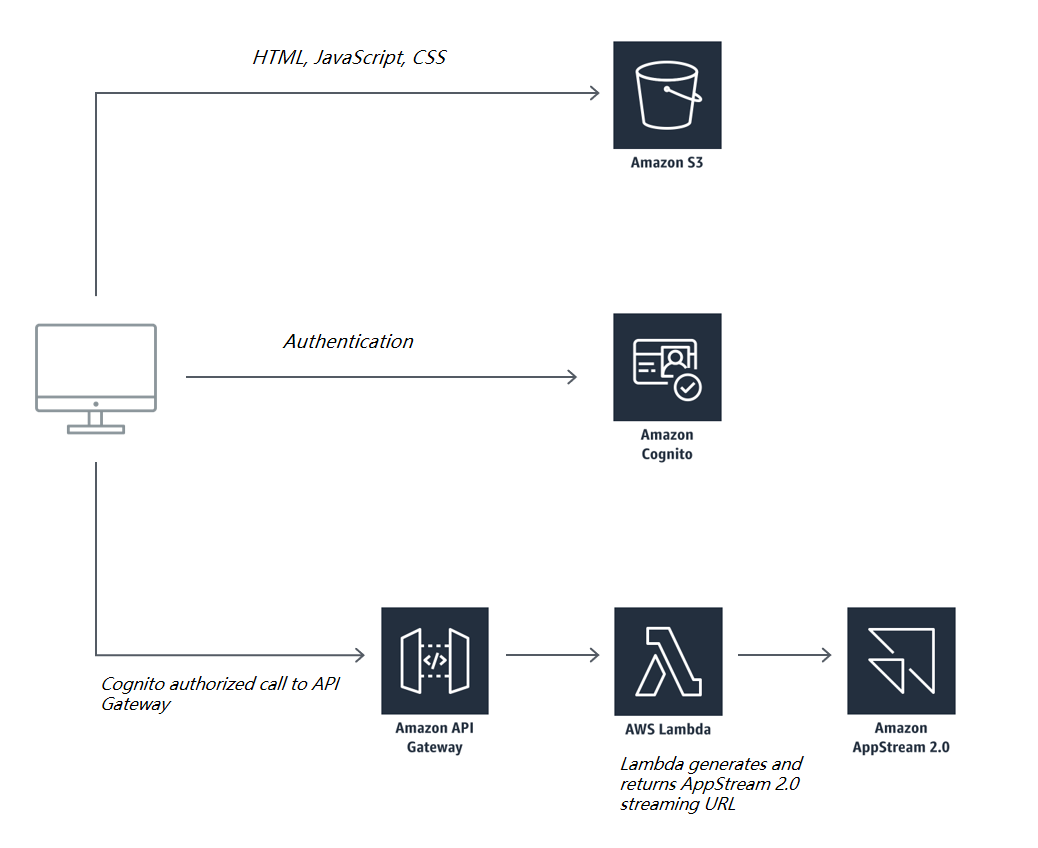
• 使用 Amazon Simple Storage Service (Amazon S3) 启用托管示例企业的网站。
• 使用 Amazon SES 设置和验证电子邮件地址身份。创建新账户后,系统会向您在 Amazon Simple Email Service (SES) 中指定的地址发送验证电子邮件。
• 使用 Amazon AppStream 2.0,将流式传输应用程序设置为对注册软件订阅的用户开放。
• 使用 AWS Identity and Access Management (IAM) 创建策略和角色。
• 将 IAM 策略附加到您创建的 IAM 角色。需要该策略才能运行您将要创建的函数。
• 使用 Amazon Cognito 新建一个用户池并添加应用程序客户端。Amazon Cognito 为您的 AppStream 流式传输应用程序提供用户管理和身份验证功能。
• 使用 AWS Lambda 创建一个函数。该函数用于在用户通过 Cognito 完成身份验证后,为流式传输用户生成流式传输 URL。
• 使用 Amazon API Gateway 创建 RESTful API。该资源和方法用于在流式传输用户和 Lambda 函数之间交换请求。
应用程序使用 Amazon S3、Amazon SES、Amazon Cognito、Amazon API Gateway、AWS Lambda 和 Amazon AppStream 2.0,如下图所示。

本项目包含六个模块。您必须完成一个模块,才能进入下一个模块。
- 托管静态网站
- 管理用户
- 构建无服务器后端
- 部署 RESTful API
- 测试您的设置
- 清理您的项目资源
AWS 使用经验:我们建议您熟悉 AppStream 2.0 和其他 AWS 服务。如果您不熟悉 AppStream 2.0,请参阅 AppStream 2.0 入门指南。本指南介绍了如何:
- 安装和配置两个应用程序。
- 使用 AppStream 2.0 控制台执行基础的管理任务。
- 使用提供的 AWS CloudFormation 模板在 Amazon virtual Private Cloud (Amazon VPC) 中预置虚拟网络。
所需时间:2.5 小时
- AWS 账户:以便开始使用 AppStream 2.0 和其他 AWS 服务。有关更多信息,请参阅如何创建并激活新的 Amazon Web Services 账户?
- AppStream 2.0 环境:需要 AppStream 2.0 映像、机群和堆栈才能完成本项目。如需了解如何创建这些资源,请参阅 AppStream 2.0 开发人员指南中的以下主题:
- 电子邮件账户:至少有权访问一个测试用户电子邮件地址,以完成本项目中描述的配置。
AWS CloudFormation 模板:您可以在选择的区域中启动其中一个 AWS CloudFormation 模板,来自动构建本研讨会不可缺少的资源。
| 区域 | CloudFormation 模板 |
|---|---|
| 美国西部(俄勒冈) | 启动堆栈 > |
| 美国东部(弗吉尼亚北部) | 启动堆栈 > |
| 亚太地区(孟买)
|
启动堆栈 > |
| 亚太地区(东京) | 启动堆栈 > |
| 亚太地区(悉尼) | 启动堆栈 > |
| 亚太地区(新加坡) | 启动堆栈 > |
| 亚太地区(首尔) | 启动堆栈 > |
| 欧洲(爱尔兰) | 启动堆栈 > |
| 欧洲(法兰克福) | 启动堆栈 > |

以下步骤介绍了如何使用 AWS CloudFormation 中的模板,实现本项目中模块 1 至 模块 4 所述的绝大多数任务的自动化。如需获取这些任务的完整列表,请参阅项目概览页面中的“将会完成的任务”部分。
注意
虽然 CloudFormation 可以自动化本项目中的绝大多数任务,但仍然需要现有的 AppStream 2.0 映像、机群和堆栈。CloudFormation 模板并不创建这些资源。此外,您必须使用 Amazon Simple Email Service (SES) 设置和验证电子邮件地址身份。有关更多信息,请参阅模块 2 中的“第 1 步:在 Amazon SES 中添加并验证新电子邮件地址 ID”。管理用户。
1.确保您已经登录 AWS Management 控制台。
2.在区域选择列表中,打开您希望与在其中为本项目构建环境的 AWS 区域关联的 Launch Stack(启动堆栈)链接。
3.在 Quick create stack(快速创建堆栈)页面上会显示以下信息:
- 模板 URL:模板的 URL
- 堆栈描述:一段对于 CloudFormation 堆栈的描述。
- 堆栈名称:CloudFormation 堆栈的名称。默认名称是 as2-stack-002。保留默认名称或者选择将名称更改为对您而言有意义的名称(例如,examplecorp-cfn-stack-saas)。
4.在 Parameters(参数)下,执行以下操作:
- 对于 AppStream2FleetName,键入 AppStream 2.0 机群要使用的名称。
- 对于 AppStream2StackName,键入 AppStream 2.0 堆栈要使用的名称。
- 对于 S3BucketName,为您的 Amazon S3 存储桶键入全局唯一的名称(例如,examplecorp-s3bucket-saas-<yourfirstname-yourlastname>)。该 S3 存储桶用于托管您的网站。
5.在 Capabilities(功能)下,系统会通知您模板中包含拥有最小所需权限的 Identity and Access Management (IAM)。具体而言,需要 [AWS::IAM::Role] 功能。选中复选框,确认 CloudFormation 可能创建具有自定义名称的 IAM 角色。
6.选择 Create stack(创建堆栈)。
7.创建流程完成后,AWS CloudFormation 控制台会显示 CREATE_COMPLETE 状态。
8.选中堆栈后,选择 Outputs(输出)选项卡。
9.在 Outputs(输出)表格的 Key(密钥)列下方,记录下 CloudFormation 模板创建的资源的值:
- BucketName – S3 存储桶的名称。此处使用您在第 4 步中为 S3 存储桶指定的名称。
- ExampleCorpApiGWInvokeUrl -- API Gateway 调用 URL。URL 采用以下格式:https://<code>.execute-api.<region>.amazonaws.com/dev
- Cognito 用户池 ID -- Cognito 用户池的 ID。
- 客户端 ID -- 应用程序客户端的 ID。ID 采用以下格式:<region>_<code>。
- 网站 URL -- S3 存储桶的 Amazon S3 网站端点。URL 采用以下格式:https://<S3bucketname>.s3-website-<region>.amazonaws.com.
10.将示例企业网站资产内容的 zip 文件 (workshop_02_SaaS.<GUID>.zip) 下载到本地电脑。
11.将下载的文件内容解压到本地电脑上。
12.导航到希望将 zip 文件内容解压到的本地电脑上的位置,然后在文本编辑器中打开以下文件:assets/js/config.js。
13.在文件中,搜索以下变量并为其设定值:
- userPoolId – Cognito 用户池的 ID。
- userPoolClientId -- 应用程序客户端 ID 的值。
- 区域 -- 您创建了 CloudFormation 堆栈的所在 AWS 区域的代码。如需获取地区代码的完整列表,请参阅 AppStream 2.0 区域和端点表格中的区域列。
- Invokeurl -- API Gateway 调用的 URL 的值。
14.保存更改并关闭文件。
15.通过以下网址打开 Amazon S3 控制台:https://console.thinkwithwp.com/s3/。
16.在存储桶名称列表中,选择您在第 4 步为 S3 存储桶指定的名称。
17.导航到您将 zip 文件内容提到本地电脑上的位置。打开 workshop_02_SaaS.<GUID> 文件夹。此文件夹包含以下文件夹和文件:
- 资产
- 镜像
- index.html
- LICENSE.TXT
- NOTICE.TXT
- register.html
- signin.html
- THIRD-PARTY.TXT
- verify.html
18.选择 workshop_02_SaaS.<GUID> 目录下的所有文件和文件夹。不要选择文件夹本身。
19.在 Amazon S3 控制台窗口的概览选项卡,选择上传。
20.将您的选择拖放到上传对话框。
21.选择上传。
22.等待上传完成,并验证概览选项卡上的列表中是否显示了正确的文件和文件夹。
23.在控制台左上角的菜单中,选择 Services(服务)。
24.在搜索框中,键入 cloudformation,然后从搜索结果中选择 CloudFormation。
25.在 Stacks(堆栈)列表中的 Stack name(堆栈名称)下,选择 CloudFormation 的堆栈的名称。
26.在 Outputs(输出)选项卡的 Value(值)下方,选择对应 WebsiteURL 密钥的 URL。系统会显示示例企业网站的主页。
27.在网址栏中,在 URL 后面输入 /signin.html。此时会显示示例企业的门户登录页面。


