AWS DevOps & Developer Productivity Blog

Unlock the power of EC2 Graviton with GitLab CI/CD and EKS Runners

Many AWS customers are using GitLab for their DevOps needs, including source control, and continuous integration and continuous delivery (CI/CD). Many of our customers are using GitLab SaaS (the hosted edition), while others are using GitLab Self-managed to meet their security and compliance requirements.

Customers can easily add runners to their GitLab instance to perform various CI/CD jobs. These jobs include compiling source code, building software packages or container images, performing unit and integration testing, etc.—even all the way to production deployment. For the SaaS edition, GitLab offers hosted runners, and customers can provide their own runners as well. Customers who run GitLab Self-managed must provide their own runners.

In this post, we’ll discuss how customers can maximize their CI/CD capabilities by managing their GitLab runner and executor fleet with Amazon Elastic Kubernetes Service (Amazon EKS). We’ll leverage both x86 and Graviton runners, allowing customers for the first time to build and test their applications both on x86 and on AWS Graviton, our most powerful, cost-effective, and sustainable instance family. In keeping with AWS’s philosophy of “pay only for what you use,” we’ll keep our Amazon Elastic Compute Cloud (Amazon EC2) instances as small as possible, and launch ephemeral runners on Spot instances. We’ll demonstrate building and testing a simple demo application on both architectures. Finally, we’ll build and deliver a multi-architecture container image that can run on Amazon EC2 instances or AWS Fargate, both on x86 and Graviton.
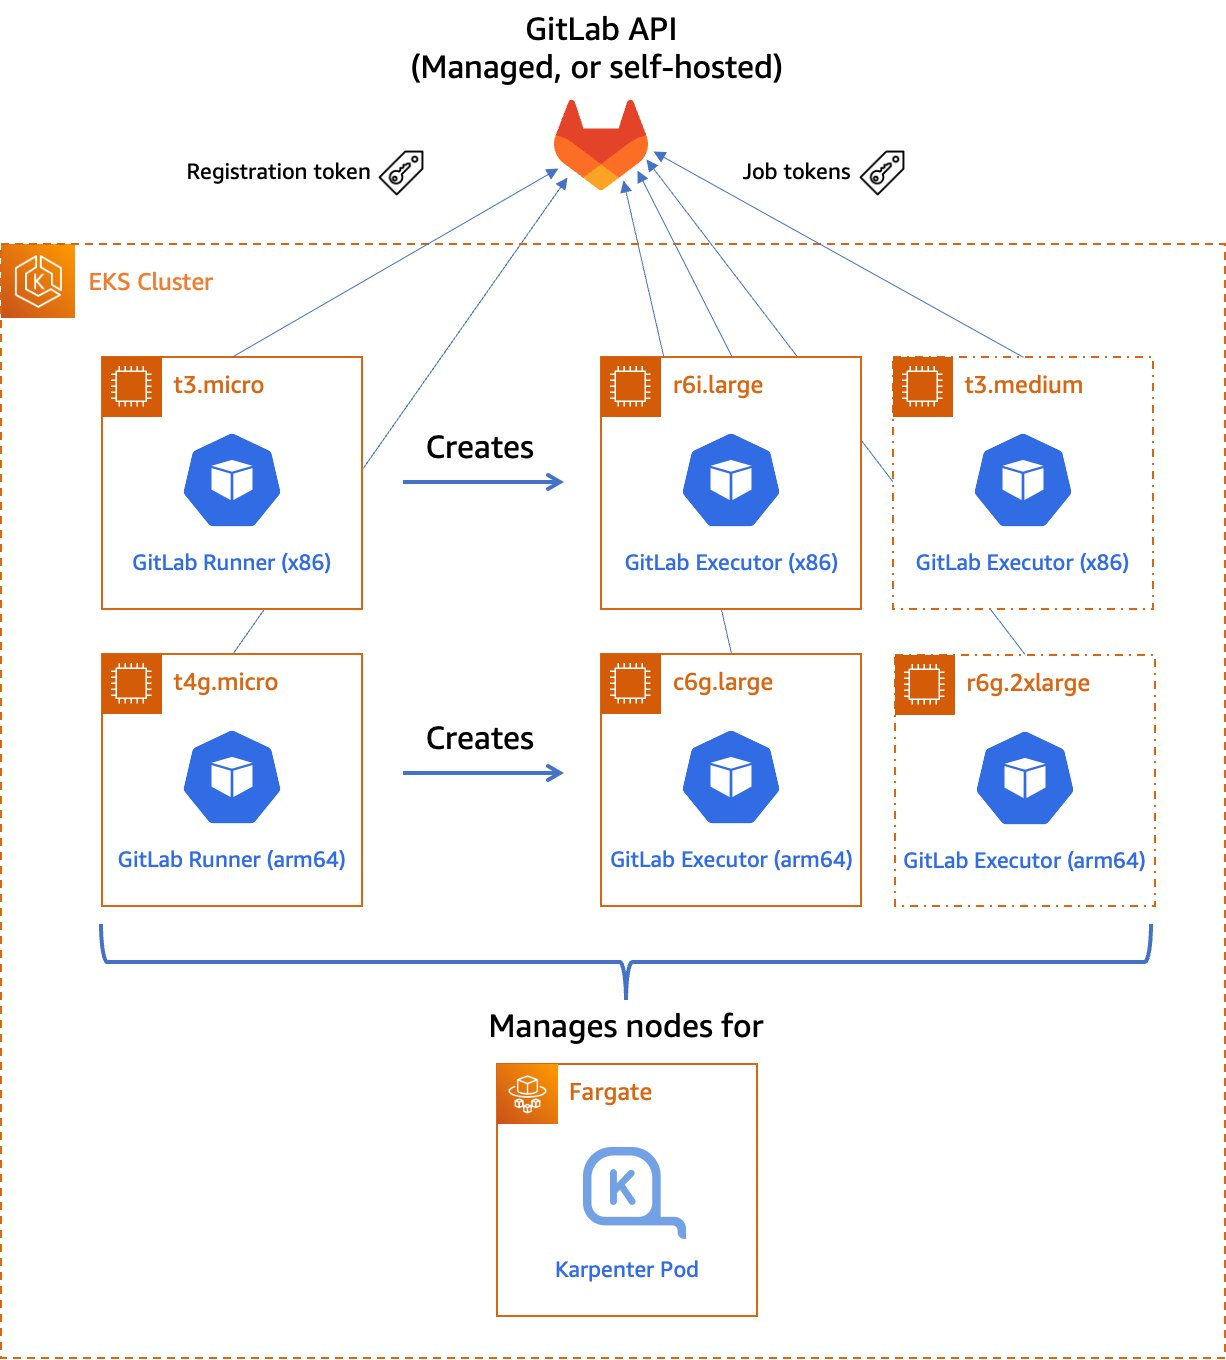
Figure 1. Managed GitLab runner architecture overview

Figure 1.  Managed GitLab runner architecture overview.

Let’s go through the components:

Runners

A runner is an application to which GitLab sends jobs that are defined in a CI/CD pipeline. The runner receives jobs from GitLab and executes them—either by itself, or by passing it to an executor (we’ll visit the executor in the next section).

In our design, we’ll be using a pair of self-hosted runners. One runner will accept jobs for the x86 CPU architecture, and the other will accept jobs for the arm64 (Graviton) CPU architecture. To help us route our jobs to the proper runner, we’ll apply some tags to each runner indicating the architecture for which it will be responsible. We’ll tag the x86 runner with x86, x86-64, and amd64, thereby reflecting the most common nicknames for the architecture, and we’ll tag the arm64 runner with arm64.

Currently, these runners must always be running so that they can receive jobs as they are created. Our runners only require a small amount of memory and CPU, so that we can run them on small EC2 instances to minimize cost. These include t4g.micro for Graviton builds, or t3.micro or t3a.micro for x86 builds.

To save money on these runners, consider purchasing a Savings Plan or Reserved Instances for them. Savings Plans and Reserved Instances can save you up to 72% over on-demand pricing, and there’s no minimum spend required to use them.

Kubernetes executors

In GitLab CI/CD, the executor’s job is to perform the actual build. The runner can create hundreds or thousands of executors as needed to meet current demand, subject to the concurrency limits that you specify. Executors are created only when needed, and they are ephemeral: once a job has finished running on an executor, the runner will terminate it.

In our design, we’ll use the Kubernetes executor that’s built into the GitLab runner. The Kubernetes executor simply schedules a new pod to run each job. Once the job completes, the pod terminates, thereby freeing the node to run other jobs.

The Kubernetes executor is highly customizable. We’ll configure each runner with a nodeSelector that makes sure that the jobs are scheduled only onto nodes that are running the specified CPU architecture. Other possible customizations include CPU and memory reservations, node and pod tolerations, service accounts, volume mounts, and much more.

Scaling worker nodes

For most customers, CI/CD jobs aren’t likely to be running all of the time. To save cost, we only want to run worker nodes when there’s a job to run.

To make this happen, we’ll turn to Karpenter. Karpenter provisions EC2 instances as soon as needed to fit newly-scheduled pods. If a new executor pod is scheduled, and there isn’t a qualified instance with enough capacity remaining on it, then Karpenter will quickly and automatically launch a new instance to fit the pod. Karpenter will also periodically scan the cluster and terminate idle nodes, thereby saving on costs. Karpenter can terminate a vacant node in as little as 30 seconds.

Karpenter can launch either Amazon EC2 on-demand or Spot instances depending on your needs. With Spot instances, you can save up to 90% over on-demand instance prices. Since CI/CD jobs often aren’t time-sensitive, Spot instances can be an excellent choice for GitLab execution pods. Karpenter will even automatically find the best Spot instance type to speed up the time it takes to launch an instance and minimize the likelihood of job interruption.

Deploying our solution

To deploy our solution, we’ll write a small application using the AWS Cloud Development Kit (AWS CDK) and the EKS Blueprints library. AWS CDK is an open-source software development framework to define your cloud application resources using familiar programming languages. EKS Blueprints is a library designed to make it simple to deploy complex Kubernetes resources to an Amazon EKS cluster with minimum coding.

The high-level infrastructure code – which can be found in our GitLab repo – is very simple. I’ve included comments to explain how it works.

// All CDK applications start with a new cdk.App object.
const app = new cdk.App();

// Create a new EKS cluster at v1.23. Run all non-DaemonSet pods in the 
// `kube-system` (coredns, etc.) and `karpenter` namespaces in Fargate
// so that we don't have to maintain EC2 instances for them.
const clusterProvider = new blueprints.GenericClusterProvider({
  version: KubernetesVersion.V1_23,
  fargateProfiles: {
    main: {
      selectors: [
        { namespace: 'kube-system' },
        { namespace: 'karpenter' },
      ]
    }
  },
  clusterLogging: [
    ClusterLoggingTypes.API,
    ClusterLoggingTypes.AUDIT,
    ClusterLoggingTypes.AUTHENTICATOR,
    ClusterLoggingTypes.CONTROLLER_MANAGER,
    ClusterLoggingTypes.SCHEDULER
  ]
});

// EKS Blueprints uses a Builder pattern.
blueprints.EksBlueprint.builder()
  .clusterProvider(clusterProvider) // start with the Cluster Provider
  .addOns(
    // Use the EKS add-ons that manage coredns and the VPC CNI plugin
    new blueprints.addons.CoreDnsAddOn('v1.8.7-eksbuild.3'),
    new blueprints.addons.VpcCniAddOn('v1.12.0-eksbuild.1'),
    // Install Karpenter
    new blueprints.addons.KarpenterAddOn({
      provisionerSpecs: {
        // Karpenter examines scheduled pods for the following labels
        // in their `nodeSelector` or `nodeAffinity` rules and routes
        // the pods to the node with the best fit, provisioning a new
        // node if necessary to meet the requirements.
        //
        // Allow either amd64 or arm64 nodes to be provisioned 
        'kubernetes.io/arch': ['amd64', 'arm64'],
        // Allow either Spot or On-Demand nodes to be provisioned
        'karpenter.sh/capacity-type': ['spot', 'on-demand']
      },
      // Launch instances in the VPC private subnets
      subnetTags: {
        Name: 'gitlab-runner-eks-demo/gitlab-runner-eks-demo-vpc/PrivateSubnet*'
      },
      // Apply security groups that match the following tags to the launched instances
      securityGroupTags: {
        'kubernetes.io/cluster/gitlab-runner-eks-demo': 'owned'      
      }
    }),
    // Create a pair of a new GitLab runner deployments, one running on
    // arm64 (Graviton) instance, the other on an x86_64 instance.
    // We'll show the definition of the GitLabRunner class below.
    new GitLabRunner({
      arch: CpuArch.ARM_64,
      // If you're using an on-premise GitLab installation, you'll want
      // to change the URL below.
      gitlabUrl: 'https://gitlab.com',
      // Kubernetes Secret containing the runner registration token
      // (discussed later)
      secretName: 'gitlab-runner-secret'
    }),
    new GitLabRunner({
      arch: CpuArch.X86_64,
      gitlabUrl: 'https://gitlab.com',
      secretName: 'gitlab-runner-secret'
    }),
  )
  .build(app, 
         // Stack name
         'gitlab-runner-eks-demo');

The GitLabRunner class is a HelmAddOn subclass that takes a few parameters from the top-level application:

// The location and name of the GitLab Runner Helm chart
const CHART_REPO = 'https://charts.gitlab.io';
const HELM_CHART = 'gitlab-runner';

// The default namespace for the runner
const DEFAULT_NAMESPACE = 'gitlab';

// The default Helm chart version
const DEFAULT_VERSION = '0.40.1';

export enum CpuArch {
    ARM_64 = 'arm64',
    X86_64 = 'amd64'
}

// Configuration parameters
interface GitLabRunnerProps {
    // The CPU architecture of the node on which the runner pod will reside
    arch: CpuArch
    // The GitLab API URL 
    gitlabUrl: string
    // Kubernetes Secret containing the runner registration token (discussed later)
    secretName: string
    // Optional tags for the runner. These will be added to the default list 
    // corresponding to the runner's CPU architecture.
    tags?: string[]
    // Optional Kubernetes namespace in which the runner will be installed
    namespace?: string
    // Optional Helm chart version
    chartVersion?: string
}

export class GitLabRunner extends HelmAddOn {
    private arch: CpuArch;
    private gitlabUrl: string;
    private secretName: string;
    private tags: string[] = [];

    constructor(props: GitLabRunnerProps) {
        // Invoke the superclass (HelmAddOn) constructor
        super({
            name: `gitlab-runner-${props.arch}`,
            chart: HELM_CHART,
            repository: CHART_REPO,
            namespace: props.namespace || DEFAULT_NAMESPACE,
            version: props.chartVersion || DEFAULT_VERSION,
            release: `gitlab-runner-${props.arch}`,
        });

        this.arch = props.arch;
        this.gitlabUrl = props.gitlabUrl;
        this.secretName = props.secretName;

        // Set default runner tags
        switch (this.arch) {
            case CpuArch.X86_64:
                this.tags.push('amd64', 'x86', 'x86-64', 'x86_64');
                break;
            case CpuArch.ARM_64:
                this.tags.push('arm64');
                break;
        }
        this.tags.push(...props.tags || []); // Add any custom tags
    };

    // `deploy` method required by the abstract class definition. Our implementation
    // simply installs a Helm chart to the cluster with the proper values.
    deploy(clusterInfo: ClusterInfo): void | Promise<Construct> {
        const chart = this.addHelmChart(clusterInfo, this.getValues(), true);
        return Promise.resolve(chart);
    }

    // Returns the values for the GitLab Runner Helm chart
    private getValues(): Values {
        return {
            gitlabUrl: this.gitlabUrl,
            runners: {
                config: this.runnerConfig(), // runner config.toml file, from below
                name: `demo-runner-${this.arch}`, // name as seen in GitLab UI
                tags: uniq(this.tags).join(','),
                secret: this.secretName, // see below
            },
            // Labels to constrain the nodes where this runner can be placed
            nodeSelector: {
                'kubernetes.io/arch': this.arch,
                'karpenter.sh/capacity-type': 'on-demand'
            },
            // Default pod label
            podLabels: {
                'gitlab-role': 'manager'
            },
            // Create all the necessary RBAC resources including the ServiceAccount
            rbac: {
                create: true
            },
            // Required resources (memory/CPU) for the runner pod. The runner
            // is fairly lightweight as it's a self-contained Golang app.
            resources: {
                requests: {
                    memory: '128Mi',
                    cpu: '256m'
                }
            }
        };
    }

    // This string contains the runner's `config.toml` file including the
    // Kubernetes executor's configuration. Note the nodeSelector constraints 
    // (including the use of Spot capacity and the CPU architecture).
    private runnerConfig(): string {
        return `
  [[runners]]
    [runners.kubernetes]
      namespace = "{{.Release.Namespace}}"
      image = "ubuntu:16.04"
    [runners.kubernetes.node_selector]
      "kubernetes.io/arch" = "${this.arch}"
      "kubernetes.io/os" = "linux"
      "karpenter.sh/capacity-type" = "spot"
    [runners.kubernetes.pod_labels]
      gitlab-role = "runner"
      `.trim();
    }
}

For security reasons, we store the GitLab registration token in a Kubernetes Secret – never in our source code. For additional security, we recommend encrypting Secrets using an AWS Key Management Service (AWS KMS) key that you supply by specifying the encryption configuration when you create your Amazon EKS cluster. It’s a good practice to restrict access to this Secret via Kubernetes RBAC rules.

To create the Secret, run the following command:

# These two values must match the parameters supplied to the GitLabRunner constructor
NAMESPACE=gitlab
SECRET_NAME=gitlab-runner-secret
# The value of the registration token.
TOKEN=GRxxxxxxxxxxxxxxxxxxxxxx

kubectl -n $NAMESPACE create secret generic $SECRET_NAME \
        --from-literal="runner-registration-token=$TOKEN" \
        --from-literal="runner-token="

Building a multi-architecture container image

Now that we’ve launched our GitLab runners and configured the executors, we can build and test a simple multi-architecture container image. If the tests pass, we can then upload it to our project’s GitLab container registry. Our application will be pretty simple: we’ll create a web server in Go that simply prints out “Hello World” and prints out the current architecture.

Find the source code of our sample app in our GitLab repo.

In GitLab, the CI/CD configuration lives in the .gitlab-ci.yml file at the root of the source repository. In this file, we declare a list of ordered build stages, and then we declare the specific jobs associated with each stage.

Our stages are:

  1. The build stage, in which we compile our code, produce our architecture-specific images, and upload these images to the GitLab container registry. These uploaded images are tagged with a suffix indicating the architecture on which they were built. This job uses a matrix variable to run it in parallel against two different runners – one for each supported architecture. Furthermore, rather than using docker build to produce our images, we use Kaniko to build them. This lets us build our images in an unprivileged container environment and improve the security posture considerably.
  2. The test stage, in which we test the code. As with the build stage, we use a matrix variable to run the tests in parallel in separate pods on each supported architecture.

The assembly stage, in which we create a multi-architecture image manifest from the two architecture-specific images. Then, we push the manifest into the image registry so that we can refer to it in future deployments.
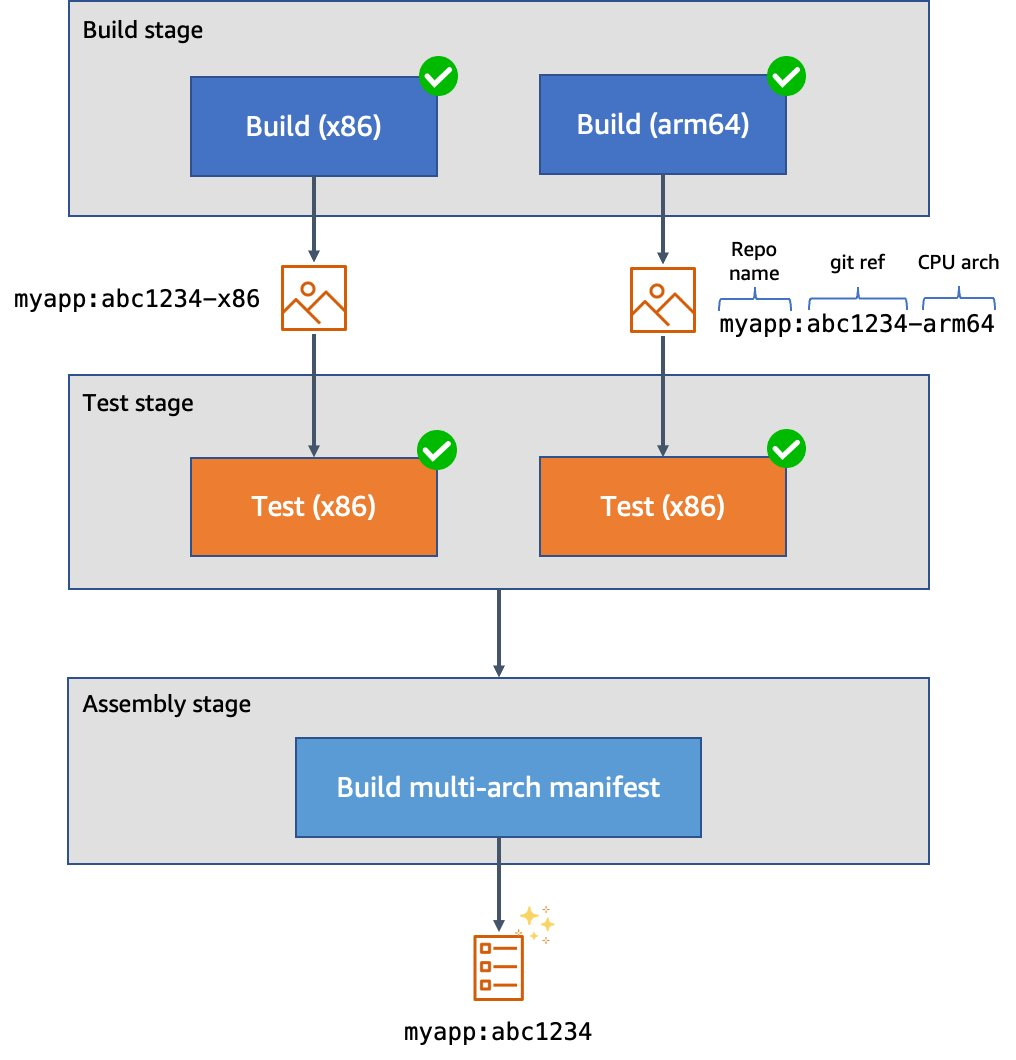
Figure 2. Example CI/CD pipeline for multi-architecture images

Figure 2. Example CI/CD pipeline for multi-architecture images.

Here’s what our top-level configuration looks like:

variables:
  # These are used by the runner to configure the Kubernetes executor, and define
  # the values of spec.containers[].resources.limits.{memory,cpu} for the Pod(s).
  KUBERNETES_MEMORY_REQUEST: 1Gi
  KUBERNETES_CPU_REQUEST: 1

# List of stages for jobs, and their order of execution  
stages:    
  - build
  - test
  - create-multiarch-manifest
Here’s what our build stage job looks like. Note the matrix of variables which are set in BUILD_ARCH as the two jobs are run in parallel:
build-job:
  stage: build
  parallel:
    matrix:              # This job is run twice, once on amd64 (x86), once on arm64
    - BUILD_ARCH: amd64
    - BUILD_ARCH: arm64
  tags: [$BUILD_ARCH]    # Associate the job with the appropriate runner
  image:
    name: gcr.io/kaniko-project/executor:debug
    entrypoint: [""]
  script:
    - mkdir -p /kaniko/.docker
    # Configure authentication data for Kaniko so it can push to the
    # GitLab container registry
    - echo "{\"auths\":{\"${CI_REGISTRY}\":{\"auth\":\"$(printf "%s:%s" "${CI_REGISTRY_USER}" "${CI_REGISTRY_PASSWORD}" | base64 | tr -d '\n')\"}}}" > /kaniko/.docker/config.json
    # Build the image and push to the registry. In this stage, we append the build
    # architecture as a tag suffix.
    - >-
      /kaniko/executor
      --context "${CI_PROJECT_DIR}"
      --dockerfile "${CI_PROJECT_DIR}/Dockerfile"
      --destination "${CI_REGISTRY_IMAGE}:${CI_COMMIT_SHORT_SHA}-${BUILD_ARCH}"

Here’s what our test stage job looks like. This time we use the image that we just produced. Our source code is copied into the application container. Then, we can run make test-api to execute the server test suite.

build-job:
  stage: build
  parallel:
    matrix:              # This job is run twice, once on amd64 (x86), once on arm64
    - BUILD_ARCH: amd64
    - BUILD_ARCH: arm64
  tags: [$BUILD_ARCH]    # Associate the job with the appropriate runner
  image:
    # Use the image we just built
    name: "${CI_REGISTRY_IMAGE}:${CI_COMMIT_SHORT_SHA}-${BUILD_ARCH}"
  script:
    - make test-container

Finally, here’s what our assembly stage looks like. We use Podman to build the multi-architecture manifest and push it into the image registry. Traditionally we might have used docker buildx to do this, but using Podman lets us do this work in an unprivileged container for additional security.

create-manifest-job:
  stage: create-multiarch-manifest
  tags: [arm64] 
  image: public.ecr.aws/docker/library/fedora:36
  script:
    - yum -y install podman
    - echo "${CI_REGISTRY_PASSWORD}" | podman login -u "${CI_REGISTRY_USER}" --password-stdin "${CI_REGISTRY}"
    - COMPOSITE_IMAGE=${CI_REGISTRY_IMAGE}:${CI_COMMIT_SHORT_SHA}
    - podman manifest create ${COMPOSITE_IMAGE}
    - >-
      for arch in arm64 amd64; do
        podman manifest add ${COMPOSITE_IMAGE} docker://${COMPOSITE_IMAGE}-${arch};
      done
    - podman manifest inspect ${COMPOSITE_IMAGE}
    # The composite image manifest omits the architecture from the tag suffix.
    - podman manifest push ${COMPOSITE_IMAGE} docker://${COMPOSITE_IMAGE}

Trying it out

I’ve created a public test GitLab project containing the sample source code, and attached the runners to the project. We can see them at Settings > CI/CD > Runners:
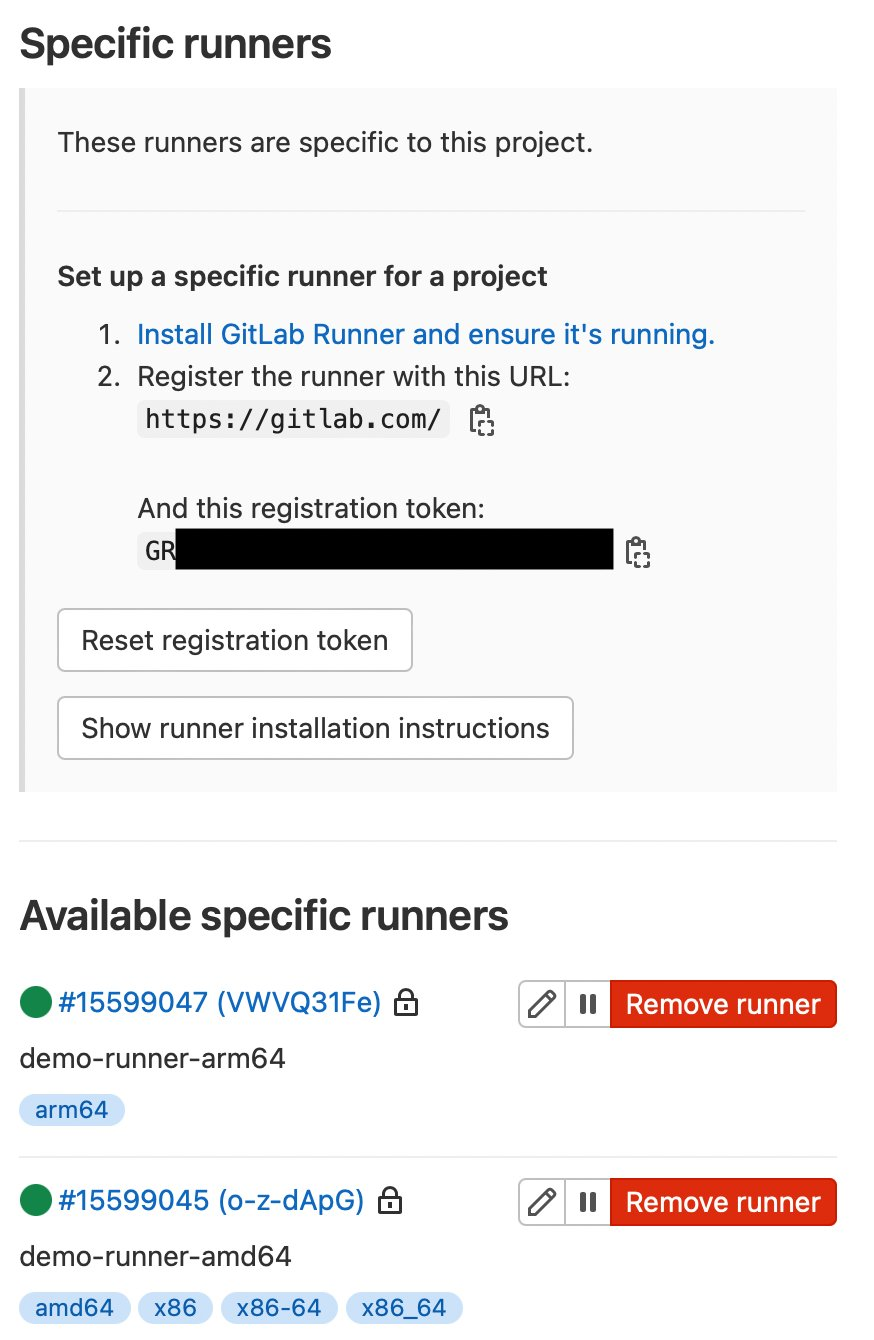
Figure 3. GitLab runner configurations

Figure 3. GitLab runner configurations.

Here we can also see some pipeline executions, where some have succeeded, and others have failed.
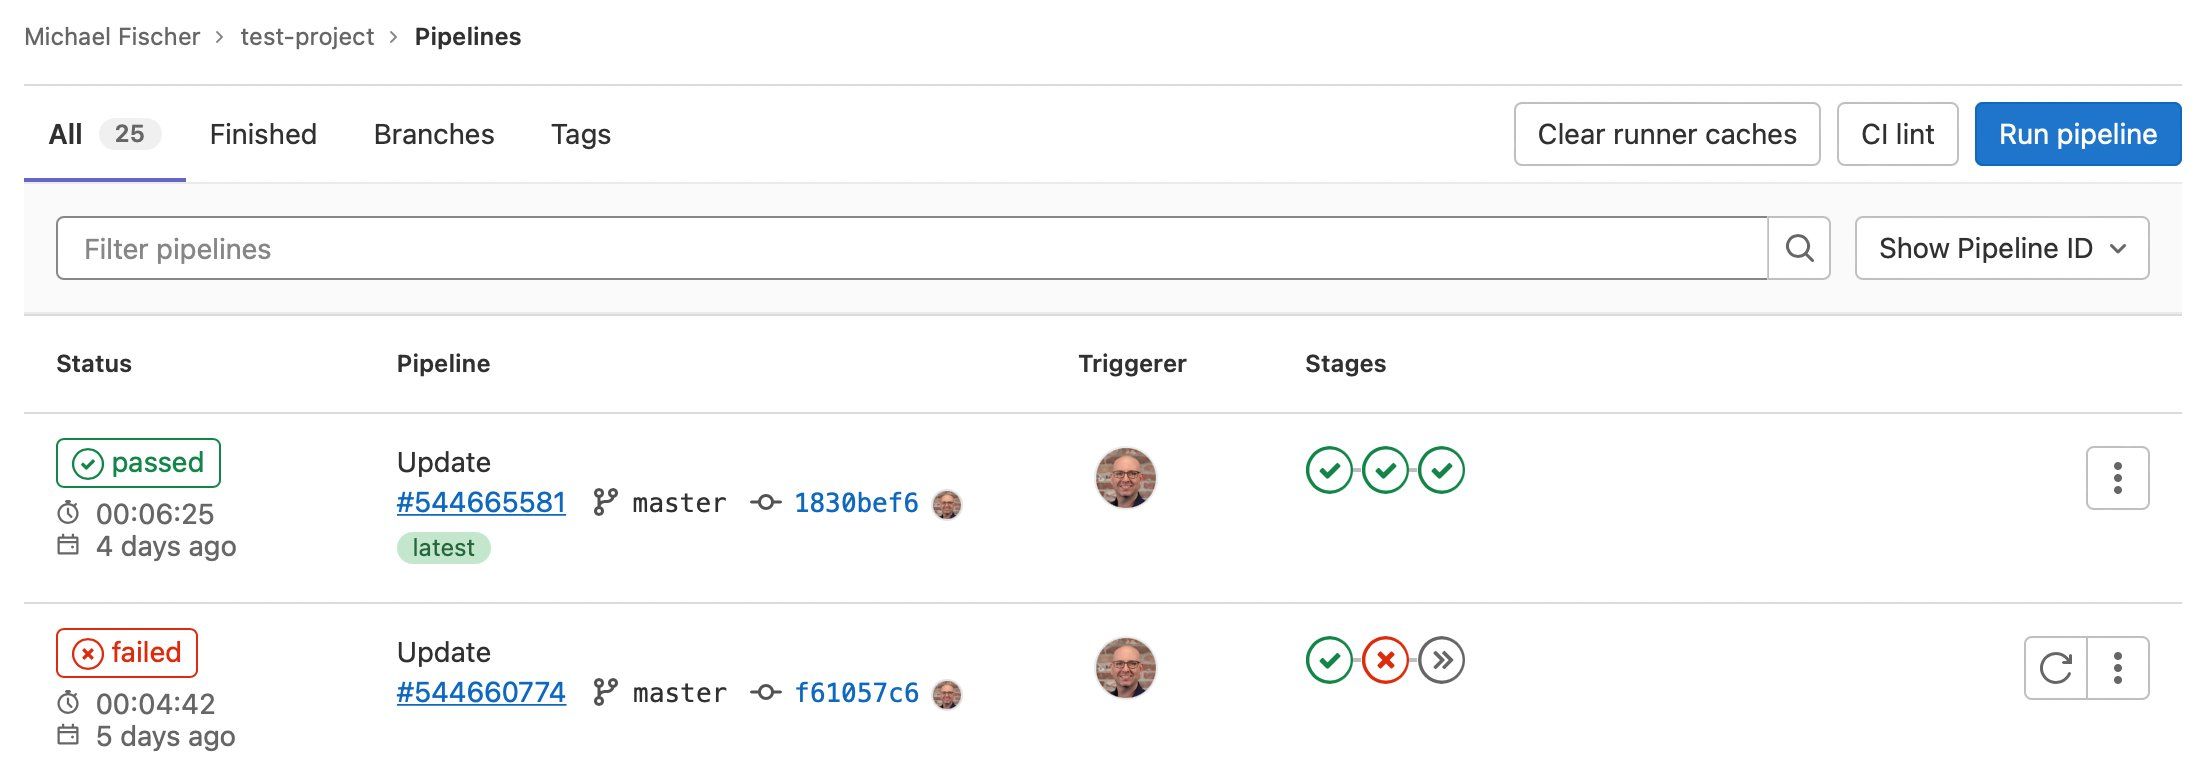
Figure 4. GitLab sample pipeline executions

Figure 4. GitLab sample pipeline executions.

We can also see the specific jobs associated with a pipeline execution:
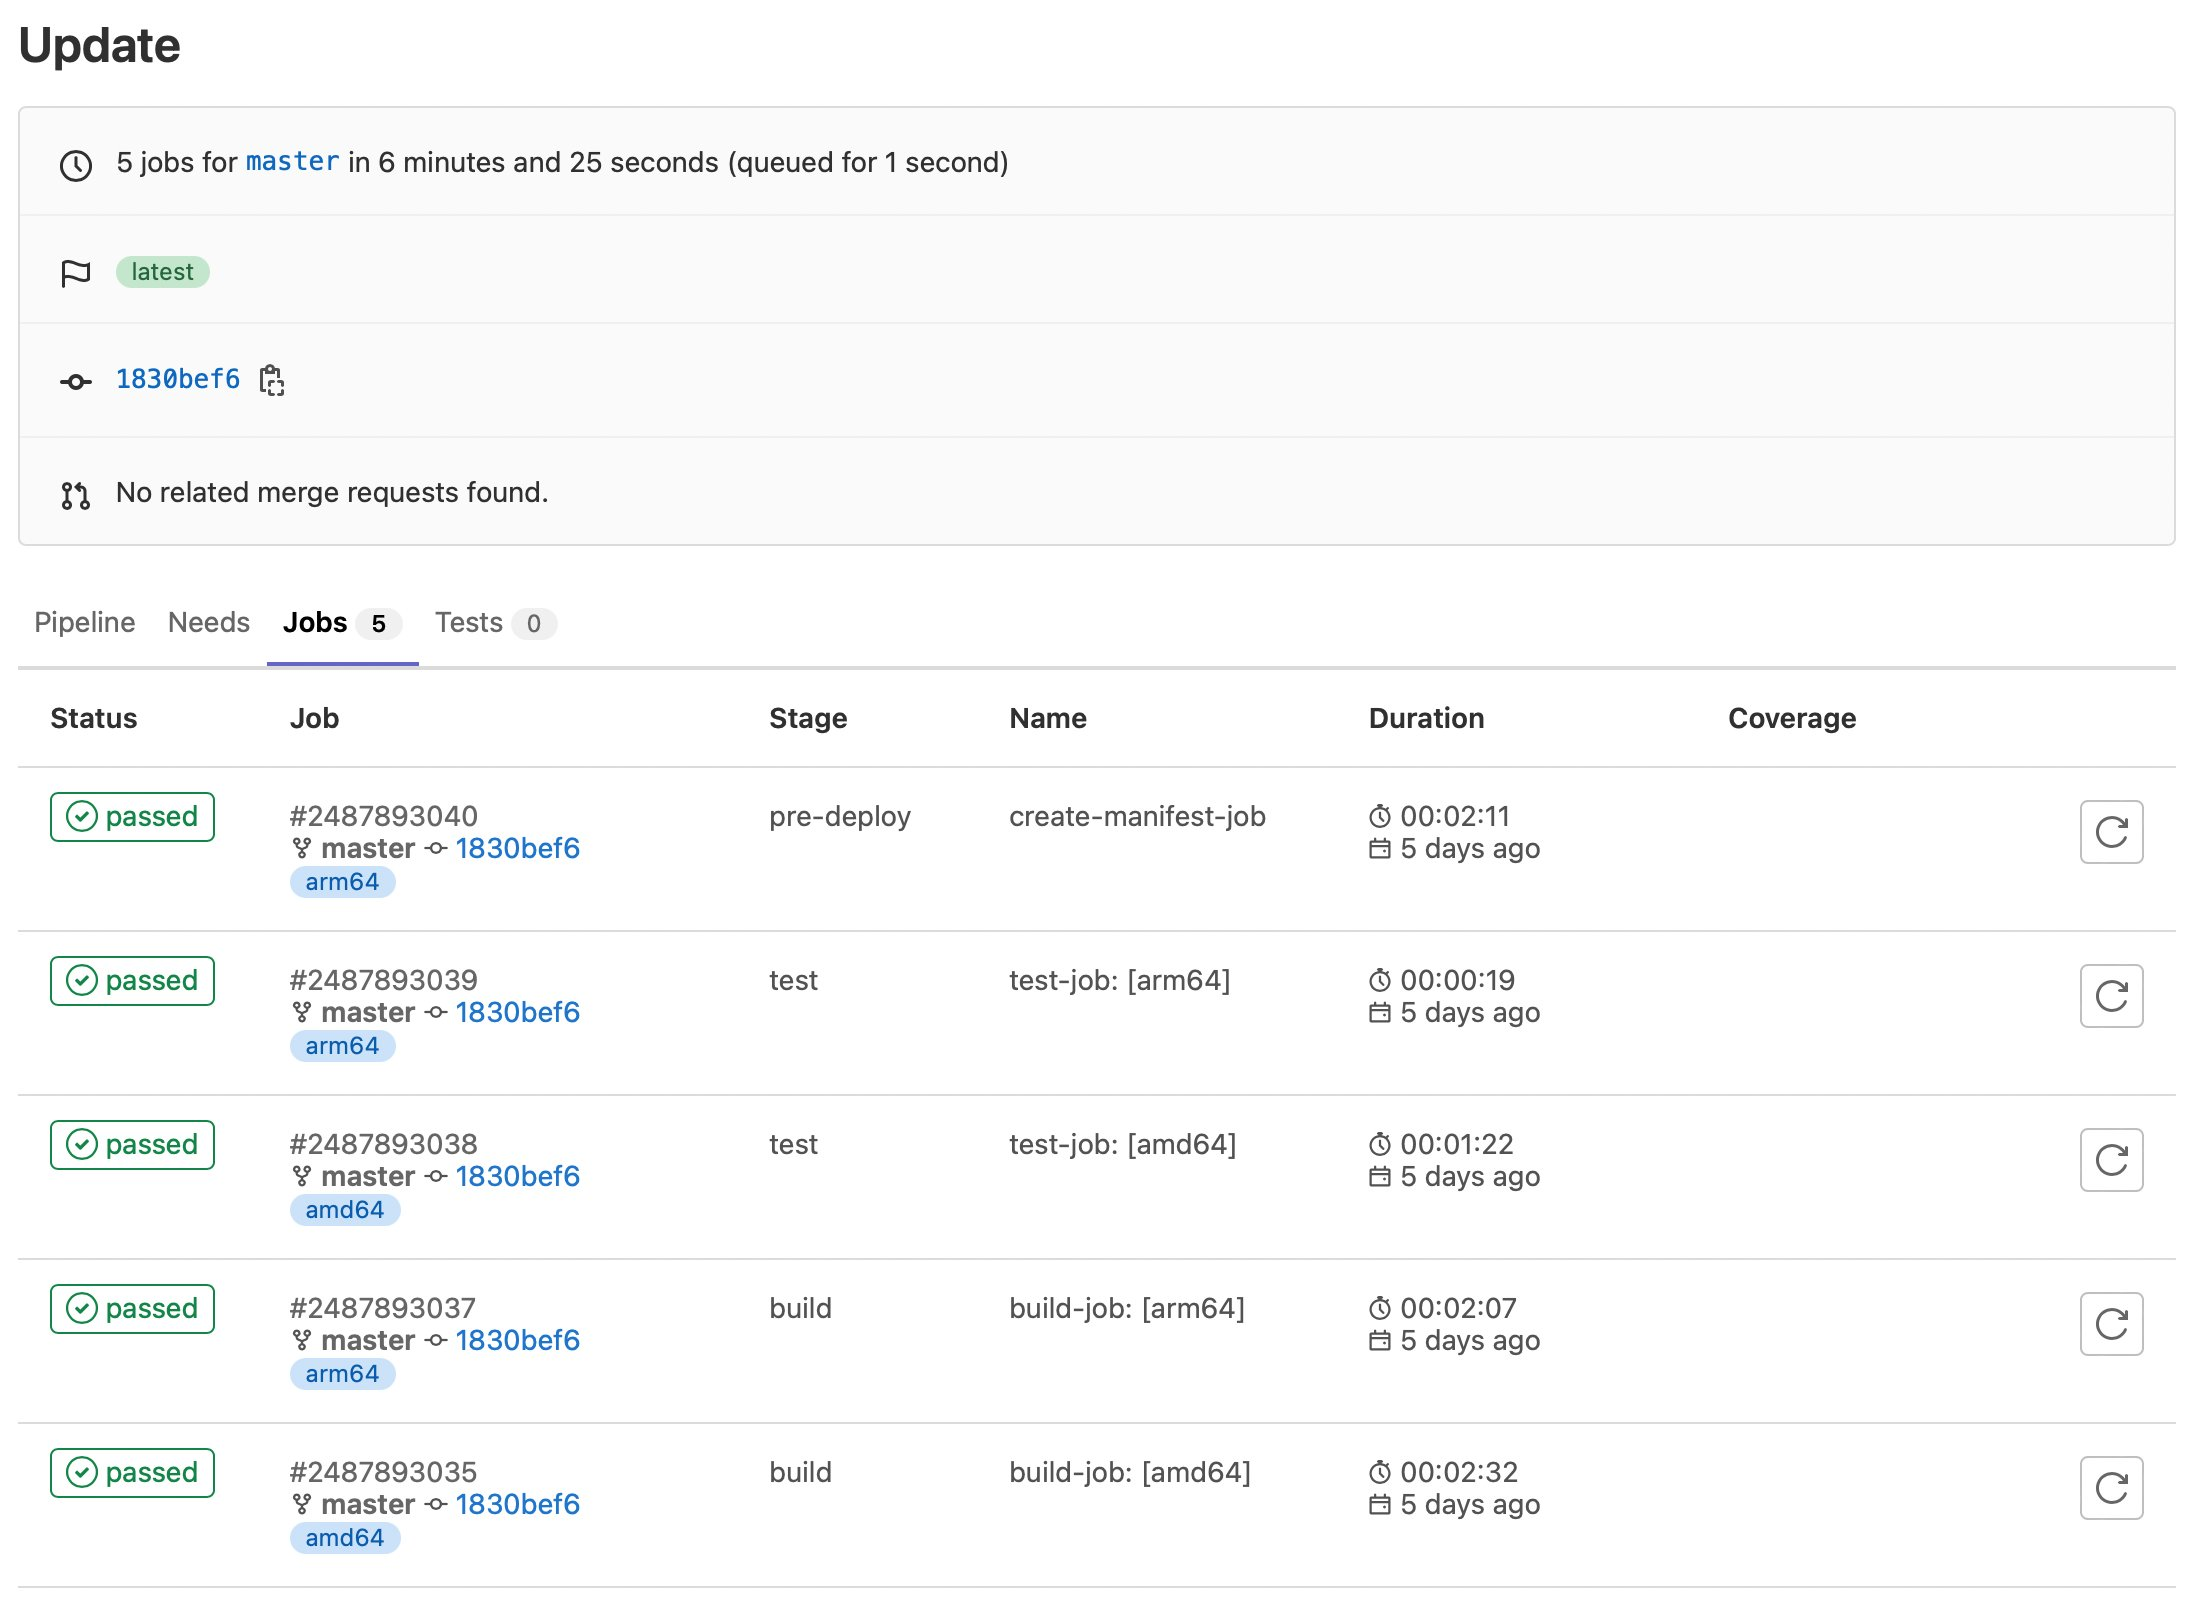
Figure 5. GitLab sample job executions

Figure 5. GitLab sample job executions.

Finally, here are our container images:
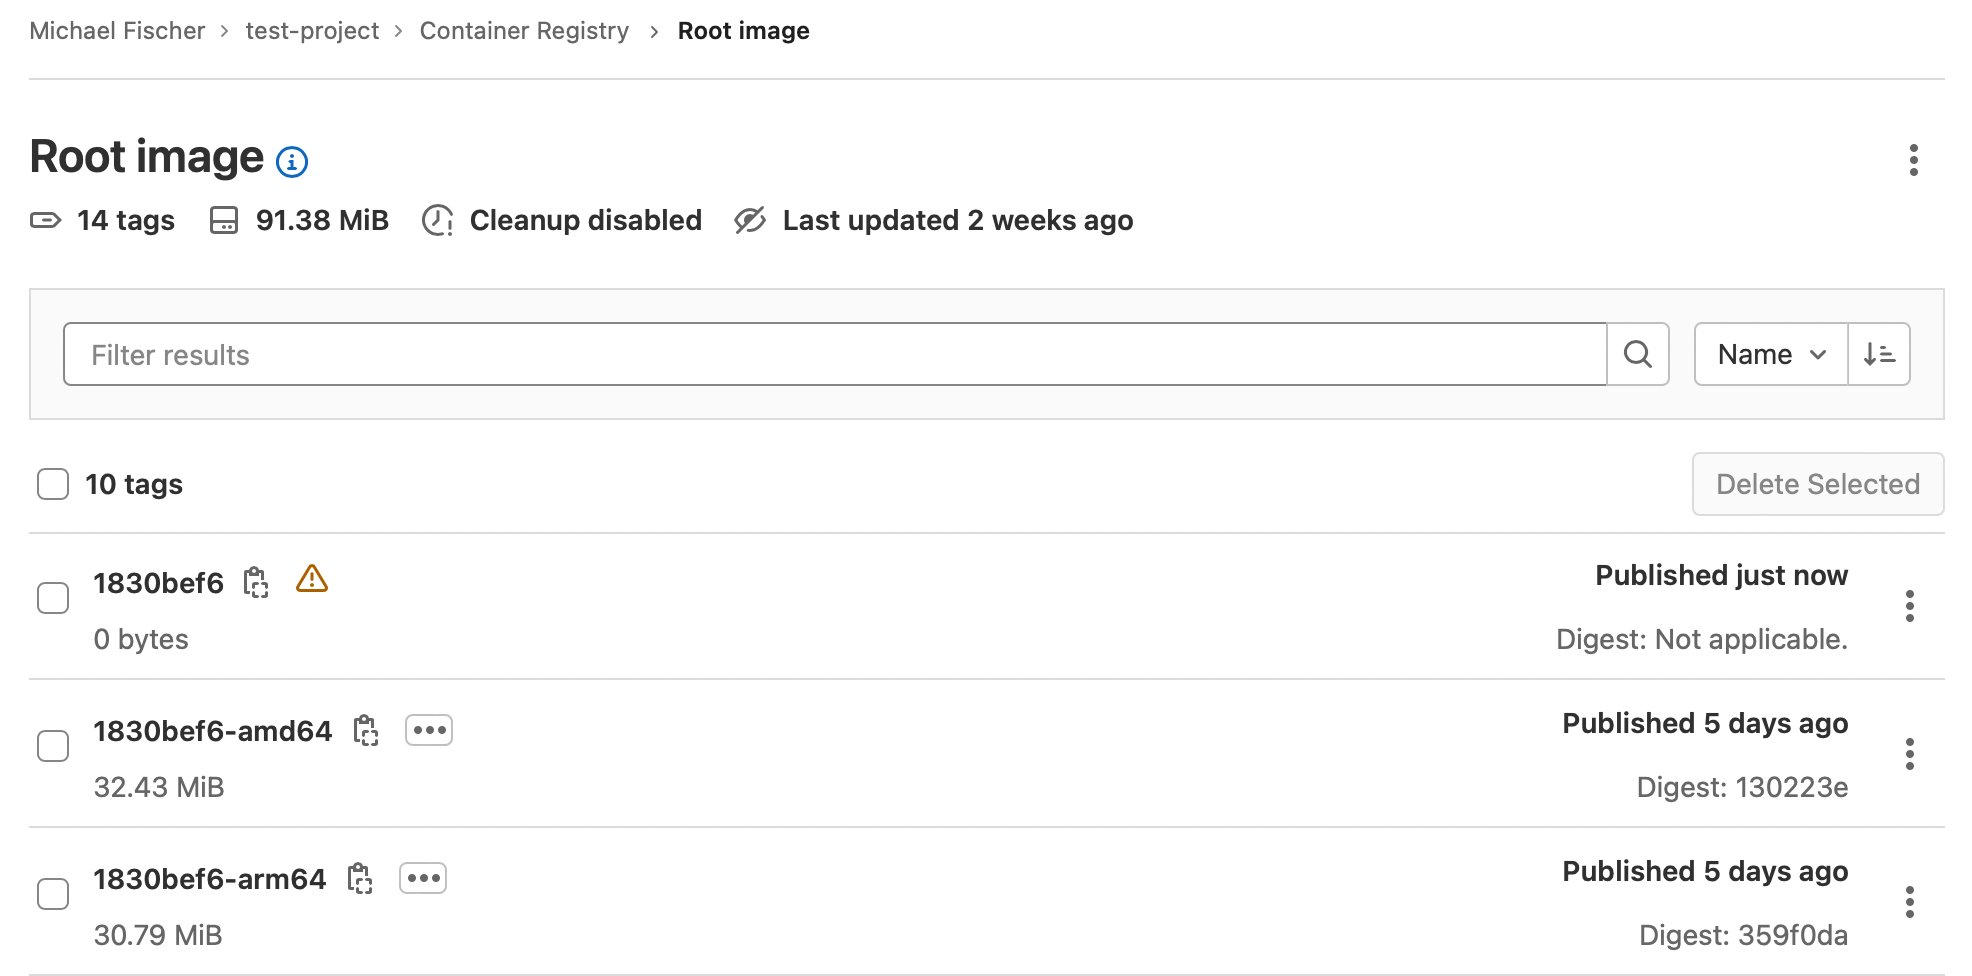
Figure 5. GitLab sample job executions

Figure 6. GitLab sample container registry.

Conclusion

In this post, we’ve illustrated how you can quickly and easily construct multi-architecture container images with GitLab, Amazon EKS, Karpenter, and Amazon EC2, using both x86 and Graviton instance families. We indexed on using as many managed services as possible, maximizing security, and minimizing complexity and TCO. We dove deep on multiple facets of the process, and discussed how to save up to 90% of the solution’s cost by using Spot instances for CI/CD executions.

Find the sample code, including everything shown here today, in our GitLab repository.

Building multi-architecture images will unlock the value and performance of running your applications on AWS Graviton and give you increased flexibility over compute choice. We encourage you to get started today.

About the author:

Michael Fischer

Michael Fischer is a Principal Specialist Solutions Architect at Amazon Web Services. He focuses on helping customers build more cost-effectively and sustainably with AWS Graviton. Michael has an extensive background in systems programming, monitoring, and observability. His hobbies include world travel, diving, and playing the drums.