Containers
Accelerate Amazon ECS-based workloads with ECS Blueprints
Introduction
We are introducing ECS Blueprints for AWS Cloud Development Kit (AWS CDK) that makes it easier and faster to build container workloads for the Amazon Elastic Container Service (Amazon ECS). ECS Blueprints is a collection of Infrastructure as Code (IaC) open-source modules that help you configure and deploy container workloads on top of Amazon ECS cluster. Customers can use ECS Blueprints not only for beginning Amazon ECS journey but also for building specific workload like frontend service with Application Load Balancer (ALB) on the existing cluster. Also, ECS Blueprints shows the best practices for each scenario and provides reference architectures and solution patterns. This allows customers to speed up building Amazon ECS workloads because ECS Blueprints addresses end-to-end requirements for specific scenarios. Furthermore, customers can easily customize ECS Blueprints templates for their use cases, which is covered in detail in this post.
AWS CDK is an open-source software development framework that models and provisions cloud infrastructure using familiar programming languages. Therefore, developers can use familiar languages such as TypeScript, Python, and Java to provision infrastructure and to build business logic at the same time. Additionally, since AWS CDK’s built-in components are a high-level abstraction consisting of one or more AWS resources, customers can quickly configure and deploy multiple environments by using custom values for parameters defined by AWS CDK constructs.
While this post is focused on ECS Blueprints with AWS CDK, ECS Blueprints with Terraform is also available in the same repository and implements similar concepts in Terraform.
Motivation
Containers are a de facto standard for packaging and deploying applications. Containers include all the application dependencies and boot up consistently across machines from developer laptop to production environments. The portability of containers enables customers to build end-to-end automated software delivery pipelines and enables them to ship software frequently and quickly. However, for many new customers, the learning curve and skills needed to attain these benefits can be quite steep. They have to learn container image building, understand container orchestration such as Amazon ECS, create deployment artifacts, instrument for observability and security, and set up the continuous integration (CI) and continuous deployment (CD) pipelines. Even though fully managed services such as Amazon ECS and AWS Fargate eliminate a lot of the heavy lift, there’s still quite a broad set of skills that new users need to ramp up.
With ECS Blueprints, we want new users to achieve benefits of container-based modernization in hours rather than months. The blueprints are meant to give new users a jumpstart, and enable them to learn-by-doing. With ECS Blueprints, we aspire to codify best practices, well-designed architecture patterns, and provide end-to-end solutions addressing CI/CD, observability, security, and cost efficiency. In this post, we’ll provide details on the ECS Blueprints that use AWS Fargate which is a serverless container engine as compute and AWS CDK as the infrastructure-as-code language.
Anatomy of ECS Blueprints
One of the best practices for developing AWS CDK is “modeling with constructs and deploying with stacks”. It means to build construct for application’s higher-level logical units from multiple AWS resources. Following this best practice guidelines, we made components directory consists of custom construct adaptable for reuse across multiple scenarios. At the time of writing this post, components directory has two constructs, responsible for the core infrastructure and CI/CD pipeline.
In the core infrastructure construct, it’s composed of Amazon VPC (Amazon Virtual Private Cloud), Amazon ECS cluster, private dns namespaces, and more. It’s a collection of basic AWS resources required to start the Amazon ECS journey. The CI/CD construct it made up of AWS CodeBuild, Amazon Elastic Container Registry (Amazon ECR), AWS CodePipeline and relevant AWS IAM Role. Instead of embedding these two constructs in each ECS Blueprints template, we made it a custom construct. The benefit of this design is that customer can reduce the source codes that used repeatedly. Customer can easily inject this construct into multiple ECS Blueprints templates as programming languages’ function.

Figure 1. Pieces of ECS Blueprints for AWS CDK
Each directory in the same level as the components directory is named each Amazon ECS workload. And each template under the directory follows a same hierarchical structure as below:
lib/<workload name>_stack.py – A file that this blueprint application’s main stack construct is defined.
- lib/<workload name>_stack_props.py – A file that consists of variables required by application’s main stack.
- README.md – A file that provides instructions on how to use this ECS Blueprint example.
- __init__.py – A file that is used to mark a directory as a Python package.
- app.py – The entry point for execution for this Amazon ECS service application.
- cdk.json – A configuration file for AWS CDK that defines what executable CDK should run to generate the CDK construct tree.
- sample.env – A sample collection of variables necessary for executing this ECS Blueprint template.
Since the AWS CDK stack is the unit of deployment, all AWS resources defined within the scope of a stack have same lifecycle. Based on this characteristic, we divided each function into different templates.
Walkthrough
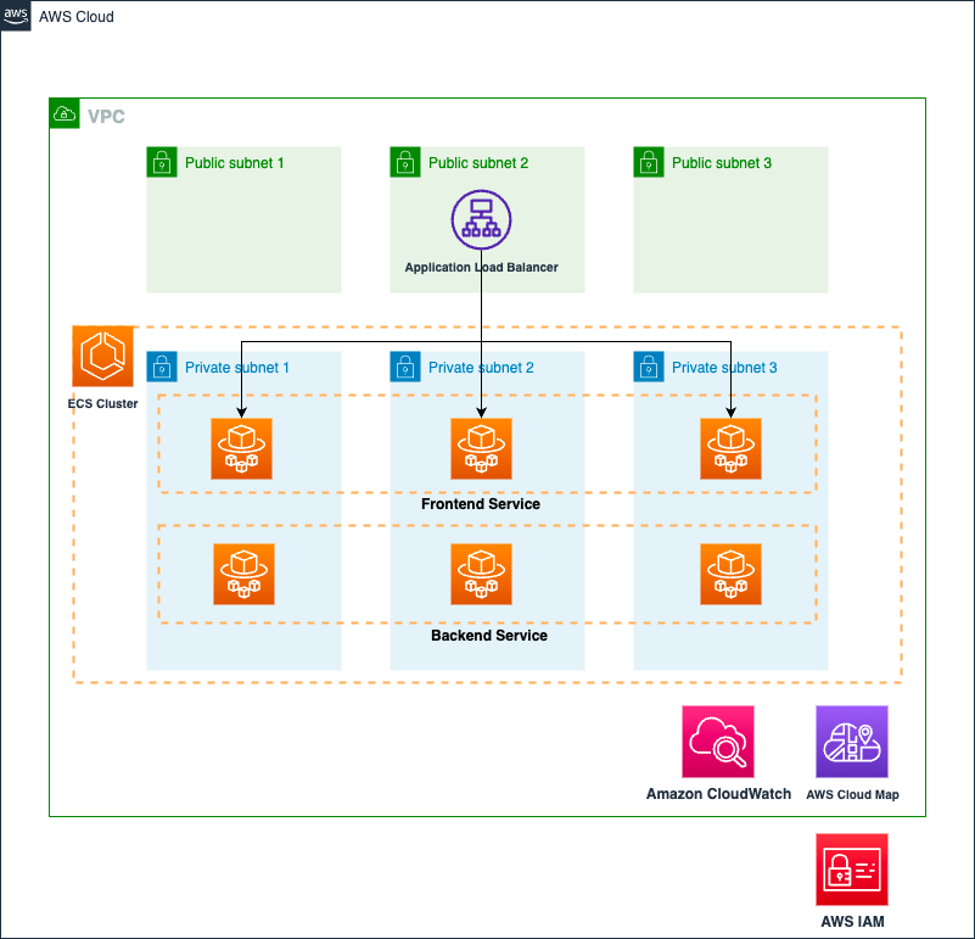
In this walkthrough, we are going to deploy simple web application to the Amazon ECS cluster by ECS Blueprint templates. Representing the most typical workload, this application allows end users to access via the Application Load Balancer’s endpoint. The traffic coming in through the ALB is handled by the frontend service, which communicates with the backend service through service discovery.

Figure 2. The architecture of full stack application deployed through AWS CDK
Prerequisites
To demonstrate how easy it is to configure an Amazon ECS workload with ECS Blueprints, we’ll use two ECS Blueprint templates for provisioning a full stack application. For this walkthrough, you need following prerequisites:
- AWS Command Line Interface (AWS CLI) version 2
- AWS CDK Toolkit
- Working with the AWS CDK in Python
- Python ≥ 3.6+
- Git
Configure the AWS credentials on the place that you’re going to walkthrough. To start, clone ECS Blueprints Github Repo.
Step 1: Deploy backend service with core infrastructure
Backend Service blueprint deploys the Node.js backend API that handles traffic for the frontend application we’ll be deploying in the next step. This backend service has a service discovery name registered with AWS Cloud Map. Other services running in this Amazon ECS cluster can access the backend service using backend service’s discovery name.
Setup an AWS Account and the AWS Region environment variables to match your environment. In this post, we use the Oregon region (us-west-2) for our examples. We’ll then generate a .env file to be used by the AWS CDK template. We fetch variables in the environment file during deploying backend service.
Create python virtual environments to isolate python installs and associated pip packages from your local environment. After that, install required packages:
Let’s figure out .env file’s each value in detail:
- deploy_core_stack – Since we didn’t provision core infrastructure including VPC and Amazon ECS cluster, we deploy both core infrastructure and backend service. Therefore, we set this value to True.
- Essential props – This includes the AWS account number and AWS Region, which are essential elements during deploying the AWS CDK stack.
- Core stack props – Specify the name for the component that make up the core infrastructure.
- Backend service props – Configure the backend service’s detail information such as container image URI, container name, container port, resource amount allocated into Amazon ECS task, etc.
- ECS cluster props and Service discovery props – Leave both props values at their default settings because those values are out automatically during provisioning core infrastructure.
Bootstrap CDK, if this is your first time using CDK to create infrastructure.
Prior to deploy backend service stack, use the following AWS CDK command to explore the AWS CDK stack of this application. You’ll observe two stacks named CoreInfraStack and BackendService.
Deploy the AWS CDK stacks using below command.
Step 2: Deploy frontend service with load balancer
Move to frontend service template. This blueprint creates a web facing load balanced Amazon ECS service.
Again, setup an AWS Account and the AWS Region environment variables to match your environment. We’ll generate a .env file to be used by the AWS CDK template. We fetch variables in the environment file during deploying frontend service.
However, unlike when deploying the backend service, some values require adjustment. First of all, since we already provisioned core infrastructure, and we’ll use that Amazon ECS cluster for the frontend service. Change the deploy_core_stack value to False. Second, specify ECS Task Execution Role ARN and namespace values by referring to the core infrastructure information provisioned in preceding step. The necessary information can be accessed from the output.json file in the backend service directory.
Deploy the AWS CDK stack using below command.
Through two ECS Blueprint templates, we’ve constructed the Amazon ECS cluster and provisioned the frontend and backend services on it. To verify deployment, copy the load balancer endpoint provided in the output information at the final part of the AWS CDK deployment into your web browser. You’ll see something similar to the following diagram.

Figure 3. The outcome after deploying backend and frontend CDK stacks
Customize ECS Blueprint with your taste

Figure 4. The correlation among the files within one workload directory
It’s possible that ECS Blueprint doesn’t fit your workload. If that’s the case, then you can easily customize ECS Blueprints to transform it into a template that aligns with your workload. In order to customize the blueprints template, a deeper understanding of the provided AWS CDK code is required.
As previously stated, the configuration logic for each Amazon ECS workload can be found in the stack.py file. And the variables enumerated in the stack_props.py file are used for the parameters when configuring each resource in the stack.py file. In other words, this file is the interface used to define the properties on the stack. Furthermore, customers can specify the values of these properties in the .env file. Therefore, customers can generate multiple services with different parameters from a single template by turning necessary parameters into variables. For example, if a customer wants to directly set the maximum and minimum task values during configuring Amazon ECS service auto scaling, then they can extract these as environment variables and state variables in the stack_props.py file. As a last step, substitute those values with the environment variables in the stack.py file.
Additionally, each Amazon ECS workload scenario is located in distinct directories and possess their own deployment life cycles. Customers can easily create an ECS Blueprint template that contains the logic for each Amazon ECS workload by using the established directory structure. Optionally, customers can achieve the same goal by making slight changes to the logic in the template.
Cleaning up
You can either delete the stack through the AWS CloudFormation console or use the AWS CDK command at the location of frontend service template.
After deletion of the frontend service, move to the backend service template and use the AWS CDK command again. Now the backend service and core infrastructure will be deleted.
Conclusion
In this post, we introduced you to what ECS Blueprints is, how to use it, and how you can customize it. Since you just learned how to use ECS Blueprint for your workload, you can get started ECS blueprint today! To learn more about the ECS Blueprints, go take a look at the ECS Blueprints workshop and the official GitHub repository. ECS Blueprints is free to use, and you pay for only the resources that you deployed.
ECS Blueprints aims to cover common Amazon ECS workload scenarios. Therefore, we would love to hear feedback on how we can shape up the ECS Blueprints. If you’re interested in giving us feedback, please open a GitHub Issue to ECS Blueprints repository.