AWS Compute Blog
Orchestrating high performance computing with AWS Step Functions and AWS Batch
This post is written by Dan Fox, Principal Specialist Solutions Architect; Sabha Parameswaran, Senior Solutions Architect.
High performance computing (HPC) workloads address challenges in a wide variety of industries, including genomics, financial services, oil and gas, weather modeling, and semiconductor design. These workloads frequently have complex orchestration requirements that may include large datasets and hundreds or thousands of compute tasks.
AWS Step Functions is a workflow automation service that can simplify orchestrating other AWS services. AWS Batch is a fully managed batch processing service that can dynamically scale to address computationally intensive workloads. Together, these services can orchestrate and run demanding HPC workloads.
This blog post identifies three common challenges when creating HPC workloads. It describes some features with Step Functions and AWS Batch that can help to solve these challenges. It then shows a sample project that performs complex task orchestration using Step Functions and AWS Batch.
Reaching service quotas with polling iterations
It’s common for HPC workflows to require that a step comprising multiple jobs completes before advancing to the next step. In these cases, it’s typical for developers to implement iterative polling patterns to track job completions.
To handle task orchestration for a workload like this, you may choose to use Step Functions. Step Functions has a hard limit of 25,000 history events. A single state transition may contain multiple history events. For example, an entry to the state and an exit from the state count as two steps. A workflow that iteratively polls many long-running processes may run into limits with this service quota.
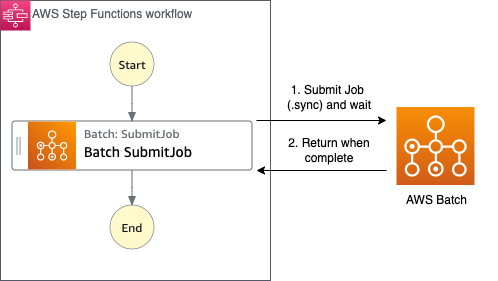
Step Functions addresses this by providing synchronization capabilities with several integrated services, including AWS Batch. For integrated services, Step Functions can wait for a task to complete before progressing to the next state. This feature, called “Run a Job (.sync)” in the documentation, returns a Success or Failure message only when the compute service task is complete, reducing the number of entries in the event history log. View the Step Functions documentation for a complete list of supported service integrations.
Supporting parallel and dynamic tasks
HPC workloads may require a changing number of compute tasks from execution to execution. For example, the number of compute tasks required in a workflow may depend on the complexity or length of an input dataset. For performance reasons, you may desire for these tasks to run in parallel.
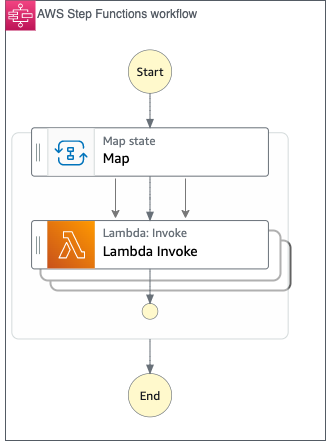
Step Functions supports faster data processing with a fixed number of parallel executions through the parallel state type. If a workload has an unknown number of branches, the map state type can run a set of parallel steps for each element of an input array. We refer to this pattern as dynamic parallelism.
Limits and flow control with dynamic tasks
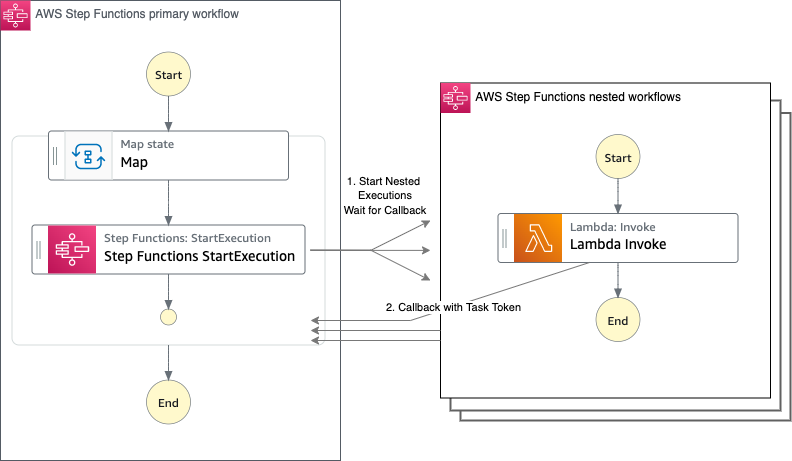
The map state may limit concurrent iterations. When this occurs, some iterations do not begin until previous iterations have completed. The likelihood of this occurring increases when an input array has over 40 items. If your HPC workload benefits from increased concurrency, you may use nested workflows. Step Functions allows you to orchestrate more complex processes by composing modular, reusable workflows.
For example, a map state may invoke secondary, nested workflows, which also contain map states. By nesting Step Functions workflows, you can build larger, more complex workflows out of smaller, simpler workflows.
As your workflow grows in complexity, you may use the callback task, which is an additional flow control feature. Callback tasks provide a way to pause a workflow pending the return of a unique task token. A callback task passes this token to an integrated service and then stops. Once the integrated service has completed, it may return the task token to the Step Functions workflow with a SendTaskSuccess or SendTaskFailure call. Once the callback task receives the task token, the workflow proceeds to the next state.
View the documentation for a list of integrated services that support this pattern.
A sample project with several orchestration patterns
This sample project demonstrates orchestration of HPC workloads using Step Functions, AWS Batch, and Lambda. The nesting in this project is three layers deep. The primary state machine runs the second layer nested state machines, which in turn run the third layer nested state machines.
The primary state machine demonstrates dynamic parallelism. It receives an input payload that contains an array of items used as input for its map step. Each dynamic map branch runs a nested secondary state machine.
The secondary state machine demonstrates several workflow patterns including a Lambda function with callback, a third layer nested state machine in sync mode, an AWS Batch job in sync mode, and a Lambda function calling AWS Batch with a callback. The tertiary state machine only notifies its parent with Success when called in sync mode.
Explore the ASL in this project to review the code for these patterns.
Deploy the sample application
The README of the Github project contains more detailed instructions, but you may also follow these steps.
Prerequisites
- AWS Account: If you don’t have an AWS account, navigate to https://thinkwithwp.com/ and choose Create an AWS Account.
- VPC: A valid existing VPC with subnets (for execution of AWS Batch jobs). Refer to https://docs.thinkwithwp.com/vpc/latest/userguide/vpc-getting-started.html for creating a VPC.
- AWS CLI: This project requires a local install of AWS CLI. Refer to https://docs.thinkwithwp.com/cli/latest/userguide/getting-started-install.html for installing AWS CLI.
- Git CLI: This project requires a local install of Git CLI. Refer to https://git-scm.com/book/en/v2/Getting-Started-Installing-Git
- AWS SAM CLI: This project requires a local install of AWS SAM CLI to build and deploy the sample application. Refer to https://docs.thinkwithwp.com/serverless-application-model/latest/developerguide/serverless-sam-cli-install.html for instructions to install and use AWS SAM CLI.
- Python 3.8 and Docker: Required only if you plan for local development and testing with AWS SAM CLI.
Build and deploy in your account
Follow these steps to build this application locally and deploy it in your AWS account:
- Git clone the repository into a local folder.
git clone https://github.com/aws-samples/aws-stepfunction-complex-orchestrator-app cd aws-stepfunction-complex-orchestrator-app - Build the application using AWS SAM CLI.
sam build - Use AWS SAM deploy with the
--guidedflag.sam deploy --guided- Parameter BatchScriptName (accept default: batch-notify-step-function.sh)
- Parameter VPCID (enter the id of your VPC)
- Parameter FargateSubnetAccessibility (choose Private or Public depending on subnet configuration)
- Parameter Subnets (enter ID for a single subnet)
- Parameter batchSleepDuration (accept default: 15)
- Accept all other defaults
- Note the name of the BucketName parameter in the Outputs of the deploy process. Save this S3 bucket name for the next step.
- Copy the batch script into the S3 bucket created in the prior step.
aws s3 cp ./batch-script/batch-notify-step-function.sh s3://<S3-bucket-name>
Testing the sample application
Once the SAM CLI deploy is complete, navigate to Step Functions in the AWS Console.
- Note the three new state machines deployed to your account. Each state machine has a random suffix generated as part of the AWS SAM deploy process:
- ComplexOrchestratorStateMachine1-…
- SyncNestedStateMachine2-…
- CallbackNotifyStateMachine3-…
- Follow the link for the primary state machine: ComplexOrchestratorStateMachine1-…
- Choose Start execution.
- The sample payload for this state machine is located here: orchestrator-step-function-payload.json. This JSON document has 2 input elements within the entries array. Select and copy this JSON and paste it into the Input field in the console, overwriting the default value. This causes the map state to create and execute two nested state machines in parallel. You may modify this JSON to contain more elements to increase the number of parallel executions.
- View the “Execution event history” in the console for this execution. Under the Resource column, locate the links to the nested state machines. Select these links to follow their individual executions. You may also explore the links to Lambda, CloudWatch, and AWS Batch job.
- Navigate to AWS Batch in the console. Step Functions workflows are available to AWS Batch users within the AWS Batch console. Find the integration from the AWS Batch side navigation under “Related AWS services”. You can also read this blog post to learn more.
- Common troubleshooting. If the batch job fails or if the Step Functions workflow times out, make sure that you have correctly copied over the batch script into the S3 bucket as described in step 5 of the Build and Deploy in your account section of this post. Also make sure that the FargateSubnetAccessibility Parameter matches the configuration of your subnet (Public or Private).
- The state machine may take several minutes to complete. When successful, the Graph Inspector displays:

Cleaning up
To clean up the deployment, run the following commands to delete the stack associated with the AWS SAM deployment:
aws cloudformation delete-stack --stack-name <stack-name>Conclusion
This blog post describes several challenges common to orchestrating HPC workloads. I describe how Step Functions with AWS Batch can solve many of these challenges. I provide a project that contains several sample patterns and show how to deploy and test this in your account.
For more information on serverless patterns, visit Serverless Land.


