AWS News Blog
Background Task Handling for AWS Elastic Beanstalk
My colleague Abhishek Singh sent along a guest post to introduce a really important new feature for AWS Elastic Beanstalk.
— Jeff;
You can now launch Worker Tier environments in Elastic Beanstalk.
These environments are optimized to process application background tasks at any scale. Worker tiers complement the existing web tiers and are ideal for time consuming tasks such as report generation, database cleanup, and email notification.
For example, to send confirmation emails from your application, you can now simply queue a task to later send the email while your application code immediately proceeds to render the rest of your webpage. A worker tier in your environment will later pick up the task and send the email in the background.
A worker is simply another HTTP request handler that Beanstalk invokes with messages buffered using the Amazon Simple Queue Service (SQS). Elastic Beanstalk takes care of creating and managing the queue if one isnt provided. Messages put in the queue are forwarded via HTTP POST to a configurable URL on the local host. You can develop your worker code using any language supported by Elastic Beanstalk in a Linux environment: PHP, Python, Ruby, Java, or Node.js.
You can create a single instance or a load balanced and auto-scaled worker tier that will scale based on the work load. With worker tiers, you can focus on writing the actual code that does the work. You don’t have to learn any new APIs and you don’t have to manage any servers. For more information, read our new documentation on the Environment Tiers.
Use Case – Sending Confirmation Emails
Imagine, youre a startup with a game changing idea or product and youd like to gauge customer interest.
You create a simple web application that will allow potential customers to register their email address to be notified of updates. As with most businesses, you decide that once the customer has provided their email address you will send them a confirmation email informing them that their registration was successful. By using an Elastic Beanstalk worker tier to validate the email address and to generate and send the confirmation email, you can make your front-end application non-blocking and provide customers with a more responsive user experience.
The remainder of the post will walk you through creating a worker tier and deploying a sample Python worker application that can be used to send emails asynchronously. If you do not have a frontend application, you can download a Python based front-end application from the AWS Application Management Blog.
We’ll use the Amazon Simple Email Service (SES). Begin by adding a verified sender email address as follows:
- Log in to the SES Management Console and select Email Addresses from the left navigation bar.
- Click on Verify a New Email Address.
- Type in the email address you want to use to send emails and click Verify This Email Address. You will receive an email at the email address provided with a link to verify the email address. Once you have verified the email address, you can use the email address as the SOURCE_EMAIL_ADDRESS.
Next, download and customize the sample worker tier application:
- Download the worker tier sample application source bundle and extract the files into a folder on your desktop.
- Browse to the folder and edit the line that reads SOURCE_EMAIL_ADDRESS = ‘nobody@amazon.com in the default_config.py file so that it refers to the verified sender email address, then save the file.
- Select all of the files in the folder and add them to a zip archive. For more details on creating a source bundle to upload to Elastic Beanstalk, please read Creating an Application Source Bundle.
Now you need to create an IAM Role for the worker role. Here’s what you need to do:
- Log in to the IAM Management Console and select Roles on the left navigation bar.
- Click the Create New Role button to create a new role.
- Type in WorkerTierRole for the Role Name.
- Select AWS Service Roles and select Amazon EC2.
- Select Custom Policy and click Select.
- Type in WorkerTierRole for the Policy Name, paste the following snippet as the Policy Document, and click Continue:
{ "Version": "2012-10-17", "Statement": [ { "Effect": "Allow", "Action": [ "ses:SendEmail" ], "Resource": [ "*" ] }, { "Effect": "Allow", "Action": [ "sqs:*" ], "Resource": [ "*" ] }, { "Effect": "Allow", "Action": [ "cloudwatch:PutMetricData" ], "Resource": [ "*" ] } ] } - Click Create Role to create the role.
You are now ready to create the Elastic Beanstalk application which will host the worker tier. Follow these steps:
- Log in to the AWS Elastic Beanstalk Web Console and click on Create New Application
- Enter the application name and description and click Create
- Select Worker for the Environment tier drop down, Python for the Predefined configuration and Single instance for Environment type. Click Continue.
- Select Upload your own and Browse to the source bundle you created previously.
- Enter the environment name and description and click Continue.
- On the Additional Resources page, leave all options unselected and click Continue.
- On the Configuration Details page, select the WorkerTierRole that you created earlier from the Instance profile drop down and click Continue.
- On the Worker Details page, modify the HTTP path to /customer-registered and click Continue.
- Review the configuration and click Create.
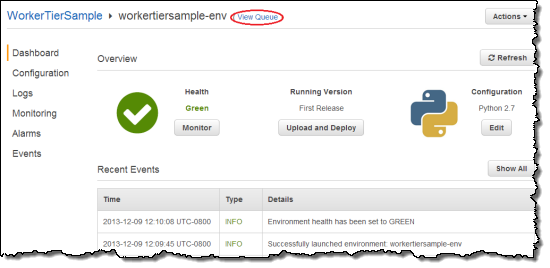
Once the environment is created and its health is reported as Green, click on View Queue to bring up the SQS Management Console:

Then Click Queue Actions and select Send a Message.
Type in messages in the following format; click Send Message to send a confirmation email:
{ "name" : "John Smith", "email" : "john@example.com" }
This new feature is available now and you can start using it today.
— Abhishek Singh, Senior Product Manager